![[HR]](../../IMAGES/REDBAR.GIF)
Many examples in this chapter show the use of wildcard characters in
file operations. The use of wildcard characters in DCL commands varies
with the individual command.
4.3.1 Types of Wildcards
There are two wildcards available for use with many DCL commands:
asterisks (*) and percent signs (%). They can be used as wildcard
characters in directory names, file names, and file types. (Refer to
Section 5.6 for information on wildcards used with directories.) You
can also use an asterisk, but not a percent sign in version numbers.
4.3.2 The Asterisk (*) Wildcard Character
Use the asterisk (*) wildcard character to match the following:
You can use the asterisk (*) wildcard character as follows:
$ PRINT [FROGMAN]*.*;*
$ TYPE *.DAT;*
$ DIRECTORY [FROGMAN.*]*.DAT
$ TYPE [*.*.*]AVERAGE.*;*
Use the percent sign (%) wildcard character as a substitute for any single character in a file specification. You can use the percent sign in the directory, file name, and file type fields. You cannot, however, use the percent sign in the version number field or in ANSI magnetic tape file specifications. The percent sign replaces one character position in a field, but there must be a character to replace.
You can specify the percent sign as many times as necessary and in
combination with other wildcard characters.
4.3.5 Examples
$ TYPE [JONES.TAXES.PROPERTY]DISTRICT%.DAT
$ [MA*]INS%%%A*.J*;*
The following sections describe other types of file names supported in
an OpenVMS environment.
4.4.1 Null File Names and File Types
The file name and file type fields can be null. For example, the following are valid file specifications:
| .TMP | (file name is null) |
| TEMP. | (file type is null) |
Because the FORTRAN command uses the default file type .FOR, the commands in this example produce different results:
$ FORTRAN TEMP
$ FORTRAN TEMP.
In the first example, the FORTRAN compiler looks for a file named
TEMP.FOR because the file type is omitted. In the second example, the
compiler looks for a file named TEMP. because a period following the
file name indicates a null file type.
4.4.3 Alternate File Names for Magnetic Tapes
In addition to standard file names, the operating system supports an alternate file-naming convention for ANSI-labeled magnetic tapes. The format is as follows:
"filename".;version
The file name can contain 1 to 17 characters from the ASCII "a" character set. This set of characters includes numeric characters, uppercase letters, and a space, as well as the following characters:
! " % ' ( ) * + , - . / : ; < => ? & _
In addition, asterisk (*) wildcards are allowed in ANSI file names.
4.5 Creating and Modifying Files
The following sections describe how to create and modify files with
tools and commands supported in an OpenVMS environment.
4.5.1 Text Editors
The most versatile interactive tool for creating and modifying text
files is the interactive text editor. EVE and EDT are two text editors
that are included in the OpenVMS operating system; other text editors
may also be available on your system.
4.5.2 Commands That Create Files
You can also create and modify files by using the DCL commands CREATE,
COPY, and RENAME. The following sections describe how to create and
modify files using these commands.
4.5.3 Creating Files
The CREATE command creates a text file. You cannot modify a file with
the CREATE command; after you have pressed Return, you cannot return to
a previous line to modify a word. You must use a text editor such as
EDT or EVE to modify a file created with the CREATE command. Pressing
Ctrl/Z signals the end of the file and returns you to DCL command level.
4.5.4 Example
In the following example, a file named POUND.LIS is created by entering the CREATE command and then typing lines of text:
$ CREATE POUND.LIS
Tag #23, Elmer Doolittle, notified
Tag #37, James Watson, notified
No tag, light brown, 30 lbs., looks part beagle
[Ctrl/Z]
You can use the COPY command to duplicate:
$ COPY FEES.DAT RECORDS.DAT
$ COPY *.TXT;* [SAVETEXT]*.*;*
$ COPY/SINCE=11-DEC-1996/MODIFIED [JONES.LICENSES.DOG]*.* *
The COPY command can also be used to concatenate files. For example, to append FEES1.DAT to FEES.DAT (forming a new version of FEES.DAT) in your default directory, enter the following command:
$ COPY FEES.DAT,FEES1.DAT FEES.DAT
Note that there is no space between the comma after FEES.DAT and the
file name FEES1.DAT.
4.5.8 Copying Files from a Remote Node to Your Node
Use the COPY command to copy files from another node to your node. For example, to copy the latest version of all files in DISK2:[PUBLIC] on node CHAOS to files with the same names in your default directory, enter the following command:
$ COPY CHAOS::DISK2:[PUBLIC]*.* *
Use the COPY command to copy files from your node to another node. If
you receive a protection violation or DECnet error message when you
attempt to copy a file across systems, you can either use mail to copy
the file or you can use an access control string.
4.5.10 Example
In the following example, the latest version of all files in the default directory are copied to files with the same names in the directory DISK2:[STAFF_BACKUP] on node CHAOS:
$ COPY *.* CHAOS::DISK2:[STAFF_BACKUP]
If the file is yours, you can use Mail to send it to a user account on the other node.
When sending files though mail, note the following restrictions:
For more information on using Mail to send files, see Chapter 6.
4.5.12 Example
In the following example, the file FEES.DAT is sent to the JONES account on node CHAOS:
$ MAIL/SUBJECT="Fee schedule" FEES.DAT CHAOS::JONES
To copy files after you have received a protection violation, you can
follow the node name in the file specification with an access control
string (see Section 4.2.21).
4.5.14 Example
In the following example, the user has an account on node CHAOS with the user name SMITH and the password SPG96PRT. The user is copying all of the files in the default directory to the account on CHAOS.
$ COPY *.* CHAOS"SMITH SPG96PRT"::DISK2:[STAFF_BACKUP]
Use the RENAME command to give the file a new name and optionally to
locate it in a different directory. Note that after being renamed, the
original file no longer exists. When you use the RENAME command, the
input and output locations must be on the same device.
4.5.16 Example
In the following example, the file FEES.DAT is given the new name RECORDS.DAT and it is moved from the default directory to the [SAVETEXT] directory:
$ RENAME FEES.DAT;4 [SAVETEXT]RECORDS.DAT
The following sections describe how to display the contents of files
with tools and commands supported in an OpenVMS environment.
4.6.1 Using the TYPE Command
To display the contents of a file on your screen, enter the TYPE
command and the file name at the DCL prompt. You do not have to specify
the version number in the file specification because the system
displays the latest version of a file by default.
4.6.2 Example
In the following example, the latest version of the file STAFF_VACATIONS.TXT is displayed:
$ TYPE STAFF_VACATIONS.TXT
To stop the scrolling of the text on the screen temporarily, press the Hold Screen key (F1 on VT200 and VT300 series terminals); to resume scrolling, press the Hold Screen key again. To stop the display and return to DCL command level, press Ctrl/Y or Ctrl/O.
If you specify the /PAGE qualifier to the TYPE command, you can view
one screen at a time. The system prompts you to press Return when you
want to see the next screen.
4.6.4 Using Text Editors to Display Files
By invoking an interactive text editor (for example, EVE or EDT) with
the /READ_ONLY qualifier, you can use interactive editing commands to
move around in a file and search for specific sequences of characters.
The /READ_ONLY qualifier prevents you from creating a modified version
of the file when you exit from the interactive editor.
4.6.5 Displaying Files on Remote Nodes
To display the contents of a file on a remote node, include the node
name, disk, and directory in the file specification.
4.6.6 Example
In the following example, the file COMPANY_HOLIDAYS.TXT (which is located on remote node CHAOS) is displayed:
$ TYPE CHAOS::DISK2:[PUBLIC]COMPANY_HOLIDAYS.TXT
You can use the asterisk (*) wildcard to display all versions of a
specific file.
4.6.8 Examples
$ TYPE [JONES]LOGIN.COM;*
$ TYPE [JONES]STAFF*.*;*
If you specify more than one file in the TYPE command line, the system
displays the files in the order you specify. If you use wildcard
characters, the system displays the files in alphabetical order.
4.7 Deleting Files
The following sections describe how to delete files with commands
supported in an OpenVMS environment.
4.7.1 Using the DELETE Command
The DELETE command removes files from directories and releases the disk
space they occupy for use by other files. When you use the DELETE
command, you must specify a version number or the asterisk (*) wildcard
character as a version number in each file specification.
4.7.2 Examples
$ DELETE POUND.LIS;17
$ DELETE POUND.LIS;16,;17
$ DELETE POUND.LIS;*
When you delete many files with wildcard characters, you might want to
confirm each deletion by using the /CONFIRM qualifier. Similarly, you
might want to display the names of files as they are deleted. To do
this, specify the /LOG qualifier with the DELETE command.
4.7.4 Examples
$ DELETE/CONFIRM *.*;*
DISK1:[JONES.LICENSES.DOG]FEES.DAT;4, delete? [N]: Y
DISK1:[JONES.LICENSES.DOG]FEMALE.LIS;6, delete? [N]: Y
DISK1:[JONES.LICENSES.DOG]MALE.LIS;3, delete? [N]: N
DISK1:[JONES.LICENSES.DOG]POUND.LIS;17, delete? [N]: Y
$ DELETE/LOG *.LIS;*
_%DELETE-I-FILDEL, DISK1:[JONES.LICENSES.DOG]FEMALE.LIS;6 deleted (35 blocks)
_%DELETE-I-FILDEL, DISK1:[JONES.LICENSES.DOG]MALE.LIS;3 deleted (5 blocks)
_%DELETE-I-FILDEL, DISK1:[JONES.LICENSES.DOG]POUND.LIS;17 deleted (9 blocks)
The PURGE command deletes all except the latest version of the
specified file (or all files) in the default directory or any other
specified directory. Purging old versions of files after updating them
enables you to retain more free space on your disk.
4.7.6 Example
In the following example, all except the latest two versions of each file in the default directory are purged:
$ PURGE/KEEP=2
The following sections provide an overview of file protection procedures. For detailed security information, see the following:
To prevent other users from accessing your files, you can change the
protection or modify the access control list (ACL) of your files. To
change the protection or modify the ACL of a file, you must own the
file, have control access to the file, or have GRPPRV, SYSPRV, BYPASS,
or READALL privilege.
4.8.2 Types of Protection
There are two types of file protection: default and explicit. When a file is created, it usually has the same protections as its parent directory; this is the default protection. If you create a file using the CREATE/PROTECTION command or if you change the protection on an existing file by issuing the SET SECURITY/PROTECTION command, you are using explicit file protection.
Note that to protect a file completely, you must apply the same or
greater protection to the directory in which the file resides.
4.9 Printing Files
The following sections provide an overview of the procedures you follow
to print files.
4.9.1 Using the PRINT Command
To print a file or files, use the PRINT command. The PRINT command places your print job (all the files to be printed) in a list of jobs to be printed called a print queue. The file types of the files named in the PRINT command default to .LIS or the last explicitly named file type. The system displays the job name, the queue name, the job number, and status of the job.
By default, the job name is the name of the first (or only) file
specification in the PRINT command. After a job is submitted to a
queue, you reference it using the job number. After the job is queued,
it will be printed when no other jobs precede it in the queue and when
the printer is physically ready to print.
4.9.2 Example
In the following example, a print job containing three files is placed in the default print queue, SYS$PRINT:
$ PRINT POUND,MALE,FEES.DAT
Job POUND (queue SYS$PRINT, entry 202) started on SYS$PRINT
Because the default file type for the PRINT command is .LIS, the files
POUND.LIS, MALE.LIS, and FEES.DAT are queued. The job name is POUND,
the queue name is SYS$PRINT, and the job number is 202.
4.9.3 Print Job Priority
A print queue can execute only one job at a time. Print jobs are
scheduled for printing according to their scheduling
priority, and the job with the highest priority is printed
first. If more than one job exists with the same priority, the smallest
job is usually printed first. Jobs of equal size having the same
priority are selected for printing according to their submission time.
Priority may also be determined by the system manger or by entering the
/PRIORITY qualifier to the PRINT command. For more information on
scheduling priorities, see the OpenVMS System Manager's Manual.
4.9.4 Displaying Queue Information
The default print queue, SYS$PRINT, is usually started as part of the site-specific system startup procedure. The following table shows commands you can use to display information about queues:
| To display... | Enter this command... |
|---|---|
| The queues at your site | SHOW QUEUE |
| The status of your print jobs | SHOW ENTRY |
| Jobs queued by other users | SHOW ENTRY/USERNAME= username |
| Information about a specific job or jobs |
SHOW ENTRY
job-name
SHOW ENTRY entry-number |
In the following example, the SHOW ENTRY command is used to display information about a print job that has been queued:
$ SHOW ENTRY

  Entry  Jobname         Username     Blocks  Status
  -----  -------         --------     ------  ------
    202  POUND           JONES            38  Pending
         On stopped printer queue SYS$PRINT)
A print form serves the following functions:
If your printing needs are limited, you do not need to use special
forms because Digital supplies a systemwide default form (named
DEFAULT) for all queues. System managers can also create print forms.
If you need to format output or if certain print jobs require special
paper, contact your system manager.
4.9.7 Stopping a Print Job
To stop a print job and delete it from the print queue, enter the entry
number parameter to the DELETE/ENTRY command.
4.9.8 Example
In the following example, entry 202 is deleted:
$ DELETE/ENTRY=202
To print a file on another system, copy that file to the remote node
and specify the /REMOTE qualifier to the PRINT command.
4.9.10 Example
In the following example, the file COMPANY_HOLIDAYS.TXT is copied from the local node to the remote node CHAOS and the file is queued for printing to the default system print queue (SYS$PRINT) on node CHAOS:
$ COPY COMPANY_HOLIDAYS.TXT CHAOS"JONES PANDEMONIUM"::DISK2:[JONES]*
$ PRINT/REMOTE CHAOS::DISK2:[JONES]COMPANY_HOLIDAYS.TXT
An access control string indicates that the user JONES is authorized to
copy files to the directory [JONES] on node CHAOS. The asterisk (*)
wildcard at the end of the file specification instructs the system to
duplicate the file name COMPANY_HOLIDAYS.TXT when that file is copied
to the remote node.
4.9.11 Using the /REMOTE Qualifier
Not all qualifiers to the PRINT command are compatible with the /REMOTE
qualifier. For example, you cannot queue a job to a specific print
queue; all jobs are queued to the default system print queue
(SYS$PRINT). See the description of the /REMOTE qualifier to the DCL
command PRINT in the OpenVMS DCL Dictionary for a list of PRINT command
qualifiers compatible with /REMOTE.
4.9.12 Print Command Qualifiers
Print jobs can be controlled in various ways by using qualifiers to the PRINT command. For example, you can specify the number of copies printed or you can request that the system notify you when your print job is complete.
In addition to the qualifiers described in this manual, if you are
running DECprint Supervisor software on your system, you can use the
/PARAMETER qualifier to print landscape, two-sided, or many other ways.
Contact your system manager for a list of print options that are
available on your system.
4.9.13 Summary of Commands That Control Print Jobs
The following table lists a summary of PRINT command qualifiers. For complete information on the PRINT command, refer to the OpenVMS DCL Dictionary or online help.
| Print Operations | Print Job Commands and Qualifiers |
|---|---|
|
Number of copies:
By job By file Specified file only |
PRINT/JOB_COUNT=n¹ PRINT/COPIES=n¹ file-spec/COPIES=n¹ |
| Number of pages | PRINT/PAGES=¹ |
|
Print features:
Flag pages Type of forms (paper) Special features Double-spacing Page heading |
PRINT/FLAG=¹ PRINT/FORM=¹ PRINT/CHARACTERISTICS=¹ PRINT/SPACE¹ PRINT/HEADER¹ |
| Notification of job execution | PRINT/NOTIFY |
|
Delay execution of a job:
For a specified time Indefinitely |
PRINT/AFTER PRINT/HOLD |
| Release a delayed job | SET QUEUE/ENTRY/RELEASE |
| Display your print jobs | SHOW ENTRY |
|
Stop a print job:
Delete job Stop current job and begin printing the next job in the queue Stop current job and requeue it for printing |
DELETE/ENTRY=job-number STOP/ABORT STOP/REQUEUE |
|
Keep a job in a queue
after it has completed |
PRINT/RETAIN |
Directories are files that store the names of files. This chapter describes how to use directories to organize and manage files. This chapter includes information on:
Note
Throughout this chapter, examples that specify a node name do not always include an access control string. This is because proxy accounts enable users to perform operations on the remote systems in these examples.
For more information on the DCL commands described in this chapter,
refer to DCL Help or see the OpenVMS DCL Dictionary.
5.2 Directory Structures
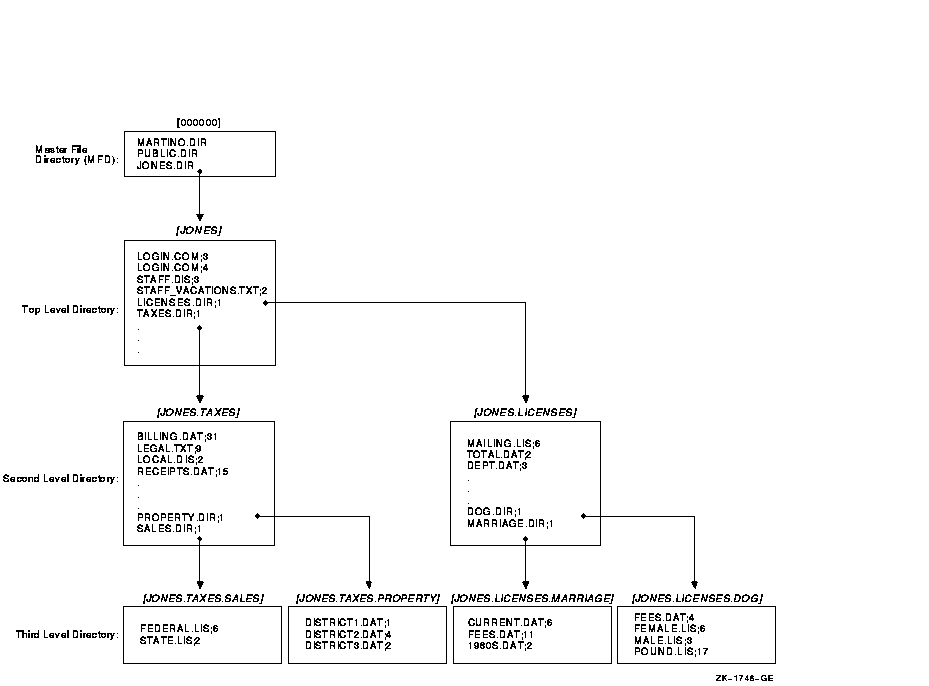
Figure 5-1 shows a sample directory hierarchy. At the top of the structure is the master file directory (MFD). Its directory name is [000000]. The MFD shown contains entries for user file directories including MARTINO.DIR, PUBLIC.DIR, and JONES.DIR. The top-level directory [JONES] is a user file directory named JONES.DIR;1 in [000000].
The sample directory structure in Figure 5-1 is the basis for many of the examples in this chapter.
Figure 5-1 Directory Structure
  6489P006.HTM
  OSSG Documentation
  22-NOV-1996 13:16:40.41
Copyright © Digital Equipment Corporation 1996. All Rights Reserved.