![[HR]](../../IMAGES/REDBAR.GIF)
Note the following about this directory structure:
The following sections describe how to specify and manage directories.
5.3.1 Directory Specifications
Use a directory specification to refer to a directory. A directory
specification consists of a top-level directory name that can be
followed by a maximum of seven subdirectory names. Subdirectory names
are always preceded by a period (.).
5.3.2 Directory Specification Format
A directory specification has the following format:
[directory.subdirectory]
To add one or more levels of subdirectories, add a period and another subdirectory name for each subdirectory (up to seven levels). (Subdirectories are specified by concatenating the subdirectory name to the name of the directory one level above it.)
[directory.subdirectory.subdirectory]
A directory or subdirectory name can contain up to 39 alphanumeric
characters. Any characters valid for file names are also valid for
directory names. Enclose the directory name in either square brackets
([ ]) or angle brackets (< >).
5.3.3 Creating Directories
To create a directory, enter the CREATE/DIRECTORY command. If you want
to create a subdirectory under your current directory, you do not have
to specify the current directory name; you can enter the subdirectory
name preceded by a period.
5.3.4 Examples
$ CREATE/DIRECTORY [JONES.LICENSES]
$ CREATE/DIRECTORY [.LICENSES]
To display the names of files in a directory, enter DIRECTORY at the DCL prompt. To list the files in a subdirectory, enter the DIRECTORY command and the subdirectory name preceded by a period.
When you include certain command qualifiers along with the DIRECTORY
command, you can retrieve information in addition to the names of the
files. For more information on DIRECTORY command qualifiers, refer to
the OpenVMS DCL Dictionary or online help.
5.3.6 Examples
$ DIRECTORY
Directory DISK1:[JONES]

LICENSES.DIR;1
LOGIN.COM;3
LOGIN.COM;4
STAFF.DIS;3
STAFF_VACATIONS.TXT;2
TAXES.DIR;1

Total of 6 files.
$ DIRECTORY [.LICENSES]
Directory DISK1:[JONES.LICENSES]

DEPT.DAT;3
DOG.DIR;1
MAILING.LIS;6
MARRIAGE.DIR;1
TOTAL.DAT;2

Total of 5 files.
To delete a directory, use the following procedure:
| Step | Task |
|---|---|
| 1 |
Make sure that the directory contains no files. To find out if the
directory contains files, enter the DIRECTORY command.
When there are no files in the directory, the system displays the following message: %DIRECT-W-NOFILES, no files found
|
| 2 | If the directory contains files, copy them to another directory to save them or delete them if you do not want to save them. If the directory contains subdirectories, examine those subdirectories, copy or delete their files, and delete the subdirectories. |
| 3 | Move to the directory one level above the directory you want to delete. Remember that subdirectories exist as files in directories. When you delete a directory, you delete the file that points to that directory. |
| 4 | Change the file protection of a directory to allow delete access to the file. Directory files in master file directories require SYSPRV privilege to delete. (See Chapter 4 for more information about file protection.) |
| 5 | Delete the directory file using the DELETE command. |
The following example shows how to delete the subdirectory [JONES.LICENSES]:
$ SET DEFAULT [JONES.LICENSES]
$ DIRECTORY
%DIRECT-W-NOFILES, no files found
$ SET DEFAULT [JONES]
$ SET SECURITY/PROTECTION=OWNER:D LICENSES.DIR
$ DELETE LICENSES.DIR;1
The following sections describe how to set and manage default
directories.
5.4.1 Changing Your Default Directory
To change your default directory, use the SET DEFAULT command. The new
default remains in effect until you enter another SET DEFAULT command
or log out. To set default to a subdirectory, append the subdirectory
name to the name of the directory one level above it.
5.4.2 Examples
$ SET DEFAULT [JONES]
$ TYPE STAFF_VACATIONS.TXT
$ SET DEFAULT [JONES.TAXES]
$ TYPE BILLING.DAT
Note that the operating system allows you to set default to a
nonexistent disk or directory. If you have set default to a nonexistent
directory, when you try to manipulate a file, the system displays a
message stating that the directory does not exist. If you find yourself
in a nonexistent disk or directory and cannot carry out a desired
operation, set default to an existing disk or directory.
5.4.4 SHOW DEFAULT Command
To display your current default directory, enter the command SHOW DEFAULT, as shown in the following example:
$ SHOW DEFAULT
  DISK1:[JONES.TAXES]
$ SET DEFAULT [PUBLIC]
$ SHOW DEFAULT
  DISK1:[PUBLIC]
You can use the SET DEFAULT command to change the default device. The
default remains in effect until you enter another SET DEFAULT command
or log out. You can also specify the device to which you want to set
default without including the directory in the command.
5.4.6 Examples
$ SHOW DEFAULT
  DISK1:[JONES]
$ SET DEFAULT DISK2:[GROUP]
$ SHOW DEFAULT
  DISK2:[GROUP]
$ SHOW DEFAULT
  DISK1:[JONES]
$ SET DEFAULT DISK2:
$ SHOW DEFAULT
  DISK2:[JONES]
If you enter a list of files and do not give a complete file
specification for each file in the list, the system applies temporary
defaults for node names, device names, and directory names. To
substitute your current default directory for a temporary default, use
empty square brackets. If you include a node name in a file that
appears in a list, you can override the temporary default by using a
double colon.
5.4.8 Examples
$ COPY [STATS]A.LIS,B.LIS [RESULTS]
$ COPY BASE:[STATS]A.LIS,[TIME]B.LIS,C.LIS [RESULTS]
$ COPY [ALPHA]TEST.DAT,[]FINAL.DAT [RESULTS]
You cannot completely protect a file without applying at least the same
protection to the directory in which the file resides. For example, if
you deny a user all access to a file but allow that user read access to
the file's directory, the user cannot access the contents of the file
but can see that it exists. Conversely, a user allowed access to a file
and denied access to the file's directory (or one of the parent
directories) cannot see that the file exists.
5.5.1 Private Files
To protect private files, directory protection alone is not adequate.
You must also protect each file within the directory.
5.5.2 Default Directory Protection
By default, top-level directories receive UIC-based protection
(S:RWE,O:RWE,G:RE,W:E) and no ACL. Subdirectories receive UIC-based
protection from the parent directory. For more information on
protection codes, see Section 19.4.
5.5.3 UIC-Based Protection
To specify UIC-based protection explicitly when creating a directory,
use the /PROTECTION qualifier with the CREATE/DIRECTORY command. You
cannot specify an ACL for the directory until the directory is created.
To change the UIC-based protection of an existing directory, apply the
SET SECURITY/PROTECTION command to the directory file.
5.5.4 Limiting Directory Access
You can limit but not prohibit directory access by specifying execute
access but not read access. Execute access on a directory permits you
to examine and read files that you know are contained in the directory;
that means you can examine a file if you already know what the file
specification is, but you cannot display a list of the files in the
directory. For additional security information, see OpenVMS Guide to System Security.
5.6 Using Wildcards to Search the Directory Structure
From any point in a directory structure, you can refer to another
directory or subdirectory in the structure. Do this by specifically
naming the directory or subdirectory you want or by using the ellipsis
(...) and hyphen (-) wildcard characters. For additional information
about wildcards, see Section 4.3.
5.6.1 Ellipsis Wildcard Character
Use the ellipsis (...) wildcard character to search down into the directory hierarchy. To search the current directory and all the subdirectories below it, use the ellipsis by itself as shown:
$ DIRECTORY [...]
If you begin the directory specification with an ellipsis, the search begins from your current directory. However, if you begin the directory specification with a period, only the subdirectory that is one level lower than the current directory is searched.
To search all top-level directories and their subdirectories from
wherever you are in the directory structure, use an asterisk (*)
followed by an ellipsis (...).
5.6.2 Examples
$ TYPE [JONES...]FEES.DAT
$ TYPE [...SALES]FEDERAL.LIS
$ TYPE [...]DEPT.DAT
$ TYPE [.LICENSES]MAILING.LIS
$ TYPE [...LICENSES...]DEPT.DAT
$ DIRECTORY [*...]
Use the hyphen (-) wildcard character to move up through the directory structure. Each hyphen refers to the directory one level up from the current one. You can follow the hyphens with directory and subdirectory names to move down the directory structure on another path.
You can specify more than one hyphen. If you enter so many hyphens that
you point above the top-level directory, the system displays an error
message.
5.6.4 Examples
$ TYPE [-]STAFF.DIS
$ TYPE [-.TAXES]BILLING.DAT
$ SET DEFAULT [--]
Although this chapter focuses on how to use named directories, you can
also specify directory names in UIC format. In UIC format, a 2-part
octal number forms a user identification code (UIC) that refers to a
user file directory (UFD). Almost every DCL command that accepts a file
specification can recognize directory names in UIC format.
In general, you do not need to use this format unless you are working
with a real-time Resource Sharing Executive (RSX) operating system.
5.7.1 UIC Directory Format and Rules
A UIC directory specification has the following format:
[group,member]
For example, [122,1] is a UIC directory specification representing member 1 in group 122. Directory names in UIC format generally, but not necessarily, correspond to the UIC of the owner of the directory.
When you refer to a UIC directory, observe the following rules:
It is also possible to use the asterisk (*) wildcard to specify a UIC
directory. For example, [*,6] indicates all directories with any group
number and a member number of 6. The search is limited to directories
in UIC format. The directory specification [*,*] locates all
directories in UIC format. To locate all named directories as well as
all directories in UIC format, use [*].
5.7.3 Translating to Named from UIC Format
Note that you can translate a directory name in UIC format to named format. If necessary, add zeros to the left of the group and member numbers to create a 6-character name.
You cannot combine UIC format and named format. If you have a directory
with a name in UIC format and you want to specify one of its
subdirectories, translate the UIC format to named format.
5.7.4 Examples
[122001]
The OpenVMS Mail utility (MAIL) lets you send messages to other users on your system or on any other computer that is connected to your system with the DECnet for OpenVMS network. This chapter describes:
For additional information, see the following:
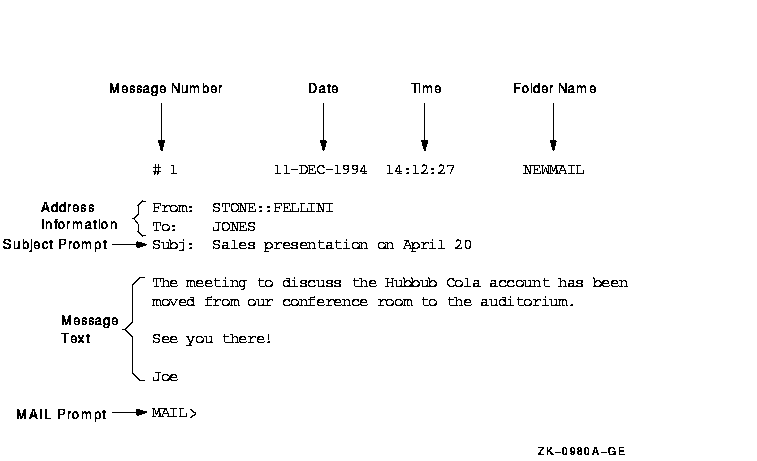
The following figure shows a sample mail message and its components:
The following sections describe how to invoke and exit Mail.
6.2.1 Invoking Mail
To invoke the Mail utility, enter the DCL command MAIL, as follows:
$ MAIL  [Return]
MAIL>
Once you are in the Mail utility, you perform the following operations by entering the appropriate command at the MAIL> prompt and then pressing either the Return or Enter key:
To exit from Mail, enter the EXIT command at the MAIL> prompt, as follows:
MAIL> EXIT  [Return]
$
You can also exit from Mail by pressing Ctrl/Z or by using the QUIT
command.
6.3 Reading Messages
Mail stores the messages you receive in mail files, which have the
default file type .MAI. In this file, by default, Mail provides two
folders that store old and new messages. New messages are
automatically placed in a folder called NEWMAIL; old messages are
placed in a folder called MAIL. After you read a new message, the
message automatically moves from the NEWMAIL folder to the MAIL folder,
unless you enter the FILE, MOVE, or DELETE command. Mail deletes the
NEWMAIL folder after you have read all new mail messages and either
select another folder or exit from Mail.
6.3.1 New Mail Notification
When you are logged in to your account and receive a mail message, Mail notifies you. For example, notification of a message sent by user FELLINI is displayed as follows:
New mail on node DOODAH from STONE::FELLINI (10:02:23)
To read a new message, invoke Mail and press the Return key at the MAIL> prompt, as follows:
$  MAIL
You have 1 new message.
MAIL> [Return]
If you have more than one new message, press Return at the MAIL>
prompt to read the other messages. When you have read all your new
messages, Mail issues the message %MAIL-E-NOMOREMSG, no more messages
and continues to prompt for commands until you exit Mail.
6.3.4 Reading New Mail While in Mail
If you receive a mail message while you are in Mail, enter the READ/NEW
command to read the new message.
6.3.5 Reading Old Messages
To reread old mail messages in your default Mail folder, use the following procedure:
| Step | Task |
|---|---|
| 1 |
Enter the SELECT command at the MAIL> prompt. For example:
MAIL> SELECT MAIL
      [Return]
Mail places you in the folder named MAIL. |
| 2 |
To read the first message in your default MAIL folder, press Return at
the MAIL> prompt or enter the READ command.
Mail displays the first message (1) in your default mail file. |
| 3 |
To display the next message, press Return.
If the message is too long to display on one screen, press Return to display the next part of the message. To skip the remainder of a message and display the next message, enter the NEXT command. |
To read a particular message in your default MAIL folder, use the following procedure:
| Step | Task |
|---|---|
| 1 |
Enter the DIRECTORY command at the MAIL> prompt.
To select a subset of messages from the list, use the DIRECTORY command qualifiers /FROM or /SUBJECT. |
| 2 |
Enter the number of the message that you want to read at the MAIL>
prompt.
Mail displays the message that you selected. |
In the following example, the DIRECTORY command is used to display old messages and then the message labeled 2 is selected for reading:
MAIL> DIRECTORY [Return]
                                                          MAIL
# From              Date              Subject
1 STONE::FELLINI    11-DEC-1996       Sales presentation on May 11
2 DOODAH::JONES     11-DEC-1996       Status
MAIL> 2 [Return]
If you have many messages, you can locate a particular message by using the SEARCH command to find a string in one or more of the messages. To search for a string, specify that string as a parameter to the SEARCH command.
Each time you specify a new string, the SEARCH command starts the
search at message number 1. To continue searching the folder for
messages that contain the specified string, use the SEARCH command
without specifying a parameter. To search for the same string in a
different folder, enter the SELECT or SET FOLDER folder-name command
and continue using the SEARCH command without specifying a parameter.
6.3.9 Example
In the following example, messages in the current folder are searched for the first messages that contains the string appointment:
MAIL> SEARCH "appointment" [Return]
To send a mail message to any user on your system, do the following:
| Step | Task |
|---|---|
| 1 |
Enter SEND at the MAIL> prompt.
Mail prompts you for the name of the user to receive the message. |
| 2 |
Enter the name of the user receiving the message and press Return.
Mail prompts you for the subject of the message. |
| 3 |
Enter the subject of the message and press Return. Entering this
information is optional.
Mail prompts you for the text of the message. |
| 4 | Enter the text of a message, or just press Return. Entering this information is optional. |
| 5 | Press Ctrl/Z to send the message. If you decide not to send the message, press Ctrl/C, which cancels the send operation without exiting from Mail. |
In the following example, a message is sent to a user named THOMPSON:
MAIL> SEND  [Return]
To: THOMPSON [Return]
Subj: Meeting on April 20 [Return]
Enter your message below. Press CTRL/Z when complete, or CTRL/C to quit:
I have some new ideas about the Hubbub Cola account.  [Return]
Let me know  when you are available to talk about them. [Return]
[Return]

--Jeff
The following sections describe how to send mail across the network.
6.5.1 Specifying Node Names
If your computer system is part of a network, you can send mail to any other user on the network. If you are sending mail to someone on a different node, enter the user's node name and user name at the To: prompt. If the user name contains special characters or spaces, you must enclose the user name in quotation marks (""). Use the following format:
nodename::username
  6489P007.HTM
  OSSG Documentation
  22-NOV-1996 13:16:42.27
Copyright © Digital Equipment Corporation 1996. All Rights Reserved.