![[HR]](../../IMAGES/REDBAR.GIF)
You can make the following changes:
Following are the qualifiers you can specify with the SUBMIT command. Note that you can also specify execution characteristics such as working set default, working set extent, working set size, job scheduling priority, and CPU time limit.
Once a job has been entered in a batch job queue, you can monitor its status with the SHOW ENTRY command or the SHOW QUEUE command. If you have no jobs in the queue, the system displays the following message:
$  SHOW QUEUE BOSTON_BATCH
Batch queue BOSTON_BATCH, on BOSTON::
To see complete information on your jobs, use the /FULL qualifier with
the SHOW ENTRY or SHOW QUEUE command. To see the status of other jobs
in the queue, use the SHOW QUEUE/ALL command.
18.5.29 Examples
$ SUBMIT EXCHAN.DAT
Job EXCHAN (queue SYS$BATCH entry 999) started on SYS$BATCH
$ SHOW ENTRY 999

  Entry  Jobname         Username     Blocks  Status
  -----  -------         --------     ------  ------
    999  EXCHAN          BLASS             3  Executing
         On batch queue SYS$BATCH
$ SUBMIT/NOPRINTER/PARAMETER=STATS.DAT UPDATE
Job UPDATE (queue SYS$BATCH entry 1080) started on BOSTON_BATCH
$ SHOW QUEUE BOSTON_BATCH
Batch queue BOSTON_BATCH on BOSTON::

  Entry  Jobname         Username     Blocks  Status
  -----  -------         --------     ------  ------
   1080  UPDATE          ODONNELL         36  Executing
$ SHOW ENTRY/FULL 999

  Entry  Jobname         Username     Blocks  Status
  -----  -------         --------     ------  ------
    999  EXCHAN          BLASS             3  Executing
         On batch queue BOSTON_BATCH
         Submitted 11-DEC-1996 13:12 /PRIORITY=100
         WRKD:[BLASS]EXCHAN.DAT;3
$ SHOW QUEUE/FULL BOSTON_BATCH
Batch queue BOSTON_BATCH, on BOSTON::
    /BASE_PRIORITY=3 /JOB_LIMIT=5 /OWNER=[EXEC] /PROTECTION=(S:E,O:D,G:R,W:W)

  Entry  Jobname         Username     Blocks  Status
  -----  -------         --------     ------  ------
   1080  UPDATE          ODONNELL         36  Executing
    Submitted 11-DEC-1996 10:46 /KEEP /PARAM=("STATS.DAT") /NOPRINTER /PRIO=4
    _BOSTON$DQA2:[ODONNELL]TEMP.COM;1 (executing)
$ SHOW QUEUE/ALL BOSTON_BATCH
Batch queue BOSTON_BATCH on BOSTON::

  Entry  Jobname         Username             Status
  -----  -------         --------             ------
    923  no privilege                         Executing
    939  no privilege                         Holding until 11-DEC-1996 19:00
   1080  UPDATE          ODONNELL             Executing
You can delete batch jobs before or during execution. To delete an entry that is pending or already executing in a batch queue, use the DELETE/ENTRY command. You need special privileges to delete a job that you did not submit. When a job terminates as a result of a DELETE/ENTRY command, the log file is neither printed nor deleted from your directory.
When you terminate a job using the DELETE/ENTRY command, it is handled
as an abnormal termination because the operating system's normal job
termination activity is preempted. As a result, the batch job log does
not, for example, contain the standard logout message that summarizes
job time and accounting information. Termination that results either
from an explicit EXIT command or STOP command or the implicit execution
of either of these commands (as the result of the current ON
condition), however, is considered normal termination. The operating
system performs proper rundown and accounting procedures after a normal
termination.
18.5.31 Deleting a Batch Job
The following command deletes the job entry 210 in SYS$BATCH:
$ DELETE/ENTRY=210 SYS$BATCH
If the system fails while your batch job is executing, your job does not complete. When the system recovers and the queue is restarted, your job is aborted and the next job in the queue is executed. However, by specifying the /RESTART qualifier when you submit a batch job, you indicate that the system should reexecute your job if the system fails before the job is finished.
By default, a batch job is reexecuted beginning with the first line. See Chapter 15 and Chapter 16 for more information about symbols you can add to your command procedures to specify a different restarting point.
In addition to restarting a job after a system failure, you can also
restart a job after you explicitly stop the job. To stop a job and then
restart it on the same or a different queue, use the
STOP/QUEUE/REQUEUE/ENTRY command.
18.5.33 Example
The command shown in this example stops job 212 on SYS$BATCH and requeues it on SYS$BATCH.
$ STOP/QUEUE/REQUEUE/ENTRY=212 SYS$BATCH
To enter this command, job 212 must have been submitted using the
/RESTART qualifier to the SUBMIT command. When the batch job executes
for the second time, the system uses the global symbol BATCH$RESTART to
determine where to begin executing the job.
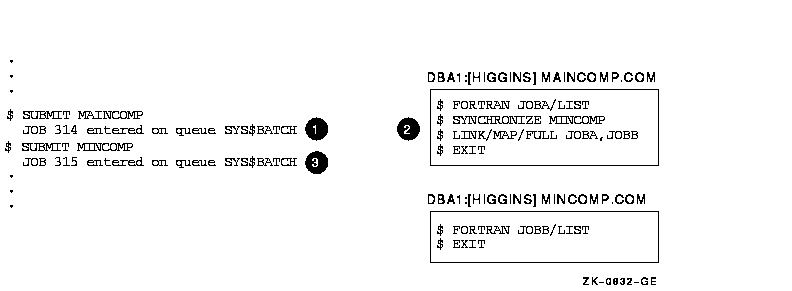
18.5.34 Synchronizing Batch Job Execution
You can use the SYNCHRONIZE and WAIT commands within a command procedure to place the procedure in a wait state. The SYNCHRONIZE command causes the procedure to wait for the completion of a specified job. The WAIT command causes the procedure to wait for a specified period of time to elapse.
If you specify a job name with the SYNCHRONIZE command, note that the
jobs to be synchronized must be associated with your user name. (A job
is associated with the user name of the process that submits it.) To
synchronize jobs for different users, you must use the /ENTRY qualifier
with the SYNCHRONIZE command to specify the job entry number.
18.5.35 Examples
$ SYNCHRONIZE BATCH25
$ SYNCHRONIZE/ENTRY=454
Figure 18-1 Synchronizing Batch Job Execution
The WAIT command is useful for command procedures that must have access
to a shared system resource such as a disk or tape drive.
18.5.37 Example: Using the WAIT Command
other window
The following example shows a procedure that requests the allocation of a tape drive:
$ TRY:
$      ALLOCATE DM: RK:
$      IF $STATUS THEN GOTO OKAY
$      WAIT 00:05
$      GOTO TRY
$ OKAY:
$ REQUEST/REPLY/TO=DISKS -
     "Please mount BACK_UP_GMB on ''F$TRNLNM("RK")'"
   .
   .
   .
If the WAIT command does not complete successfully, the procedure places itself in a wait state. After a 5-minute interval, it retries the request.
The IF command following the ALLOCATE request checks the value of $STATUS. If the value of $STATUS indicates successful completion, the command procedure continues. Otherwise, the procedure executes the WAIT command; the WAIT command specifies a time interval of five minutes. After waiting five minutes, the next command, GOTO, is executed and the request is repeated. This procedure continues looping and attempting to allocate a device until it succeeds or until the batch job is deleted or stopped.
This chapter describes some of the ways OpenVMS protects and audits your system resources. It includes information on:
Refer to the following for additional security information:
Some ways you can familiarize yourself with OpenVMS security features are:
All processes that attempt to access protected objects carry
credentials known as rights identifiers. All protected objects list a
set of access requirements that specify who has a right to access the
object in a given manner. If an accessing process' rights identifiers
do not match those of the object, access is denied.
19.2.1 Example: Displaying Rights Identifiers
The following example shows how to display the identifiers for your current process using the SHOW PROCESS command:
$ SHOW PROCESS/ALL
25-NOV-1996 15:23:18.08   User: GREG            Process ID:   34200094
                          Node: ACCOUNTS        Process name: "_TWA2:"

Terminal:           TWA2:
User Identifier:    [DOC,GREG]   (1)
Base priority:      4
Default file spec:  WORK1:[GREG.FISCAL_96]

Devices allocated:  ACCOUNTS$TWA2:

Process Quotas:
   .
   .
   .
Process rights:
 INTERACTIVE   (2)
 LOCAL         (3)
 SALES         (4)
 MINDCRIME                         resource  (5)

System rights:
 SYS$NODE_ACCOUNTS   (6)
There are three types of rights identifiers: UIC, environmental, and general. Output from the SHOW PROCESS command displays all three:
Because the operating system supports many users simultaneously, it has
built-in security mechanisms to prevent one user's activities from
interfering with another's. Protection codes, access controls, and
hardware design together protect the use of memory, shareable devices,
and data so many users can share the system. An object's security
profile is comprised of the user identification code (UIC), the ACL,
and the protection codes assigned to that object. You can display or
modify the security profile of any object that you own.
19.3.1 Displaying a Security Profile
To see the security profile of any protected object, use the DCL command SHOW SECURITY. For example, the following command requests security information about the file 95_FORECAST.TXT:
$ SHOW SECURITY 95_FORECAST.TXT
WORK_DISK$:[GREG]95_FORECAST.TXT;1 object of class FILE
      Owner: [ACCOUNTING,GREG]
      Protection: (System: RWED, Owner: RWED, Group: RE, World)
      Access Control List: <empty>
The display indicates the file 95_FORECAST.TXT is owned by user Greg.
It also lists the file's protection code, which gives read, write,
execute, and delete access to system users and to the owner. The code
grants read and execute access to group users and provides no access to
world users. (See Section 19.4 for further explanation.) There is no
ACL on the file.
19.3.2 Modifying a Security Profile
You can provide new values for the owner, protection code, or ACL of a protected object, or you can copy a profile from one object to another by using the SET SECURITY command.
For example, the SHOW SECURITY display in Section 19.3.1 shows the file 95_FORECAST.TXT is owned by user Greg. As owner, he can change the protection code for that file. Originally, the code gave no access to users in the world category. Now, Greg has changed that to allow read and write access to world users:
$ SET SECURITY/PROTECTION=(W:RW) 95_FORECAST.TXT
The SHOW SECURITY command verifies the new protection code for the file:
$ SHOW SECURITY 95_FORECAST.TXT
95_FORECAST.TXT object of class FILE
     Owner: [GREG]
     Protection: (System: RWED, Owner: RWED, Group: RE, World: RW)
     Access Control List: <empty>
The following sections describe how to interpret protection codes.
19.4.1 Protection Code Format
A protection code controls the type of access allowed (or denied) to a particular user or group of users. It has the following format:
[category: list of access allowed (, category: list of access allowed,...)]
Categories include system (S), owner (O), group (G), and world (W). Each category can be abbreviated to its first character. Categories have the following definitions:
| System | Any user process or application whose UIC is in the range 1 through 10 (octal), has SYSPRV privilege, or is in the same group as the owner and holds GRPPRV. |
| Owner | Any user process or application whose UIC is identical to the UIC of the object. |
| Group | Any user process or application whose group UIC is identical to the group UIC of the object. |
| World | Any user process or application on the system. |
When specifying more than one user category, separate the categories with commas and enclose the entire code in parentheses. You can specify user categories and access types in any order.
A null access specification means no access, so when you omit an access
type for a user category, that category of user is denied that type of
access. To deny all access to a user category, specify the user
category without any access types. Omit the colon after the user
category when you are denying access to a category of users.)
19.4.3 Access List
For files, an access list includes read (R), write (W), execute (E), or delete (D) access types. The access type is assigned to each ownership category and is separated from its access types with a colon (:). File access types have the following meanings:
| Read | Gives you the right to read, print, or copy a disk file. With directory files, read access gives you the right to read or list a file and use a file name with wildcard characters to look up files. Read access implies execute access. |
| Write | Gives you the right to write to or change the contents of a file, but not delete it. Write access allows modification of the file characteristics that describe the contents of the file. With directory files, write access gives you the right to insert or delete an entry in the catalog of files. |
| Execute | Gives you the right to execute a file that contains an executable program image or DCL command procedure. With a directory file, execute access gives you the right to look up files whose names you know. |
| Delete | Gives you the right to delete the file. To delete a file, you must have delete access to the file and write access to the directory that contains the file. |
A new file receives the default UIC-based protection and the default access control list (ACL) of its parent directory. An ACL is a collection of entries that define the access rights a user or group of users has to a particular protected object such as file, directory, or device.
You can use either default UIC protection or default ACL protection to
override the default UIC-based protection given to new files.
19.5.1 Default UIC protection
The operating system provides each process with the following UIC-based protection:
(S:RWED, O:RWED, G:RE, W)
By default, users with a system UIC and the owners of objects have full access to the object, users in the same UIC group as the object owner have read and execute access to the object, and all other users are denied access to the object. To change the default protection for files that you create, enter the SET PROTECTION command with the /DEFAULT qualifier. For example, if you enter the following command in your login command procedure, you grant all processes read and execute access to any files that you create. (Remember that you must execute the login command procedure for this command to execute.)
$ SET PROTECTION = (S:RWED,O:RWED,G:RE,W:RE)/DEFAULT
You can override default UIC protection for specified directories or subdirectories by placing a default protection ACE in the ACL of the appropriate directory file. The default protection specified in the ACE is applied to any new file created in the specified directory or subdirectory of the directory. The following ACE, which must be in the ACL of a directory file, specifies that the default protection for that directory and the directory's subdirectories allow system and owner processes full access, group processes read and execute access, and world users no access.
$ SET SECURITY/ACL = (DEFAULT_PROTECTION,S:RWED,O:RWED,G:RE,W:)
[JONES]PERSONAL.DIR
To specify a default identifier ACE to be copied to the ACL of any file
subsequently created in the directory, specify the DEFAULT option in
the directory file's identifier ACL.
19.5.3 Example
The ACE shown in the following example is applied to a directory file and denies network users access to all files created in the directory:
$ SET SECURITY/ACL = (IDENTIFIER=NETWORK,OPTIONS=DEFAULT,ACCESS=NONE) -
_$ [JONES]PERSONAL.DIR
A renamed file's protection is unchanged. A new version of an existing
file receives the UIC-based protection and ACL of the previous version.
(Use the /PROTECTION qualifier of the BACKUP, COPY, CREATE, and SET
FILE commands to override the default UIC-based protection.)
19.5.5 Explicit File Protection
You can explicitly specify UIC-based protection for a new file with the /PROTECTION qualifier (valid with the BACKUP, COPY, and CREATE commands).
You can change the UIC-based protection on an existing file with the SET SECURITY/PROTECTION command.
After a file is created and you have created an ACL for the file, you
can modify the ACL and add as many entries to it as you want. The
protection specified by the ACL overrides the file's user
identification code protection.
19.5.6 Examples
$ CREATE MAST12.TXT/PROTECTION=(S:RWED,O:RWED,G,W)
$ SET SECURITY/PROTECTION=(S:RWED,O:RWED,G:RE,W) MAST12.TXT
The following sections describe how to access files across networks.
19.6.1 Access Control Strings
You can include network access control strings in the file
specifications of DCL commands that perform operations across the
DECnet for OpenVMS network. The access control strings permit a user on
a local node to access a file on a remote node.
19.6.2 Access Control String Format
An access control string consists of the user name for the remote account and the user's password enclosed within quotation marks, as follows:
NODE"username password"::disk:[directory]filename.filetype
Because access control strings include sufficient information to allow
someone to break in to the remote account, they create serious security
exposure.
19.6.4 Protecting Access Control Strings
To protect access control string information, do the following:
To avoid the need for access control strings, you might prefer to use proxy login accounts. Proxy logins let you access files across a network without specifying a user name or password in an access control string. Thus, proxy logins have the following security benefits:
Before you can initiate a proxy login, the system or security
administrator at the remote node must create a proxy account for you.
Proxy accounts, like regular accounts, are created with the OpenVMS
Authorize utility (AUTHORIZE). They are usually nonprivileged accounts.
Security administrators can allow you access to one default proxy
account and up to 15 other proxy accounts.
While proxy logins require more setup effort on the part of system
managers, they provide more secure network access and eliminate the
need for users to enter access control strings.
19.6.7 Examples
The following example illustrates the differences between a normal network login request and a proxy login request. For each example, the following conditions exist:
  6489P036.HTM
  OSSG Documentation
  22-NOV-1996 13:17:31.20
Copyright © Digital Equipment Corporation 1996. All Rights Reserved.