![[HR]](../../IMAGES/REDBAR.GIF)
The Mail utility also has default file protection to discourage mail
tampering. However, Mail is not completely secure from tampering.
Anyone with sufficient privileges can change protection and access mail
files.
6.12.2 Security Measures
Mail files are within your own directory, so you have the option of applying the file protection techniques for sensitive files described in Chapter 19. In addition:
The following sections describe how to use text editors in the Mail
environment.
6.13.1 Using EVE
You can use a text editor to write a message before you send it. To do so, specify the /EDIT qualifier with the SEND command. After you respond to the To: and Subj: prompts, Mail invokes the text editor. Unless you have selected a different editor, Mail invokes the DECTPU-based EVE editor.
The [End of file] marker moves down as you enter text. For more
information about the EVE editor, see Chapter 8. To send the
message, press the Do key and enter the EXIT command. To cancel the
send operation, press the Do key and enter the QUIT command.
6.13.2 Example
In the following example, EVE is used to create a mail message:
MAIL> SEND/EDIT [Return]
[End of file]


Buffer:  MAIN                     |  Write  | Insert | Forward
Do not edit a .DDIF mail file because you will no longer be able to use
the file as a .DDIF file. If you edit a .DDIF mail file, you can access
only the text of the file.
6.13.4 Using /EDIT Qualifier Keywords
By specifying the /EDIT qualifier when you invoke Mail, you can use the editor for sending, replying, and forwarding during the ensuing mail session. You can also use keywords with the /EDIT qualifier to set the default for Mail.
To invoke the editor only when you are replying to a message, use the REPLY keyword with the MAIL/EDIT command. To invoke the editor and display the message to which you are replying, use the REPLY keyword with the =EXTRACT option. If you do not specify a keyword with /EDIT, the default is /EDIT=(SEND,REPLY).
To send or reply to a message, EXIT from the editor. To cancel a SEND
or REPLY command, enter the QUIT command to exit from the editor.
6.13.5 Examples
$ MAIL/EDIT=(SEND,FORWARD) [Return]
$ MAIL/EDIT=(REPLY) [Return]
$ MAIL/EDIT=(REPLY=EXTRACT) [Return]
By default, Mail invokes the DECTPU-based EVE editor when you specify the Mail command SEND/EDIT. If you are not running an ANSI-compliant CRT (hardcopy) terminal, you will not be able to invoke DECTPU-based editors (such as EVE and LSE). If you attempt to invoke a DECTPU-based editor, you will receive the error message :
%TPU-E-NONANSICRT, SYS$INPUT must be supported CRT
By entering the Mail command SET EDITOR, you can specify that a
different editor be invoked instead of EVE. For example, to select the
EDT editor, issue the Mail command SET EDITOR EDT. The EDT editor
remains your default Mail editor (even if you log out of the system and
log back in) until you enter another SET EDITOR command.
6.13.8 Displaying the Selected Editor
To display the name of the selected Mail editor, enter the Mail command
SHOW EDITOR.
6.13.9 Example
In the following example, the EDT editor is selected and then used to create a message:
MAIL> SET EDITOR EDT [Return]
MAIL> SHOW EDITOR [Return]
Your editor is EDT.
MAIL> SEND/EDIT [Return]
To:   STONE::THOMPSON [Return]
Subj: Budget Meeting [Return]
[EOB]
*
When EDT is used to edit messages, you will see an asterisk (*) after
you enter the subject line and press Return. Enter the CHANGE command
and press Return to switch to the screen editor. For more information
on using EDT, see Chapter 9. Enter the text of your message using
EDT commands to move around in the buffer. A buffer is a
temporary storage area that exists only during an editing session. To
send the message, press Ctrl/Z. To cancel and not send the message,
press Ctrl/C.
6.13.11 Using a Command File to Edit Mail
You can define the logical name MAIL$EDIT to be a command file before
entering Mail. Then, when you issue any Mail command that invokes an
editor, the command file will be called to perform the edit. In the
command file, you can also invoke other utilities such as the
spell-checker and you can specify any function that can be done in a
command file. Refer to Appendix C for an annotated example of a
MAILEDIT.COM command procedure and refer to Chapter 15 and
Chapter 16 for more information on command files.
6.13.12 Overriding Your Selected Editor
If you wish to temporarily override your selected editor, you can define MAIL$EDIT to be the string "CALLABLE_" with the desired editor name appended. For example, to use callable EDT rather than callable EVE, you can type the following command:
$ DEFINE MAIL$EDIT CALLABLE_EDT
If you issue the SET EDITOR command during a session that was invoked
with MAIL$EDIT defined, you override both your permanent selected
editor and the current editor setting. In order to use the command file
defined by MAIL$EDIT again, you must exit from Mail and restart it.
6.14 Customizing Your Mail Environment
The following sections describe how to customize your Mail environment.
6.14.1 Specifying Transports
When you receive a message, Mail interprets the specified address as follows:
However, you can customize your Mail environment to force the system to choose a specific protocol. This option is helpful in cases where a mail address can be interpreted as valid for either the Internet or DECnet protocol.
To specify protocols, you can define the MAIL$INTERNET_MODE logical name as follows:
To modify your Mail environment in any of these ways, Digital recommends that you define the MAIL$INTERNET_MODE and MAIL$INTERNET_TRANSPORT logicals in your LOGIN.COM file. (See Chapter 13 for complete information about using and defining logical names.)
For example, if your system is set up to use the default (HYBRID), the Mail address smith@pluto is interpreted as a DECnet address because there are no periods in that address. However, if you want Mail to use SMTP instead of DECnet, you can add the following line to your LOGIN.COM file:
$ DEFINE MAIL$INTERNET_MODE SMTP
When you then specify smith@pluto, Mail interprets this address as an
Internet address and uses the SMTP protocol (for example,
SMTP%"smith@pluto.xyz.dec.com").
6.14.2 Using the Mail Keypad
You can use the numeric keypad on your keyboard to execute commands in Mail. Most keypad keys can execute two commands.
Figure 6-2 shows the Mail keypad. To enter the top command for each key shown, press the appropriate key. To enter the bottom command shown, press the PF1 key first, and then the desired function key.
Figure 6-2 Mail Utility Keypad
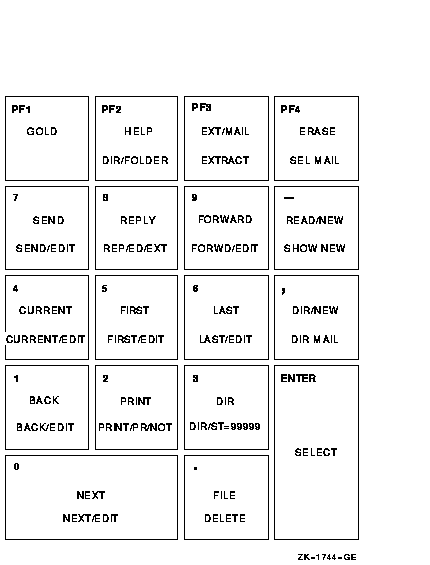
To execute the Mail command SEND, press KP7. To execute the Mail
command SEND/EDIT, press the PF1 key first and then press KP7.
6.14.4 Redefining Keypad Keys
You can redefine the keypad keys to execute Mail commands when you are in Mail. Note that the previous definition of the key is superseded when you redefine a key.
Defining keypad keys in Mail is similar to defining keypad keys to
execute DCL commands.
6.14.5 Example
In the following example, the key KP2 is defined as the Mail command PRINT/PARAM=PAGE_ORIENT=LANDSCAPE. After KP2 is defined, you can press it to display the PRINT/PARAM=PAGE_ORIENT=LANDSCAPE command:
MAIL> DEFINE/KEY KP2 "PRINT/PARAM=PAGE_ORIENT=LANDSCAPE" [Return]
To increase the number of key definitions available on your terminal,
use the /STATE qualifier. You can assign many definitions to the same
key as long as each definition is associated with a different state.
State names can be any alphanumeric string. By specifying states, you
can press a key once to enter a command and a second time to enter a
qualifier.
6.14.7 Example
In the following example, PF1 (pressed twice) is defined as DIRECTORY/FOLDER:
MAIL> DEFINE/KEY PF1 "DIRECTORY"/SET_STATE=FOLDER /NOTERMINATE  [Return]
MAIL> DEFINE/KEY PF1 "/FOLDER" /IF_STATE=FOLDER /TERMINATE  [Return]
Press PF1 twice to enter the command DIRECTORY/FOLDER. The /TERMINATE
qualifier ends the command line so you do not need to press the Return
key.
6.14.8 Creating Permanent Key Definitions
Any keypad keys that you define during a Mail session are lost when you exit from Mail. To retain keypad key definitions from one Mail session to another, create a file containing key definitions (for example, MAIL$KEYDEF.INI) in your top-level directory. For example, the following MAIL$KEYDEF.INI file contains six key definitions:
DEFINE/KEY PF1 "DIRECTORY "     /NOTERMINATE    /SET_STATE=folder
DEFINE/KEY PF1 "/FOLDER"        /TERMINATE      /IF_STATE=folder
DEFINE/KEY PF2 "SELECT "        /NOTERMINATE    /SET_STATE=mail
DEFINE/KEY PF2 "MAIL"           /TERMINATE      /IF_STATE=mail
DEFINE/KEY PERIOD "READ "       /NOTERMINATE    /SET_STATE=new
DEFINE/KEY PERIOD "/NEW"        /TERMINATE      /IF_STATE=new
To execute these commands each time you invoke Mail, enter the following command line in your login command file (LOGIN.COM):
$ DEFINE MAIL$INIT SYS$LOGIN:MAIL$KEYDEF.INI
This section contains a summary of all Mail utility commands. For
complete information on qualifiers used with these commands, refer to
online help.
6.15.1 Reading Messages
Use the following commands to read messages:
Use the following commands to exchange messages:
Use the following commands to remove messages:
Use the following commands to print messages:
Use the following commands to organize messages:
The following commands are used for marking messages:
The following commands are used for customizing the mail environment:
6.15.8 Exiting or Transferring Control
The following commands are used for exiting Mail or transferring
control:
The following command is used for compressing mail files:
The following commands are used for system management:
The OpenVMS Phone utility (PHONE) is a communication program designed to allow users to talk to each other via their terminals, computers, or computer networks. This chapter includes information on:
For additional information about the commands described in this
chapter, refer to online help.
7.2 Using Phone
The following sections describe how to use the Phone utility.
7.2.1 Phone Features
Phone (also sometimes referred to as the Phone facility) is designed to
provide features similar to that of actual telephone communications,
such as the hold button, conference calls, and telephone directories.
You can use Phone to communicate with other users on your system or
with any other system connected to your system by DECnet for OpenVMS
networks.
7.2.2 Invoking Phone
To invoke Phone, enter the PHONE command at the DCL prompt and press
Return. You can specify the user name of the person with whom you want
to communicate before or after you enter Phone. When you invoke the
Phone utility, Phone takes control of your terminal and displays the
Phone viewport.
7.2.3 Example of a Phone Viewport
The following figure shows the Phone viewport:
$ PHONE   (1)


                OpenVMS Phone Facility         11-DEC-1996


% (2)

---------------------------------------------------------
                   TAURUS::SMITH  (3)


----------------------------------------------------------
                  GEMINI::PETERS  (4)


----------------------------------------------------------
The fields on the viewport are as follows:
You can obtain information about Phone by invoking the HELP command at the DCL prompt as follows:
$ HELP
Topic? PHONE
You can also enter Help from within the Phone utility by entering the HELP command at the switchhook (%) prompt.
Each person engaged in the conversation has a viewport on the screen.
Phone can display as many as six viewports at a time. The viewport
contains information regarding the user's name, the text of the
conversation, and various status indicators, such as who is on hold.
User names of people that you have on hold can be temporarily
eliminated from the screen to make room for new participants.
7.3 Entering Phone Commands
The following sections describe how to enter Phone commands.
7.3.1 Switchhook
To enter Phone commands, you must first press the switchhook character
(%). If you are using the Phone utility but are not currently engaged
in a conversation, the switchhook character is optional because there
is no ambiguity between a command and conversation.
7.3.2 Refreshing the Screen
You can press Ctrl/W at any time during your current conversation to
refresh the screen.
7.3.3 Logical Names
The DIAL, DIRECTORY, MAIL, and PHONE commands accept logical names. To
prevent Phone from treating a parameter to these commands as a logical
name, prefix the parameter with an underscore.
7.3.4 Special Characters
When you are engaged in a conversation, most of the characters that you
type are considered part of that conversation and are sent to each
participant. The exception is the percent sign (%), which signals that
you want to enter a Phone utility command. You can enter any Phone
utility command during a conversation. See Section 7.5 for a list of
available Phone commands.
7.4 Customizing Your Phone Viewport
When entering the DCL command PHONE, you can supply the following qualifiers that modify the characteristics of the simulated telephone:
| /SCROLL | Determines how new lines of text are displayed on the screen when the viewport becomes full. |
| /SWITCH_HOOK | Specifies the character to be used for the switchhook prompt. The switchhook character must be entered before each Phone utility command that is entered during a conversation. |
| /VIEWPORT_SIZE | Specifies the maximum number of lines in a viewport, including the heading line and the bottom line of dashes. |
  6489P009.HTM
  OSSG Documentation
  22-NOV-1996 13:16:45.68
Copyright © Digital Equipment Corporation 1996. All Rights Reserved.