![[Digital logo]](../../IMAGES/DIGITAL-LOGO.GIF)
![[HR]](../../IMAGES/REDBAR.GIF)
![[Digital logo]](../../IMAGES/DIGITAL-LOGO.GIF)
![[HR]](../../IMAGES/REDBAR.GIF)
DWZZA converters are available as standalone, desktop components or as StorageWorks compatible building blocks. DWZZA converters can be used with the internal SCSI adapter or the optional KZPAA adapters.
The HSZ40 is a high-performance differential SCSI controller that can be connected to a differential SCSI bus, and supports up to 42 SCSI devices. An HSZ40 can be configured on a shared SCSI bus that includes DWZZA single-ended to differential converters. Disk devices configured on HSZ40 controllers can be combined into RAID sets to further enhance performance and provide high availability.
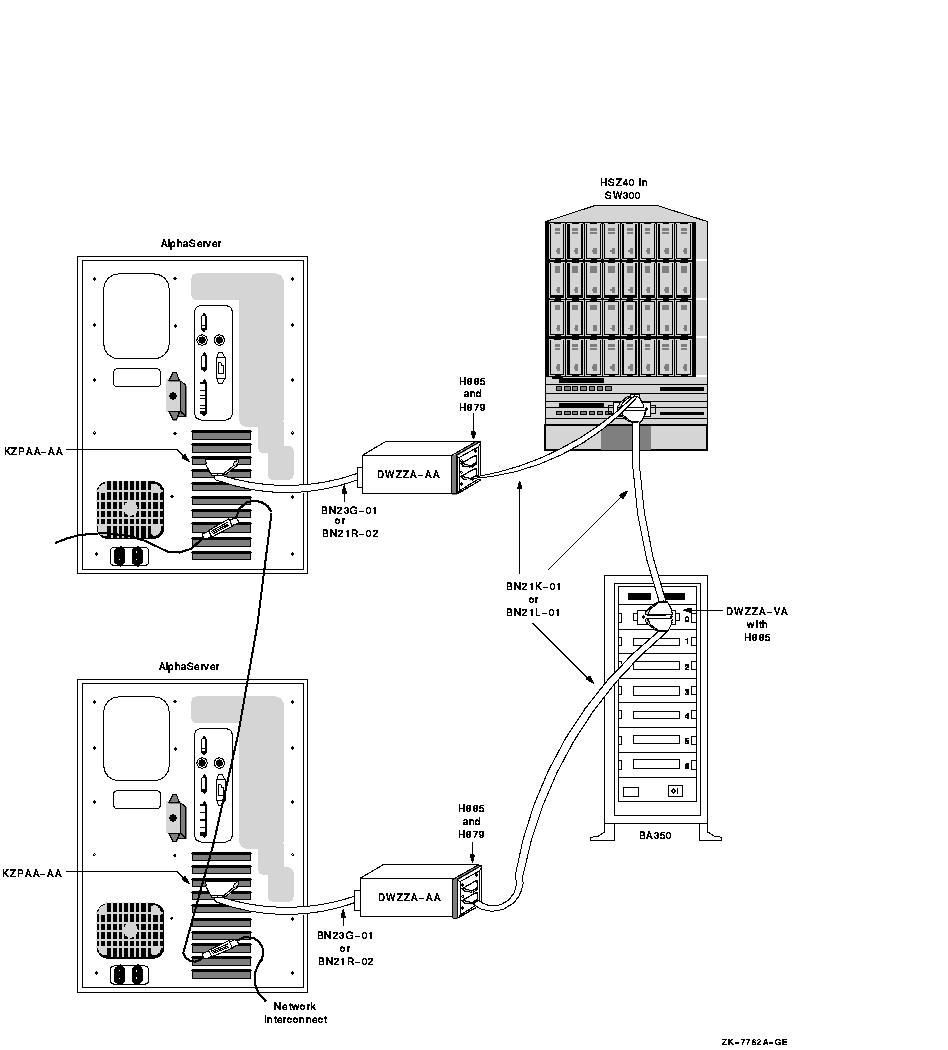
Figure A-6 shows a logical view of a configuration that uses additional DWZZAs to increase the potential physical separation (or to allow for additional enclosures and HSZ40s), and Figure A-7 shows a sample representation of this configuration.
Figure A-6 Conceptual View: Using DWZZAs to Allow for Increased Separation or More Enclosures
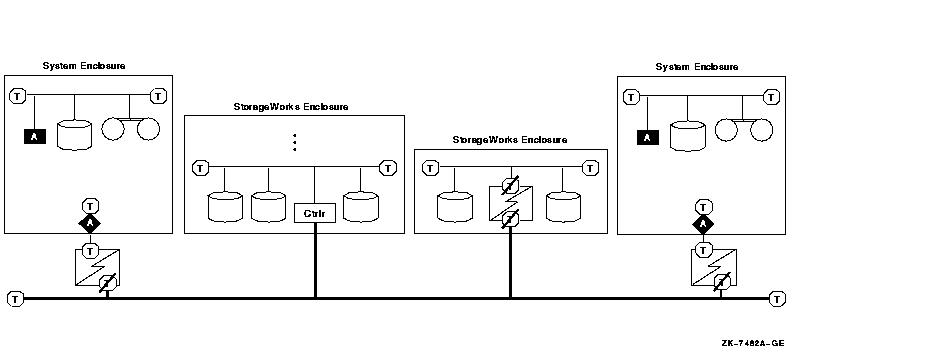
Figure A-7 Sample Configuration: Using DWZZAs to Allow for Increased Separation or More Enclosures
In OpenVMS Version 7.0, you can connect up to three hosts on a multihost SCSI bus. Figure A-8 shows how a three-host SCSI OpenVMS Cluster system might be configured.
Figure A-8 Sample Configuration: Three Hosts on a SCSI Bus
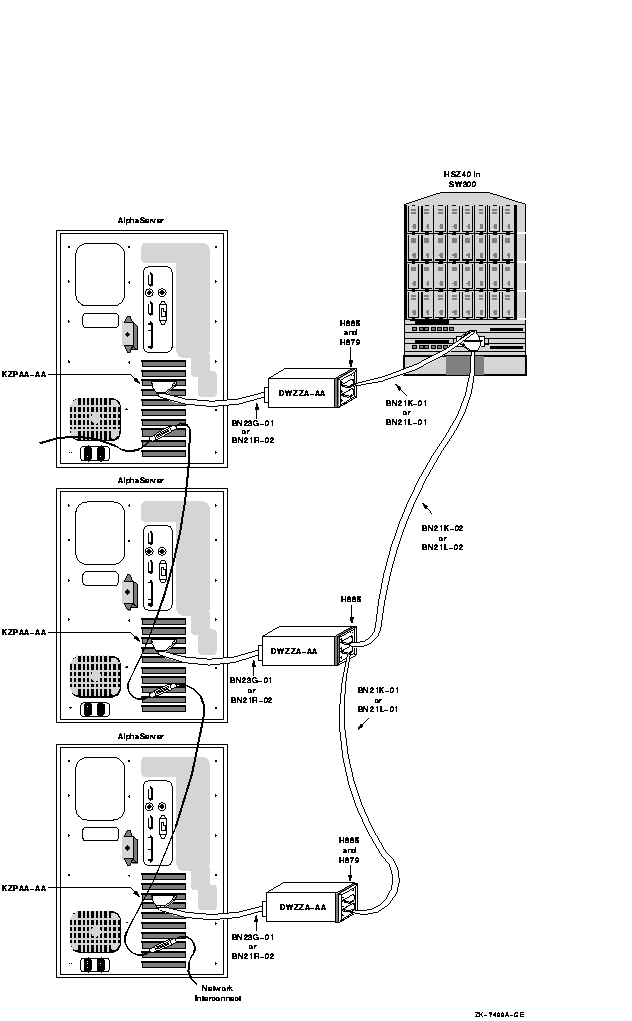
Figure A-9 is a sample configuration with two KZPSA adapters on the same SCSI bus. In this configuration, the SCSI termination has been removed from the KZPSA, and external terminators have been installed on "Y" cables. This allows you to remove the KZPSA adapter from the SCSI bus without rendering the SCSI bus inoperative. The capability of removing an individual system from your SCSI OpenVMS Cluster configuration (for maintenance or repair) while the other systems in the cluster remain active gives you an especially high level of availability.
Please note the following about Figure A-9:
Figure A-9 Sample Configuration: SCSI System Using Differential Host Adapters (KZPSA)
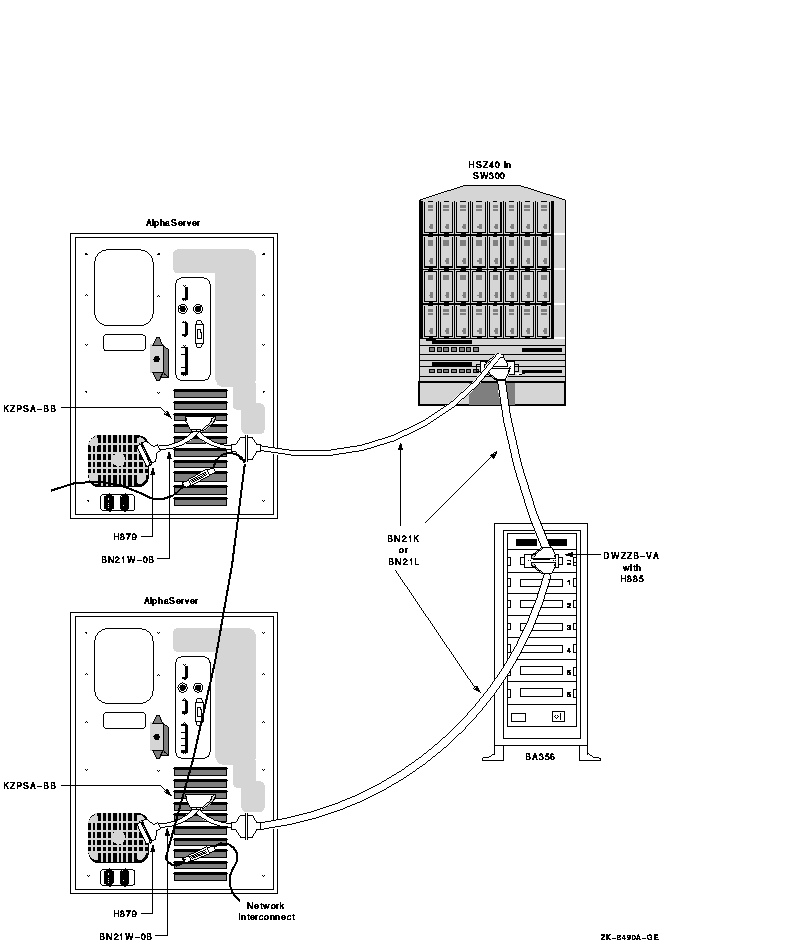
The differential SCSI bus in the configuration shown in Figure A-9 is chained from enclosure to enclosure and is limited to 25 m in length. (The BA356 does not add to the differential SCSI bus length. The differential bus consists only of the BN21W-0B "Y" cables and the BN21K/BN21L cables.) In configurations where this cabling scheme is inconvenient or where it does not provide adequate distance, an alternative radial scheme can be used.
The radial SCSI cabling alternative is based on a "SCSI hub," which comprises a StorageWorks BA356 enclosure and DWZZB bus converters.
Figure A-10 shows a logical view of the SCSI hub configuration, and Figure A-11 shows a sample representation of this configuration. Note the following restrictions for a SCSI hub configuration:
Figure A-10 Conceptual View: SCSI System Using a SCSI Hub
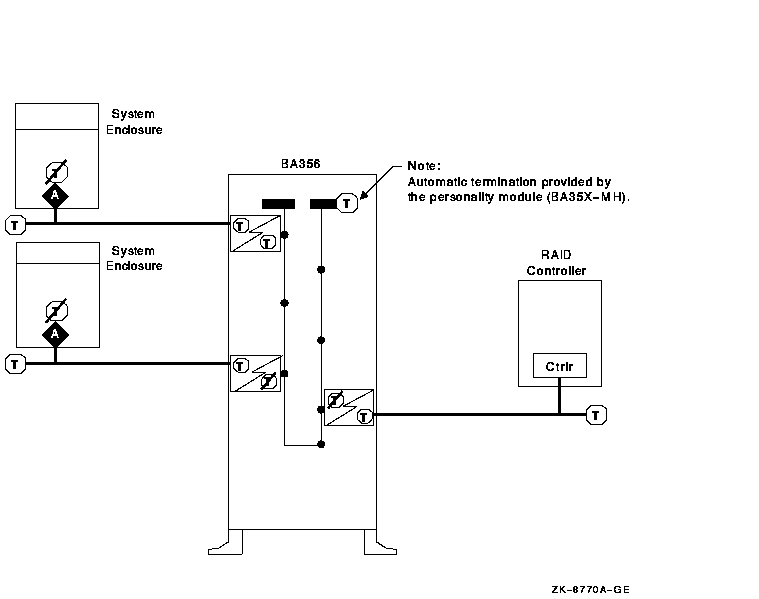
Figure A-11 shows a sample representation of a SCSI hub configuration.
Figure A-11 Sample Configuration: SCSI System with SCSI Hub Configuration

Please note the following about Figure A-11:
You can build a multihost SCSI OpenVMS Cluster configuration with two systems using internal adapters that are joined by a single SCSI cable. This type of configuration is relatively inexpensive, and it provides some of the benefits of multihost SCSI OpenVMS Cluster systems that use external adapters (for example, fully shared disks and twice the serving performance of a single system). This system configuration can also be expanded to provide improved performance, availability, and scaling.
However, a multihost SCSI OpenVMS Cluster system that uses only internal SCSI adapters has the following limitations:
Some of the limitations associated with the internal adapter can be removed by using DWZZAs, additional SCSI adapters, and additional storage enclosures.
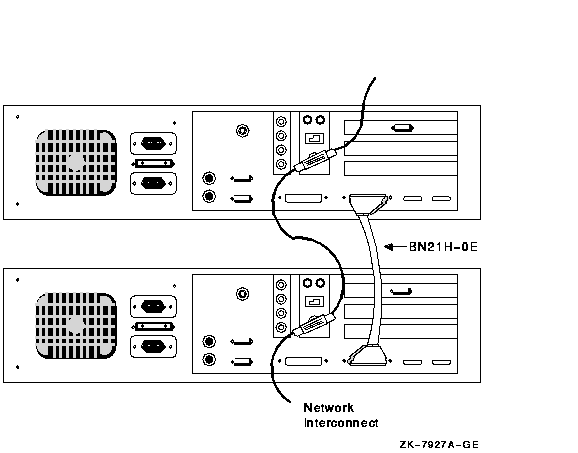
Figure A-12 shows a conceptual view of a SCSI system using internal adapters, and Figure A-13 shows a sample configuration of such a system. (See Figure A-1 for the key to the symbols used in these figures.)
Figure A-12 Conceptual View: SCSI OpenVMS Cluster System Using Internal Adapters
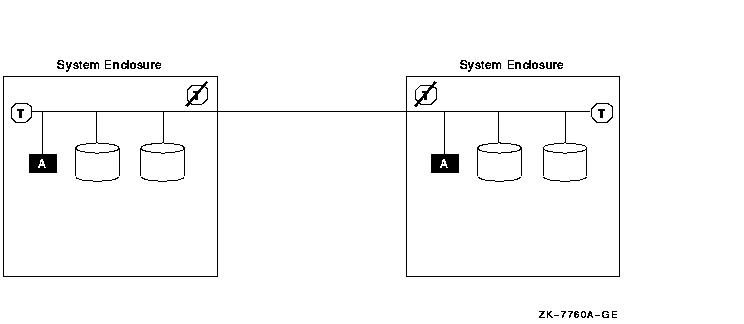
Figure A-13 Sample Configuration: SCSI OpenVMS Cluster System with AlphaStation 200 Systems Using Internal Adapters
| System Type | Internal Cable Length |
|---|---|
| AlphaServer 1000 rackmount | 1.6 m |
| AlphaServer 1000 pedestal with an internal StorageWorks shelf in a dual-bus configuration¹ | 2.0 m |
| AlphaServer 2000 pedestal with the internal StorageWorks shelf that is not connected | 1.7 m |
| AlphaServer 2100 rackmount | 2.0 m |
| AlphaServer 2100 pedestal with the internal StorageWorks shelf that is not connected | 1.6 m |
| AlphaStation 200 | 1.2 m |
| AlphaStation 400 | 1.4 m |
This section describes the steps required to set up and install the hardware in a SCSI OpenVMS Cluster system. The assumption in this section is that a new OpenVMS Cluster system, based on a shared SCSI bus, is being created. If, on the other hand, you are adding a shared SCSI bus to an existing OpenVMS Cluster configuration, then you should integrate the procedures in this section with those described in OpenVMS Cluster Systems to formulate your overall installation plan.
Table A-6 lists the steps required to set up and install the hardware in a SCSI OpenVMS Cluster system.
| Step | Description | Reference |
|---|---|---|
| 1 | Ensure proper grounding between enclosures. | Section A.6.1 and Section A.7.8 |
| 2 | Configure SCSI host IDs. | Section A.6.2 |
| 3 | Power up the system and verify devices. | Section A.6.3 |
| 4 | Set SCSI console parameters. | Section A.6.4 |
| 5 | Install the OpenVMS operating system. | Section A.6.5 |
| 6 | Configure additional systems. | Section A.6.6 |
You must ensure that your electrical power distribution systems meet local requirements (for example, electrical codes) prior to installing your OpenVMS Cluster system. If your configuration consists of two or more enclosures connected by a common SCSI interconnect, you must also ensure that the enclosures are properly grounded. Proper grounding is important for safety reasons and to ensure the proper functioning of the SCSI interconnect.
Electrical work should be done by a qualified professional.
Section A.7.8 includes details of the grounding requirements for SCSI
systems.
A.6.2 Step 2: Configure SCSI Node IDs
This section describes how to configure SCSI node and device IDs. SCSI IDs must be assigned separately for multihost SCSI buses and single-host SCSI buses.
Figure A-14 shows two hosts; each one is configured with a single-host SCSI bus and shares a multihost SCSI bus. (See Figure A-1 for the key to the symbols used in this figure.)
Figure A-14 Setting Allocation Classes for SCSI Access

The following sections describe how IDs are assigned in this type of
multihost SCSI configuration. For more information about this topic,
see OpenVMS Cluster Systems.
A.6.2.1 Configuring Device IDs on Multihost SCSI Buses
When configuring multihost SCSI buses, adhere to the following rules:
The device ID selection depends on whether you are using a node allocation class or a port allocation class. The following discussion applies to node allocation classes. Refer to OpenVMS Cluster Systems for a discussion of port allocation classes.
In multihost SCSI configurations, device names generated by OpenVMS use the format $allocation_class$DKA300. You set the allocation class using the ALLOCLASS system parameter. OpenVMS generates the controller letter (for example, A, B, C, and so forth) at boot time by allocating a letter to each controller. The unit number (for example, 0, 100, 200, 300, and so forth) is derived from the SCSI device ID.
When configuring devices on single-host SCSI buses that are part of a multihost SCSI configuration, take care to ensure that the disks connected to the single-host SCSI buses have unique device names. Do this by assigning different IDs to devices connected to single-host SCSI buses with the same controller letter on systems that use the same allocation class. Note that the device names must be different, even though the bus is not shared.
For example, in Figure A-14, the two disks at the bottom of the picture are located on SCSI bus A of two systems that use the same allocation class. Therefore, they have been allocated different device IDs (in this case, 2 and 3).
For a given allocation class, SCSI device type, and controller letter (in this example, $4$DKA), there can be up to eight devices in the cluster, one for each SCSI bus ID. To use all eight IDs, it is necessary to configure a disk on one SCSI bus at the same ID as a processor on another bus. See Section A.7.5 for a discussion of the possible performance impact this can have.
SCSI bus IDs can be effectively "doubled up" by configuring
different SCSI device types at the same SCSI ID on different SCSI
buses. For example, device types DK and MK could produce $4$DKA100 and
$4$MKA100.
A.6.3 Step 3: Power Up and Verify SCSI Devices
After connecting the SCSI cables, power up the system. Enter a console SHOW DEVICE command to verify that all devices are visible on the SCSI interconnect.
If there is a SCSI ID conflict, the display may omit devices that are present, or it may include nonexistent devices. If the display is incorrect, then check the SCSI ID jumpers on devices, the automatic ID assignments provided by the StorageWorks shelves, and the console settings for host adapter and HSZ40 controller IDs. If changes are made, type INIT, then SHOW DEVICE again. If problems persist, check the SCSI cable lengths and termination.
Example A-1 is a sample output from a console SHOW DEVICE command. This system has one host SCSI adapter on a private SCSI bus (PKA0), and two additional SCSI adapters (PKB0 and PKC0), each on separate, shared SCSI buses.
Example A-1 SHOW DEVICE Command Sample Output
>>>SHOW DEVICE
dka0.0.0.6.0               DKA0                          RZ26L  442D
dka400.4.0.6.0             DKA400                        RRD43  2893
dkb100.1.0.11.0            DKB100                        RZ26  392A
dkb200.2.0.11.0            DKB200                        RZ26L  442D
dkc400.4.0.12.0            DKC400                        HSZ40   V25
dkc401.4.0.12.0            DKC401                        HSZ40   V25
dkc500.5.0.12.0            DKC500                        HSZ40   V25
dkc501.5.0.12.0            DKC501                        HSZ40   V25
dkc506.5.0.12.0            DKC506                        HSZ40   V25
dva0.0.0.0.1               DVA0
jkb700.7.0.11.0            JKB700                        OpenVMS  V62
jkc700.7.0.12.0            JKC700                        OpenVMS  V62
mka300.3.0.6.0             MKA300                        TLZ06  0389
era0.0.0.2.1               ERA0                          08-00-2B-3F-3A-B9
pka0.7.0.6.0               PKA0                          SCSI Bus ID 7
pkb0.6.0.11.0              PKB0                          SCSI Bus ID 6
pkc0.6.0.12.0              PKC0                          SCSI Bus ID 6
The following list describes the device names in the preceding example:
When creating a SCSI OpenVMS Cluster system, you need to verify the settings of the console environment parameters shown in Table A-7 and, if necessary, reset their values according to your configuration requirements.
Table A-7 provides a brief description of SCSI console parameters. Refer to your system-specific documentation for complete information about setting these and other system parameters.
Note
If you need to modify any parameters, first change the parameter (using the appropriate console SET command). Then enter a console INIT command or press the Reset button to make the change effective.
| Parameter | Description |
|---|---|
| bootdef_dev device_name | Specifies the default boot device to the system. |
| boot_osflags root_number, bootflag | The boot_osflags variable contains information that is used by the operating system to determine optional aspects of a system bootstrap (for example, conversational bootstrap). |
| pk*0_disconnect | Allows the target to disconnect from the SCSI bus while the target acts on a command. When this parameter is set to 1, the target is allowed to disconnect from the SCSI bus while processing a command. When the parameter is set to 0, the target retains control of the SCSI bus while acting on a command. |
| pk*0_fast | Enables SCSI adapters to perform in fast SCSI mode. When this parameter is set to 1, the default speed is set to fast mode; when the parameter is 0, the default speed is standard mode. |
| pk*0_host_id | Sets the SCSI device ID of host adapters to a value between 0 and 7. |
| scsi_poll | Enables console polling on all SCSI interconnects when the system is halted. |
| control_scsi_term | Enables and disables the terminator on the integral SCSI interconnect at the system bulkhead (for some systems). |
Examples
Before setting boot parameters, display the current settings of these parameters, as shown in the following examples:
>>>SHOW *BOOT*

boot_osflags            10,0
boot_reset              OFF
bootdef_dev             dka200.2.0.6.0
>>>
>>>SHOW *PK*

pka0_disconnect         1
pka0_fast               1
pka0_host_id            7
>>>SHOW *POLL*
scsi_poll               ON
>>>SHOW *TERM*
control_scsi_term       external
Refer to the OpenVMS Alpha or VAX upgrade and installation manual for information about installing the OpenVMS operating system. Perform the installation once for each system disk in the OpenVMS Cluster system. In most configurations, there is a single system disk. Therefore, you need to perform this step once, using any system.
During the installation, when you are asked if the system is to be a
cluster member, answer Yes. Then, complete the installation according
to the guidelines provided in OpenVMS Cluster Systems.
A.6.6 Step 6: Configure Additional Systems
Use the CLUSTER_CONFIG command procedure to configure additional
systems. Execute this procedure once for the second host that you have
configured on the SCSI bus. (See Section A.7.1 for more information.)
A.7 Supplementary Information
The following sections provide supplementary technical detail and
concepts about SCSI OpenVMS Cluster systems.
A.7.1 Running the OpenVMS Cluster Configuration Command Procedure
You execute either the CLUSTER_CONFIG.COM or the CLUSTER_CONFIG_LAN.COM command procedure to set up and configure nodes in your OpenVMS Cluster system. Your choice of command procedure depends on whether you use DECnet or the LANCP utility for booting. CLUSTER_CONFIG.COM uses DECnet; CLUSTER_CONFIG_LAN.COM uses the LANCP utility. (For information about using both procedures, see OpenVMS Cluster Systems).
Typically, the first computer is set up as an OpenVMS Cluster system during the initial OpenVMS installation procedure (see Section A.6.5). The CLUSTER_CONFIG procedure is then used to configure additional nodes. However, if you originally installed OpenVMS without enabling clustering, the first time you run CLUSTER_CONFIG, the procedure converts the standalone system to a cluster system.
To configure additional nodes in a SCSI cluster, execute CLUSTER_CONFIG.COM for each additional node. Table A-8 describes the steps to configure additional SCSI nodes.
| Step | Procedure |
|---|---|
| 1 | From the first node, run the CLUSTER_CONFIG.COM procedure and select the default option [1] for ADD. |
| 2 | Answer Yes when CLUSTER_CONFIG.COM asks whether you want to proceed. |
| 3 | Supply the DECnet name and address of the node that you are adding to the existing single-node cluster. |
| 4 | Confirm that this will be a node with a shared SCSI interconnect. |
| 5 | Answer No when the procedure asks whether this node will be a satellite. |
| 6 | Configure the node to be a disk server if it will serve disks to other cluster members. |
| 7 | Place the new node's system root on the default device offered. |
| 8 | Select a system root for the new node. The first node uses SYS0. Take the default (SYS10 for the first additional node), or choose your own root numbering scheme. You can choose from SYS1 to SYS n, where n is hexadecimal FFFF. |
| 9 | Select the default disk allocation class so that the new node in the cluster uses the same ALLOCLASS as the first node. |
| 10 | Confirm whether or not there is a quorum disk. |
| 11 | Answer the questions about the sizes of the page file and swap file. |
| 12 |
When CLUSTER_CONFIG.COM completes, boot the new node from the new
system root. For example, for SYSFF on disk DKA200, enter the following
command:
BOOT -FL FF,0 DKA200
In the BOOT command, you can use the following flags:
|
![[HR]](../../IMAGES/REDBAR.GIF)
  6318P010.HTM
  OSSG Documentation
  26-NOV-1996 11:20:27.41
Copyright © Digital Equipment Corporation 1996. All Rights Reserved.