![[HR]](../../IMAGES/REDBAR.GIF)
The following example sets the default device and directory to DMA1:[SMITH.COM]:
$ RUN SYS$SYSTEM:SYSMAN
SYSMAN> SET PROFILE/DEFAULT=DMA1:[SMITH.COM]
Use the SET PROFILE/VERIFY command to turn on DCL verification, which displays DCL command lines and data lines as they execute.
SYSMAN can execute DCL commands using the DO command. By default, SYSMAN DCL verification is turned off.
Example
$ RUN SYS$SYSTEM:SYSMAN
SYSMAN> SET PROFILE/VERIFY
The SYSMAN command DO executes DCL command procedures and SYSMAN command procedures on all nodes in an OpenVMS Cluster environment. In an OpenVMS Cluster environment or in any environment with multiple nodes, you enter a set of commands once, and SYSMAN executes the commands sequentially on every node in the environment. SYSMAN displays the name of each node as it executes commands, or an error message if the command fails.
If a node does not respond within a given timeout period, SYSMAN displays a message before proceeding to the next node in the environment. You can specify a timeout period with the SET TIMEOUT command.
Each DO command executes as an independent subprocess, so no process context is retained between DO commands. For this reason, you must express all DCL commands in a single command string, and you cannot run a procedure that requires input.
In an OpenVMS Cluster environment, SYSMAN executes DO commands sequentially on all nodes in the cluster. After a command completes or times out on one node, SYSMAN sends it to the next node in the environment. Any node that is unable to execute a command returns an error message.
For more information about using the DO command to manage an OpenVMS Cluster system, see Section 20.6. You can also refer to the OpenVMS System Management Utilities Reference Manual for a complete description of the SYSMAN command DO.
Example
In the following example, SYSMAN runs the INSTALL utility and makes a file known on all nodes in the cluster when you enter the commands from the local node:
$ RUN SYS$SYSTEM:SYSMAN
SYSMAN> SET ENVIRONMENT/CLUSTER
SYSMAN> SET PROFILE/PRIVILEGE=CMKRNL
SYSMAN> DO INSTALL ADD/OPEN/SHARED WORK4:[CENTRAL]STATSHR
.
.
.
%SYSMAN-I-OUTPUT, Command execution on node NODE21
%SYSMAN-I-OUTPUT, Command execution on node NODE22
The SYSMAN execute procedure (@) command executes SYSMAN command procedures on each node in the environment.
Example
The following example creates and executes a SYSMAN command procedure to display the current date and system time for each OpenVMS Cluster node:
$ CREATE TIME.COM
SET ENVIRONMENT/CLUSTER
CONFIGURATION SHOW TIME[Ctrl/Z]
$ RUN SYS$SYSTEM:SYSMAN
SYSMAN> @TIME
%SYSMAN-I-ENV, Current command environment:
            Clusterwide on local cluster
            Username SYSTEM   will be used on nonlocal nodes
System time on node NODE21: 19-JUN-1996 13:32:19.45
System time on node NODE22: 19-JUN-1996 13:32:27.79
System time on node NODE23: 19-JUN-1996 13:32:58.66
SYSMAN>
You can create an initialization file that is used each time you invoke SYSMAN. In the initialization file, you can perform tasks such as defining keys and setting up your environment.
The default file specification for the SYSMAN initialization file is SYS$LOGIN:SYSMANINI.INI. If you want your SYSMAN initialization file to have a different file specification, you must define the logical name SYSMANINI to point to the location of the file. The following is a sample initialization file that defines several keys:
$ TYPE SYSMANINI.INI
DEFINE/KEY/TERMINATE KP0 "SET ENVIRONMENT/CLUSTER/NODE=(NODE21,NODE22)"
DEFINE/KEY/TERMINATE KP1 "CONFIGURATION SHOW TIME"
DEFINE/KEY/TERMINATE KP2 "SHOW PROFILE"
   .
   .
   .
The operator communication manager (OPCOM) is a tool for communicating with users and operators on the system. OPCOM allows you to perform the following functions:
| Function | For More Information |
|---|---|
| To broadcast messages to users who are logged in | Section 2.4.3 |
| To control the use of OPA0: as an operator terminal | Section 2.4.4 |
| To designate terminals as operator terminals, enabling them to display messages broadcast by OPCOM | Section 2.4.5 |
| To record messages broadcast by OPCOM in a log file | Section 18.6.3 |
| To send requests to an operator¹ | Section 2.4.6 |
| To reply to operator requests¹ | Section 2.4.7 |
Figure 2-3 illustrates the function of OPCOM.
Figure 2-3 Operator Communication Manager (OPCOM)
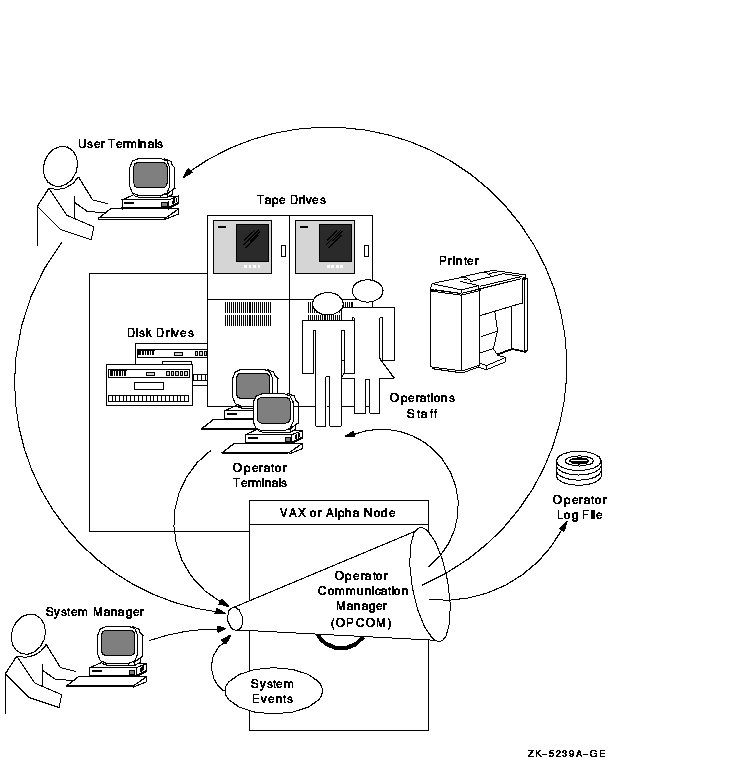
OPCOM uses the following components:
| Component | Description | For More Information |
|---|---|---|
| OPCOM process | The system process that manages OPCOM operations. Unless you disable it, the OPCOM process starts automatically at system startup time. | Section 2.4.2 |
| Operator terminals | Terminals designated to display messages broadcast by OPCOM. Usually, the console terminal (with the device name OPA0:) is the operator terminal. However, you can designate any user terminal as an operator terminal. | Section 2.4.5 |
| Operator log file | A file that records messages broadcast by OPCOM. The file is named SYS$MANAGER:OPERATOR.LOG. | Section 18.6.1 |
| OPCOM messages | Messages broadcast by OPCOM. These messages are displayed on operator terminals and written to the operator log file. The messages might be general messages sent by you, user requests, operator replies, or system events. | Section 18.6.2 |
| REPLY and REQUEST commands | DCL commands that allow you to use and control OPCOM. |
Section 2.4.3,
Section 2.4.6, and Section 2.4.7 |
OPCOM Defaults
OPCOM uses the following defaults:
OPCOM Requirements
OPCOM has the following requirements:
The OPCOM process starts automatically during system startup, unless it is disabled. You might need to start OPCOM interactively if a software problem causes the process to fail and prevents OPCOM from restarting automatically.
To start OPCOM, enter the following command from the system manager's account (SYSTEM):
$ @SYS$SYSTEM:STARTUP OPCOM
If a software problem causes OPCOM to fail, contact your Digital
support representative. Be sure to keep the process dump file named
SYS$SYSTEM:OPCOM.DMP. (When OPCOM fails, it creates this file.)
2.4.3 Sending Messages to Users
To broadcast a message to users, enter the DCL command REPLY as follows:
REPLY [/qualifier...] ["message-text"]
For example:
$ REPLY/ALL/BELL "Please log off"
Use the following qualifiers to control OPCOM messages:
| Qualifier | Description |
|---|---|
| /ALL | Broadcasts a message to all terminals that are attached to the system or cluster. These terminals must be turned on and have broadcast-message reception enabled. |
| /BELL | Rings a bell at the terminal receiving a message when entered with the /ALL, /TERMINAL, or /USERNAME qualifier; two bells when entered with the /URGENT qualifier; and three bells when entered with the /SHUTDOWN qualifier. |
| /NODE[=( node-name[,...]) | Broadcasts a message to the local cluster node only, or to a node or nodes you specify. |
| /SHUTDOWN | Sends a message beginning "SHUTDOWN..."; if used with the /BELL qualifier, rings three bells at terminals receiving the message. |
| /TERMINAL=( terminal-name[,..]) | Broadcasts the message to the specified terminals. |
| /URGENT | Broadcasts a message beginning "URGENT..."; if used with the /BELL qualifier, rings two bells at terminals receiving the message. |
| /USERNAME=( username[,...]) | Broadcasts a message to all terminals at which users are logged in to the system (or cluster), or only to the terminals of the specified users. |
For more information, see the OpenVMS DCL Dictionary.
The REPLY command in the following example sends a message to all users logged in to node WLDWND. When the message is displayed, a bell rings at the terminal.
$ REPLY/ALL/BELL/NODE=WLDWND "Please log off"
The REPLY command in the following example sends a message to the user logged in at terminal TTC1. When the message is displayed, a bell rings at that terminal.
$ REPLY/BELL/TERMINAL=TTC1: "Your file has completed printing"
You can control the use of OPA0: as an operator terminal, whether or not the node is part of an OpenVMS Cluster system, by defining the following logicals in SYS$MANAGER:SYLOGICALS.COM:
| Logical Name | Function |
|---|---|
| OPC$OPA0_ENABLE | Defined as True or False; if True, specifies that OPA0: is to be enabled as an operator terminal. |
| OPC$OPA0_CLASSES | Specifies the operator classes that are enabled for OPA0. The logical name can be a search list of the allowed classes, a comma-separated list, or a combination of the two. |
The logicals take effect the next time you boot the system.
2.4.5 Designating Operator Terminals
Normally, the console terminal (with the device name OPA0:) is automatically an operator terminal except for workstations in an OpenVMS Cluster environment. However, you can designate any terminal as an operator terminal. You can also disable a previously designated operator terminal.
Enabling Operator Terminals
To designate a terminal as an operator terminal, enter the REPLY/ENABLE command at the terminal. For example:
$ REPLY/ENABLE
$
%%%%%%%%%%%  OPCOM  13-JUL-1996 11:30:30.56  %%%%%%%%%%%
Operator _BHAK$FTA20: has been enabled, username SYSTEM
To designate an operator's terminal in batch or in startup command procedures, SYS$COMMAND must be assigned to a valid terminal device.
If your facility is large, there may be several operators, each of whom is assigned to specific tasks. If this is the case, you can specify the classes of messages the operator terminal receives and responds to when you enable the operator terminal, as follows:
REPLY/ENABLE=(keyword[,...])
The following table describes each keyword:
| Keyword | Description |
|---|---|
| CARDS | Displays messages sent to the card readers. |
| CENTRAL | Displays messages sent to the central system operator. |
| CLUSTER | Displays messages from the connection manager pertaining to OpenVMS Cluster system state changes. |
| DEVICES | Displays messages pertaining to mounting disks. |
| DISKS | Displays messages pertaining to mounting and dismounting disk volumes. |
| LICENSE | Displays messages pertaining to software licenses. |
| NETWORK | Displays messages pertaining to networks; the keyword CENTRAL must also be specified to inhibit network messages. |
| OPER1 to OPER12 | Displays messages sent to operators identified as OPER1 to OPER12. |
| PRINTER | Displays messages pertaining to print requests. |
| SECURITY | Allows messages pertaining to security events; requires SECURITY privilege. |
| TAPES | Allows messages pertaining to mounting and dismounting tape volumes. |
For example:
$ REPLY/ENABLE=(PRINTER,OPER3)
Disabling Operator Terminals
A terminal that you designate as an operator's terminal remains enabled even when the operator logs out. To return the terminal to normal (nonoperator) status, enter the REPLY/DISABLE command from the terminal.
Example
The following example designates terminal TTA3 as an operator terminal, enabling it to receive messages concerning printers, magnetic tapes and disks, and messages intended for the central operator. Later, it relinquishes terminal TTA3's ability to receive messages concerning tapes. The terminal still receives and can respond to messages about disks and printers and messages directed to CENTRAL.
$ REPLY/ENABLE=(PRINTER,DISKS,TAPES,CENTRAL)
$
%%%%%%%%%%%  OPCOM  13-JUL-1996 11:37:09.52  %%%%%%%%%%%
Operator TTA3 has been enabled, username SYSTEM

$
%%%%%%%%%%%  OPCOM  13-JUL-1996 11:37:09.53  %%%%%%%%%%%
Operator status for operator TTA3
CENTRAL, PRINTER, DISKS, TAPES
$ REPLY/DISABLE=TAPES
%%%%%%%%%%%  OPCOM  13-JUL-1996 11:37:09.53  %%%%%%%%%%%
Operator status for operator TTA3
CENTRAL, PRINTER, DISKS
$ REPLY/DISABLE
%%%%%%%%%%%  OPCOM  13-JUL-1996 11:38:50.68  %%%%%%%%%%%
Operator TTA3 has been disabled, username SYSTEM
2.4.6 Sending Requests to an Operator
In sites where operators are assigned to assist users by mounting
volumes and changing printer forms, users can communicate with
operators by entering the DCL command REQUEST and the following
qualifiers:
| Qualifier | Description |
|---|---|
| /REPLY | Sends a request and requests a reply to the message. Requests sent with this command are issued a unique identification number to which the operator sends the response. The user cannot enter any commands until the operator responds. |
| /TO=( operator[,...]) | If your facility is large, there may be several operators, each of whom has specific tasks. The /TO qualifier lets users send requests to a specific operator. Options are as follows: CARDS, CENTRAL, CLUSTER, DEVICES, DISKS, NETWORK, OPER1 to OPER12, PRINTER, SECURITY, TAPES. |
The DCL commands MOUNT/ASSIST and BACKUP/ASSIST also request operator assistance. For more information, see the following sections:
Example
An operator is monitoring an operator terminal enabled for the PRINTER class. The following PRINT command submits an output job that requires a special print form (/FORM=LETTER). The REQUEST command sends a message to the operator. After completing the request, the operator would send a reply, as explained in Section 2.4.7.
$ PRINT/COPIES=2/QUEUE=LQ_PRINT  REPORT.OUT/FORM=LETTER
Job REPORT (queue LQA1, entry 401) pending
$ REQUEST/REPLY/TO=PRINTER -
_$ "Have queued job 401 as FORM=LETTER;  can you print it?"
%OPCOM-S-OPRNOTIF, operator notified, waiting...10:42:16.10
%OPCOM-S-OPREPLY, AFTER 11:00
19-APR-1996 10:25:32.40, request 3 completed by operator OPA0
In sites where operators are assigned to assist users by mounting volumes and changing printer stock, operators can reply to user requests using the DCL command REPLY and the following qualifiers:
| Qualifier | Description |
|---|---|
| /ABORT= identification-number | Replies to the request specified by the identification number and cancels the request. |
| /PENDING= identification-number | Replies to the request specified by the identification number and prevents the user from entering other commands until the operator fulfills or aborts the request. The current terminal must be enabled as an operator terminal. |
| /STATUS | Reports which classes are enabled, and all outstanding user requests for the terminal from which this command was entered. The current terminal must be enabled as an operator terminal. |
| /TO= identification-number |
Replies to the request specified by the identification number and
completes the request. The current terminal must be enabled as an
operator terminal.
Note that you can also use a variation of the REPLY/TO command in response to a MOUNT/ASSIST and BACKUP/ASSIST commands. For more information, see Section 8.5.3 and Section 10.9.1. |
An operator working with magnetic tapes would also use additional REPLY qualifiers specific to magnetic tape operations. For more information, see Section 8.8.2.4. For detailed information on the REPLY command and its qualifiers, see the OpenVMS DCL Dictionary.
Example
In the following example, the REPLY/TO command replies to operator request number 5, issued by user ROBINSON. The MOUNT device is switched to DUA4, and the user is notified.
%%%%%%%%%%  OPCOM, 19-APR-1996 10:20:50.39  %%%%%%%%%%%
           request 5 from user ROBINSON
           Please mount volume GRAPHIC_FILES in device _DUA11:
           Shelf 4 - slot B
$ REPLY/TO=5 "SUBSTITUTE  DUA4"
On VAX systems, the command procedure SYS$UPDATE:VMSKITBLD.COM allows you to duplicate system files from an existing system disk on another disk.
On Alpha systems, procedures similar to those in the VMSKITBLD.COM procedure are performed by the AXPVMS$PCSI_INSTALL.COM procedure. See Section 3.1.2 and also the OpenVMS Alpha Version 7.1 Upgrade and Installation Manual.
The SYS$UPDATE:VMSKITBLD.COM procedure offers the following options:
| Option | Description | For More Information |
|---|---|---|
| BUILD | Builds a new common system disk after destroying all existing files on the disk. | Section 2.5.1 |
| COPY | Copies the operating system files to an existing disk without destroying nonsystem files that are currently on the disk. | Section 2.5.2 |
| ADD | Adds a new system root directory to an existing system disk. | Section 2.5.3 |
VMSKITBLD uses two disks:
| Disk | Description |
|---|---|
| Source disk | The disk from which you copy system files. The source disk must be an existing system disk. |
| Target disk | The disk to which you move the system files. |
Caution
Do not attempt to use VMSKITBLD with the current system disk as the target disk. VMSKITBLD.COM deletes files that are required for a running system.
At some point, you might want to create a new system disk. For example, suppose that your existing system disk is an RA81 disk. If you purchase a larger RA90 disk and want to use it as your system disk, you could use the VMSKITBLD BUILD option to build a new system disk on the RA90 disk.
The existing system disk is the source disk. The new disk is the target disk.
Caution
The VMSKITBLD BUILD option initializes the target disk, deleting all of its previous contents. For information on copying files to an existing system disk without destroying files, see Section 2.5.2.
If you want to build your operating system on another disk and you are not concerned about losing the current contents of the target disk, use the BUILD option as described in the following procedure.
How to Perform This Task
$ @SYS$UPDATE:VMSKITBLDVMSKITBLD prompts you to choose one of the following options:
* Operation [BUILD,ADD,COPY]?
* Enter mounted SOURCE disk name (ddcu:):
* Enter SOURCE disk top-level system directory [default = SYS0]:
* Enter TARGET disk name (ddcu:):
* Enter the TARGET disk's label [default = VAXVMSRL5]:
* Enter TARGET disk top-level system directory [default = SYS0]:
The target disk will be initialized.
* Target disk, _DUA0:, ready to be initialized? (Y/N): Y
Example
The following example runs VMSKITBLD.COM to build a new system disk. It copies the files on the current system disk to create a new system disk on the DUA0: disk.
* Enter mounted SOURCE disk name (ddcu:): SYS$SYSDEVICE:
* Enter SOURCE disk top level system directory [default = SYS0]: [Return]
* Enter TARGET disk name (ddcu:): DUA0: [Return]
* Enter the TARGET disk's label [default = VAXVMSRL5]: [Return]
* Enter TARGET disk top level system directory [default = SYS0]: [Return]
    The target disk will be initialized.
* Target disk, _DUA0:, ready to be initialized? (Y/N): Y
    Target disk, _DUA0:, has been initialized.
%MOUNT-I-MOUNTED, VAXVMSRL5   mounted on _DUA0:
    Creating system specific directories ...
    Creating cluster common directories ...
    Creating SYSGEN files ...
%SYSGEN-I-CREATED, _DUA0:<SYS0.SYSEXE>SWAPFILE.SYS;1 created
%SYSGEN-I-CREATED, _DUA0:<SYS0.SYSEXE>PAGEFILE.SYS;1 created
%SYSGEN-I-CREATED, _DUA0:<SYS0.SYSEXE>SYSDUMP.DMP;1 created
    Copying files from source disk ...
    Copying DECwindows file from source disk ...
    Writing a boot block ...
    System disk complete.
$
After you create a new system disk using the VMSKITBLD BUILD option, use the following procedure to complete the new system disk:
Example
SYSBOOT> USE DEFAULT
SYSBOOT> CONTINUE
   .
   .
   .
$ SET DEFAULT SYS$COMMON:[SYSEXE]
$ RUN AUTHORIZE
UAF> CREATE/RIGHTS
UAF> CREATE/PROXY
UAF> EXIT
$ @SYS$UPDATE:AUTOGEN SAVPARAMS REBOOT CHECK_FEEDBACK
   .
   .
   .
You can use VMSKITBLD to copy the operating system files to a target disk without deleting the files already existing on the target disk. For example, if you accidentally delete a large number of system files from a system disk, you can use VMSKITBLD to copy the system files from another system disk.
  6017P002.HTM
  OSSG Documentation
  22-NOV-1996 14:21:18.83
Copyright © Digital Equipment Corporation 1996. All Rights Reserved.