![[HR]](../../IMAGES/REDBAR.GIF)
The debugger creates dummy modules for each shareable image in your program. The names of these shareable image modules have the prefix SHARE$. The command SHOW MODULE/SHARE identifies these shareable image modules as well as the modules in the current image.
Once a shareable image module has been set with the SET MODULE command, you can access all of the image's universal symbols. For example, the following command lists all of the universal symbols in LIBRTL:
DBG> SHOW SYMBOL * IN SHARE$LIBRTL
   .
   .
   .
routine SHARE$LIBRTL\STR$APPEND
routine SHARE$LIBRTL\STR$DIVIDE
routine SHARE$LIBRTL\STR$ROUND
   .
   .
   .
routine SHARE$LIBRTL\LIB$WAIT
routine SHARE$LIBRTL\LIB$GETDVI
   .
   .
   .
You can then specify these universal symbols with, for example, the CALL or SET BREAK command.
Setting a shareable image module with the SET MODULE command loads the
universal symbols for that image into the run-time symbol table so that
you can reference these symbols from the current image. However, you
cannot reference other (local or global) symbols in that image from the
current image. That is, your debugging context remains set to the
current image.
5.4.3 Debugging Resident Images (Alpha Only)
A resident image is a shareable module that is created and installed in a particular way to enhance its efficiency. The requirements of creating such an image include linking the image without a symbol table, and running the image in system space. These requirements make such an image difficult to debug. The following procedure creates a resident image that can be more easily debugged.
$ CC/DEBUG/NOOPTIMIZE RESIDENTMODULE.C
$ LINK/NOTRACEBACK/SHAREABLE/SECTION_BINDING/DSF RESIDENTMODULE
$ CC/DEBUG/NOOPTIMIZE TESTPROGRAM
$ LINK/DSF TESTPROGRAM
$ COPY SYS$LIBRARY:RESIDENTMODULE.EXE []RESIDENTMODULE.EXE
$ DEFINE RESIDENTMODULE []RESIDENTMODULE
$ DEBUG/KEEP TESTPROGRAM
You should now have access to all debugging options for the executable and resident images.
The term source code refers to statements in a programming language as they appear in a source file. Each line of source code is also called a source line.
This chapter covers the following topics:
The techniques described in this chapter apply to screen mode as well as line (noscreen) mode. Any difference in behavior between line mode and screen mode is identified in this chapter and in the descriptions of the commands discussed. (Screen mode is described in Chapter 7.)
If your program has been optimized by the compiler, the code that is
executing as you debug might not always match your source code. See
Section 13.1 for more information.
6.1 How the Debugger Obtains Source Code Information
When a compiler processes source files to generate object modules, it assigns a line number to each source line sequentially. For most languages, each compilation unit (module) starts with line 1. For other languages like Ada, each source file, which might represent several compilation units, starts with line 1.
Line numbers appear in a source listing obtained with the /LIST compile-command qualifier. They also appear whenever the debugger displays source code, either in line mode or screen mode. Moreover, you can specify line numbers with several debugger commands (for example, TYPE and SET BREAK).
The debugger displays source lines only if you have specified the
/DEBUG command with both the compile command and the LINK command.
Under these conditions, the symbol information created by the compiler
and passed to the debug symbol table (DST) includes source-line
correlation records. For a given module, source-line correlation
records contain the full file specification of each source file that
contributes to that module. In addition, they associate source records
(symbols, types, and so on) with source files and line numbers in the
module.
6.2 Specifying the Location of Source Files
The debug symbol table (DST) contains the full file specification of each source file when it was compiled. By default, the debugger expects a source file to be in the same directory it was in at compile time. If a source file is moved to a different directory after it is compiled, the debugger does not find it and issues a warning such as the following when attempting to display source code from that file:
%DEBUG-W-UNAOPNSRC, unable to open source file DISK:[JONES.WORK]PRG.FOR;2
In such cases, use the SET SOURCE command to direct the debugger to the new directory. The command can be applied to all source files for your program or to only the source files for specific modules.
For example, after the following command line is entered, the debugger looks for all source files in WORK$:[JONES.PROG3]:
DBG> SET SOURCE WORK$:[JONES.PROG3]
You can specify a directory search list with the SET SOURCE command. For example, after the following command line is entered, the debugger looks for source files first in the current default directory ([]) and then in WORK$:[JONES.PROG3]:
DBG> SET SOURCE [], WORK$:[JONES.PROG3]
If you want to apply the SET SOURCE command only to the source files for a given module, use the /MODULE=module-name qualifier and specify that module. For example, the following command line specifies that the source files for module SCREEN_IO are in the directory DISK2:[SMITH.SHARE] (the search of source files for other modules is not affected by this command):
DBG> SET SOURCE/MODULE=SCREEN_IO DISK2:[SMITH.SHARE]
To summarize, the SET SOURCE/MODULE command specifies the location of source files for a particular module, but the SET SOURCE command specifies the location of source files for modules that were not mentioned explicitly in SET SOURCE/MODULE commands.
When you enter a SET SOURCE command, be aware that one of the two qualifiers, /LATEST or /EXACT, will always be active. The /LATEST qualifier directs the debugger to search for the latest version of your source files (the highest-numbered version in your directory). The /EXACT qualifier, the default, directs the debugger to search for the version last compiled (the version recorded in the debugger symbol table created at compile time). For example, A SET SOURCE/LATEST command might search for SORT.FOR;3 while a SET SOURCE/EXACT command might search for SORT.FOR;1.
Use the SHOW SOURCE command to display all source directory search lists currently in effect. The command displays the search lists for specific modules (as previously established by one or more SET SOURCE/MODULE commands) and the search list for all other modules (as previously established by a SET SOURCE command). For example:
DBG> SET SOURCE [PROJA],[PROJB],USER$:[PETER.PROJC]
DBG> SET SOURCE/MODULE=COBOLTEST [], DISK$2:[PROJD]
DBG> SHOW SOURCE
source directory search list for COBOLTEST:
        []
        DISK$2:[PROJD]
source directory search list for all other modules:
        [PROJA]
        [PROJB]
        USER$:[PETER.PROJC]
DBG>
If no SET SOURCE or SET SOURCE/MODULE command has been entered, the SHOW SOURCE command indicates that no search list is currently in effect.
Use the CANCEL SOURCE command to cancel the effect of a previous SET SOURCE command. Use the CANCEL SOURCE/MODULE command to cancel the effect of a previous SET SOURCE/MODULE command (specifying the same module name).
When a source directory search list has been canceled, the debugger again expects the source files corresponding to the designated modules to be in the same directories they were in at compile time.
For more information about how the debugger locates source files that
have been moved to another directory after compile time, see the
SET SOURCE command.
6.3 Displaying Source Code by Specifying Line Numbers
The TYPE command enables you to display source lines by specifying compiler-assigned line numbers, where each line number designates a line of source code.
For example, the following command displays line 160 and lines 22 to 24 of the module being debugged:
DBG> TYPE 160, 22:24
module COBOLTEST
   160: START-IT-PARA.
module COBOLTEST
    22: 02      SC2V2   PIC S99V99      COMP VALUE  22.33.
    23: 02      SC2V2N  PIC S99V99      COMP VALUE -22.33.
    24: 02      CPP2    PIC PP99        COMP VALUE  0.0012.
DBG>
You can display all the source lines of a module by specifying a range of line numbers starting from 1 and ending at a number equal to or greater than the largest line number in the module.
After displaying a source line, you can display the next line in that module by entering a TYPE command without a line number---that is, by entering a TYPE command and then pressing the Return key. For example:
DBG> TYPE 160
module COBOLTEST
   160: START-IT-PARA.
DBG> TYPE
module COBOLTEST
   161:         MOVE SC1 TO ES0.
DBG>
You can then display the next line and successive lines by entering the TYPE command repeatedly, which lets you read through your code one line at a time.
To display source lines in an arbitrary module of your program, specify the module name with the line numbers. Use standard pathname notation---that is, first specify the module name, then a backslash (\), and finally the line numbers (or the range of line numbers) without intervening spaces. For example, the following command displays line 16 of module TEST:
DBG> TYPE TEST\16
If you specify a module name with the TYPE command, the module must be set. Use the SHOW MODULE command to determine whether a particular module is set. Then use the SET MODULE command, if necessary (see Section 5.2).
If you do not specify a module name with the TYPE command, the debugger displays source lines for the module in which execution is currently paused by default---that is, the module associated with the PC scope. If you have specified another scope with the SET SCOPE command, the debugger displays source lines in the module associated with the specified scope.
In screen mode, the output of a TYPE command updates the current source display (see Section 7.2.6).
After displaying source lines at various locations in your program, you
can redisplay the line at which execution is currently paused by
pressing KP5.
6.4 Displaying Source Code by Specifying Code Address Expressions
The EXAMINE/SOURCE command enables you to display the source line corresponding to a code address expression. A code address expression denotes the address of a machine-code instruction and, therefore, must be one of the following:
You cannot specify a variable name with the EXAMINE/SOURCE command, because a variable name is associated with data, not with instructions.
When you use the EXAMINE/SOURCE command, the debugger evaluates the address expression to obtain a memory address, determines which compiler-assigned line number corresponds to that address, and then displays the source line designated by the line number.
For example, the following command line displays the source line associated with the address (declaration) of routine SWAP:
DBG> EXAMINE/SOURCE SWAP
module MAIN
    47:  procedure SWAP(X,Y: in out INTEGER) is
DBG>
If you specify a line number that is not associated with an instruction, the debugger issues a diagnostic message. For example:
DBG> EXAMINE/SOURCE %LINE 6
%DEBUG-I-LINEINFO, no line 6, previous line is 5, next line is 8
%DEBUG-E-NOSYMBOL, symbol '%LINE 6' is not in the symbol table
DBG>
When using the EXAMINE/SOURCE command with a symbolic address expression (a line number, label, or routine), you might need to set the module in which the entity is defined, unless that module is already set. Use the SHOW MODULE command to determine whether a particular module is set. Then, if necessary, use the SET MODULE command (see Section 5.2).
The command EXAMINE/SOURCE .%PC displays the source line corresponding to the current PC value (the line that is about to be executed). For example:
DBG> EXAMINE/SOURCE .%PC
module COBOLTEST
   162:         DISPLAY ES0.
DBG>
Note the use of the contents-of operator (.), which specifies the contents of the entity that follows the period. If you do not use the contents-of operator, the debugger tries to find a source line for the PC rather than for the address currently stored in the PC:
DBG> EXAMINE/SOURCE %PC
%DEBUG-W-NOSRCLIN, no source line for address 7FFF005C
DBG>
The following example shows the use of a numeric path name (1\) to display the source line at the PC value one level down the call stack (at the call to the routine in which execution is paused):
DBG> EXAMINE/SOURCE .1\%PC
In screen mode, the output of an EXAMINE/SOURCE command updates the current source display (see Section 7.2.6).
The debugger uses the EXAMINE/SOURCE command in the following contexts to display source code at the current PC value.
Keypad key 5 (KP5) is bound to the following debugger command sequence:
EXAMINE/SOURCE .%SOURCE_SCOPE\%PC; EXAMINE/INST .%INST_SCOPE\%PC
This command sequence displays the source line and the instruction at which execution is currently paused in the current scope. Pressing KP5 enables you to quickly determine your debugging context.
The predefined source display SRC is an automatically updated display that executes the following built-in command every time the debugger interrupts execution and prompts for commands (see Section 7.4.1):
EXAMINE/SOURCE .%SOURCE_SCOPE\%PC
The SEARCH command enables you to display any source lines that contain an occurrence of a specified string.
The syntax of the SEARCH command is as follows:
SEARCH[/qualifier[, ...]] [range] [string]
The range parameter can be a module name, a range of line numbers, or a combination of both. If you do not specify a module name, the debugger uses the current scope to find source lines, as with the TYPE command (see Section 6.3).
By default, the SEARCH command displays the source line that contains the first (next) occurrence of a string in a specified range (SEARCH/NEXT). The command SEARCH/ALL displays all source lines that contain an occurrence of a string in a specified range. For example, the following command line displays the source line that contains the first occurrence of the string pro in module SCREEN_IO:
DBG> SEARCH SCREEN_IO pro
The remaining examples use source lines from one COBOL module, in the current scope, to show various aspects of the SEARCH command.
The following command line displays all source lines within lines 40 to 50 that contain an occurrence of the string D:
DBG> SEARCH/ALL 40:50 D
module COBOLTEST
    40: 02      D2N     COMP-2 VALUE -234560000000.
    41: 02      D       COMP-2 VALUE  222222.33.
    42: 02      DN      COMP-2 VALUE -222222.333333.
    47: 02      DR0     COMP-2 VALUE  0.1.
    48: 02      DR5     COMP-2 VALUE  0.000001.
    49: 02      DR10    COMP-2 VALUE  0.00000000001.
    50: 02      DR15    COMP-2 VALUE  0.0000000000000001.
DBG>
After you have found an occurrence of a string in a particular module, you can enter the SEARCH command with no parameters to display the source line containing the next occurrence of the same string in the same module. This is similar to using the TYPE command without a parameter to display the next source line. For example:
DBG> SEARCH 42:50 D
module COBOLTEST
    42: 02      DN      COMP-2 VALUE -222222.333333.
DBG> SEARCH
module COBOLTEST
    47: 02      DR0     COMP-2 VALUE  0.1.
DBG>
By default, the debugger searches for a string as specified and does not interpret the context surrounding an occurrence of the string (this is the behavior of SEARCH/STRING). If you want to locate occurrences of a string that is an identifier in your program (for example, a variable name) and exclude other occurrences of the string, use the /IDENTIFIER qualifier. The command SEARCH/IDENTIFIER displays only those occurrences of the string that are bounded on either side by a character that cannot be part of an identifier in the current language.
The default qualifiers for the SEARCH command are /NEXT and /STRING. If you want to establish different default qualifiers, use the SET SEARCH command. For example, after the following command is executed, the SEARCH command behaves like SEARCH/IDENTIFIER:
DBG> SET SEARCH IDENTIFIER
Use the SHOW SEARCH command to display the default qualifiers currently in effect for the SEARCH command. For example:
DBG> SHOW SEARCH
search settings: search for next occurrence, as an identifier
DBG>
By default, the debugger displays the associated source line when a breakpoint, tracepoint, or watchpoint is triggered and upon the completion of a STEP command.
When you enter a STEP command, the debugger displays the source line at which execution is paused after the step. For example:
DBG> STEP
stepped to MAIN\%LINE 16
    16:        RANGE := 500;
DBG>
When a breakpoint or tracepoint is triggered, the debugger displays the source line at the breakpoint or tracepoint, respectively. For example:
DBG> SET BREAK SWAP
DBG> GO
   .
   .
   .
break at MAIN\SWAP
    47: procedure SWAP(X,Y: in out INTEGER) is
DBG>
When a watchpoint is triggered, the debugger displays the source line corresponding to the instruction that caused the watchpoint to be triggered.
The SET STEP [NO]SOURCE command enables you to control the display of source code after a step and at breakpoints, tracepoints, and watchpoints. SET STEP SOURCE, the default, enables source display. SET STEP NOSOURCE suppresses source display. For example:
DBG> SET STEP NOSOURCE
DBG> STEP
stepped to MAIN\%LINE 16
DBG> SET BREAK SWAP
DBG> GO
   .
   .
   .
break at MAIN\SWAP
DBG>
You can selectively override the effect of a SET STEP SOURCE command or a SET STEP NOSOURCE command by using the qualifiers /SOURCE and /NOSOURCE with the STEP, SET BREAK, SET TRACE, and SET WATCH commands.
The STEP/SOURCE command overrides the effect of the SET STEP NOSOURCE command, but only for the duration of that STEP command (similarly, STEP/NOSOURCE overrides the effect of SET STEP SOURCE for the duration of that STEP command). For example:
DBG> SET STEP NOSOURCE
DBG> STEP/SOURCE
stepped to MAIN\%LINE 16
    16:        RANGE := 500;
DBG>
The SET BREAK/SOURCE command overrides the effect of the SET STEP NOSOURCE command, but only for the breakpoint set with that SET BREAK command (similarly, SET BREAK/NOSOURCE overrides the effect of SET STEP SOURCE for the breakpoint set with that SET BREAK command). The same conventions apply to the SET TRACE and SET WATCH commands. For example:
DBG> SET STEP SOURCE
DBG> SET BREAK/NOSOURCE SWAP
DBG> GO
   .
   .
   .
break at MAIN\SWAP
DBG>
The SET MARGINS command enables you to specify the leftmost and rightmost source-line character positions at which to begin and end the display of a source line (respectively, the left and right margins). This is useful for controlling the display of source code when, for example, the code is deeply indented or long lines wrap at the right margin. In such cases, you can set the left margin to eliminate indented space in the source display, and you can decrease the right margin setting to truncate lines and prevent them from wrapping.
For example, the following command line sets the left margin to column 20 and the right margin to column 35.
DBG> SET MARGINS 20:35
Subsequently, only that portion of the source code that is between columns 20 and 35 is displayed when you enter commands that display source lines (for example, TYPE, SEARCH, STEP). Use the SHOW MARGINS command to identify the current margin settings for the display of source lines.
Note that the SET MARGINS command affects only the display of source lines. It does not affect the display of other debugger output (for example, output from an EXAMINE command).
The SET MARGINS command is useful mostly in line (noscreen) mode. In screen mode, the SET MARGINS command has no effect on the display of source lines in a source display, such as the predefined display SRC.
Screen mode is an enhancement to the command line interface of the OpenVMS debugger that enables you to simultaneously display separate groups of data about the debugging session, in a manner similar to that available with the DECwindows Motif interface (see Part 3). For example, you can display source code in one portion of the screen, register contents in a different portion, debugger output in another portion, and so on.
To invoke screen mode, press PF3 on the keypad (or enter the SET MODE SCREEN command). To return to line-oriented debugging, press PF1 PF3 (or enter the SET MODE NOSCREEN command).
Note
Note that you cannot enter screen mode from within the DECWindows Motif interface to the debugger.
Screen mode output is best displayed on VT-series terminals with higher numbers than VT52, and on workstations running VWS. The larger screen of workstations is particularly suitable to using a number of displays for different purposes.
This chapter covers the following topics:
Many screen mode commands are bound to keypad keys. For key definitions, see Appendix A.
Note
This chapter provides information common to programs that run in one or several processes. See Chapter 14 for additional information specific to multiprocess programs.
A display is a group of text lines. The text can be lines from a source file, assembly-language instructions, the values contained in registers, your input to the debugger, debugger output, or program input and output.
You view a display through its display window, which can occupy any rectangular area of the screen. Because a display window is typically smaller than the associated display, you can scroll the display window up, down, right, and left across the display text to view any part of the display.
Figure 7-1 is an example of screen mode that shows three display windows. The name of each display (SRC, OUT, and PROMPT) appears at the top left corner of its display window. The display name serves both as a tag on the display itself and as a name for future reference in commands.
Figure 7-1 Default Screen Mode Display Configuration
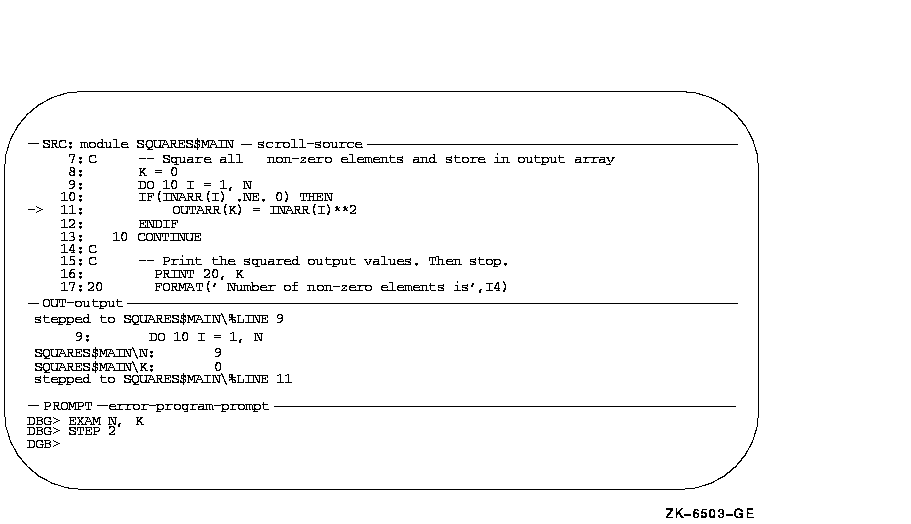
Figure 7-1 is the default display configuration established when you first invoke screen mode. SRC, OUT, and PROMPT are three of the predefined displays that the debugger provides when you enter screen mode (see Section 7.4). You can modify the configuration of these displays as well as create additional displays.
Displays SRC, OUT, and PROMPT have the following basic characteristics:
Conceptually, displays are placed on the screen as on a pasteboard. The display most recently referenced by a command is put on top of the pasteboard by default. Therefore, depending on their screen locations, display windows that you have referenced recently might overlay or hide other display windows.
  4538P010.HTM
  OSSG Documentation
  22-NOV-1996 13:01:44.81
Copyright © Digital Equipment Corporation 1996. All Rights Reserved.