![[HR]](../../IMAGES/REDBAR.GIF)
The PURGE command removes the SETcommand for a parameter from the private script file. The PURGE ALLcommand removes the entire object.
The NCP Emulator does not support the NCP PURGE KNOWN command.
Because the PURGEcommand operates only on the NCP Emulator private command file, use NET$CONFIGUREto purge objects from the standard system applicationsor mop clients scripts (SYS$MANAGER:NET$APPLICATION_STARTUP.NCL and SYS$MANAGER:NET$MOP_CLIENT_STARTUP.NCL).
TELL Command
The TELL command functions as it does in DECnet Phase IV, allowing you to remotely manage Phase IV nodes. For more information on how to remotely manage Phase IV nodes by using the NCP Emulator, see Section 2.3.4.
SET EXECUTOR NODE Command
The SET EXECUTOR NODE command works as expected for managing
Phase IV nodes.
2.3.2 Information About Supported NCP Components
The NCP Emulator supports all NCP components except the following:
If you attempt an operation with one of these unsupported components, you will receive the %NCP-W-UNRCMPerror message or, with the AREA or LINKS components, a message stating that no information exists for these components in the database.
The remainder of this section includes special notes about the supported NCP components.
EXECUTOR Component
The NCP Emulator supports only the SHOW and LIST commands with the EXECUTOR component. It does not change or clear any EXECUTOR parameters.
The only relevant EXECUTORparameters are NAMEand ADDRESS. The Identification displayed with the SHOW EXECUTORcommand indicates that the node is DECnet-Plus, but the executor type is displayed as "nonrouting IV."
NODE Component
The DECnet Phase IV NODE component usually corresponds to the NCL mop client entity, since a product installation usually requires that type of information. You can reference a node by name, which results in a look-up in the mop clientdatabase. If the NCP Emulator does not find a name, it checks DECdns for a node synonym with that name and the corresponding DECnet Phase IV address.
If you refer to a node by node number, the NCP Emulator first searches the mop clientdatabase for a client with a PHASE IV CLIENT ADDRESSattribute matching the specified node address. If it finds a client with a matching address, the corresponding client name becomes the node name. If the emulator does not find a matching address, it then searches for a client that has, as one of its ADDRESSESattributes, an address that begins with AA-00-04-00and translates to the specified address. If it still cannot find a matching address, the emulator uses DECdns. Because referencing nodes by address is not efficient, Digital recommends that you avoid doing so.
With the NCP Emulator, KNOWN NODES refers to all NCL mop client entities. The NCP Emulator maps MOP-related parameters only. For example, it maps the following DECnet Phase IV SET NODE command parameters to the corresponding NCL mop client attributes:
DECnet Phase IV node parameters such as ACCESS and COUNTER TIMER have nothing to do with NCL MOP, so they are ignored during the translation from NCP to NCL.
The NCP Emulator does not attempt to set, clear, purge, or define any other parameter. Permanent database operations (DEFINE, PURGE, SET ALL) manipulate the file SYS$MANAGER:NET$NCP_MOP_CLIENTS.COM.
OBJECT Component
The NCP OBJECT component maps to the NCL session control applications entity. The permanent database for objects is SYS$MANAGER:NET$NCP_APPLICATIONS.COM.
CIRCUIT Component
The NCP CIRCUIT component refers to the NCL csma-cd station and mop circuit entities. The SHOW KNOWN CIRCUITS command will list all of the csma-cd station entities currently configured.
Only two circuit characteristics are used by the NCP Emulator: STATE and SERVICE. The STATE characteristic determines whether MOP will service requests from that circuit. It is determined by the csma-cd station stateattribute. The NCP Emulator can change the STATEparameter from Off to On but not from On to Off.
The SERVICEparameter indicates whether a mop circuit exists and whether the service is enabled. The parameter also is used to enable or disable the service, such as with the NCP SET CIRCUIT SERVICE ENABLED command.
The NCP Emulator uses the mop circuit entity that is linked to the datalink circuit.
Circuit names are always of the form "ddd-u", where "ddd" indicates the device type (such as SVA and BNA) and "u" indicates the controller (0 or 1, for example).
The naming scheme is the same scheme used with NCP. The NCP Emulator attempts to translate a circuit name to the correct csma-cd stationand mop circuit, regardless of their actual names used with NCL. For example, the circuit name SVA-0 translates to the station whose COMMUNICATIONS PORT attribute is "ESA" and to the mop circuitwhose LINK NAME attribute refers to the station with "ESA". The name BNA-1 translates to the station with "ETB."
Enabling the SERVICEparameter on a circuit first creates (if necessary) the appropriate csma-cd station and/or mop circuit, and then enables the LOAD SERVER, DUMP SERVER, and CONSOLE REQUESTERfunctions on the mop circuit. Disabling SERVICE disables the same functions on the mop circuit.
The circuits command procedure is
SYS$MANAGER:NET$NCP_MOP_CIRCUITS.COM.
2.3.3 Running the NCP Emulator on Your System
Use the following command to run the NCP Emulator. The NCP Emulator will prompt you for an NCP command, as shown in the following example:
$ run sys$system:ncp
NCP>
You can use the NCP Emulator tool to manage remote Phase IV nodes with the TELL and SET EXECUTOR NODEcommands. For example, to zero EXECUTOR counters on a remote Phase IV node from a local Phase V node, enter the following commands:
$ run sys$system:ncp
NCP> tell remnod"account password" zero exec counters
The NCP Emulator tool is not intended for management of Phase V nodes. The following error is returned when an NCP Emulator command is attempted on a Phase V system without specifying a remote Phase IV system:
NCP> zero exec counters
%NCP-W-SYSMGT, System-specific management function not supported
Before you begin to change your network's configuration, make sure you have a clear picture of the network's current topology. Two decnet_migrate commands, collect and report, gather and organize information about the DECnet Phase IV and Phase V nodes and connections in your network. A third command, show path, displays the possible paths that node-to-node communication might take through the network, helping to determine what effect the transition has had on the network's communication paths.
Note
You need network management privileges that allow you to display information for each remote node in the network, so the collect and show path commands can gather information from the nodes. You also need the same privilege for the local node.
The collect and show path commands operate by sending network management requests. They use the Network Information and Control Exchange (NICE) Protocol and the Digital Network Architecture Common Management Information Protocol (DNA CMIP); they do not use the Simple Network Management Protocol (SNMP). The collect and show path commands can succeed only when the nodes are able to respond to either NICE or DNA CMIP network management requests. The commands do not work, for example, if the nodes respond only to SNMP requests.
For collect, if an area contains both routers that do and do not respond to NICE or DNA CMIP requests, you can collect information about the area by using the area=node:node_name parameter and specifying the node name of a router that does respond to NICE or DNA CMIP requests.
This use of the area parameter is useful when an area contains only a few routers, such as cluster alias routers, that respond to NICE or DNA CMIP. The collected data will not, however, contain information on nodes that do not respond to NICE or DNA CMIP requests, other than their network addresses. Invoke decnet_migrate on OpenVMS systems by entering the following command:
$ run sys$update:decnet_migrate
The following example shows how to collect and report information about your network configuration:
decnet_migrate> collect data_file (1)
decnet_migrate> report report_file data=data_file (2)
The following example shows how to use the show path command:
decnet_migrate> show path from node-name to node-name
For more information and an example output of the collect,
report, and show path commands and their associated
parameters, see Appendix D.
3.2 Determining the DECnet Version of Your System
Either DECnet Phase IV or DECnet-Plus for OpenVMS (Phase V; Alpha or VAX) can run on a particular system; thus, you cannot use the OpenVMS version to determine which software version is running. Instead, an item code for the $GETSYI system service (DECNET_VERSION) shows the version of DECnet that is running. The system cell containing the setting of this value is set by SYS$NETWORK_SERVICES when the system boots. You can read the value directly with a program or through the F$GETSYI lexical function with a command procedure. The DECNET_VERSION item has the following format:
To distinguish Phase IV from DECnet-Plus for OpenVMS, use DEC Version (byte 2).
For example, the lexical function F$GETSYI("decnet_version") returns the value %X00040000 for a system running Phase IV. DECnet/OSI for OpenVMS Version 6.3 returns %X00050902.
Any program or command procedure that requires different execution based on the DECnet version should check DECNET_VERSION.
The format of the version longword is as follows:
 |Reserved|DEC Major|DEC Minor|User ECO|
 31                                    0
| OpenVMS Alpha and VAX Version 6.1 and Version 6.2 | |
|---|---|
| 00050902 | DECnet/OSI Version 6.3 (+ ECO 2) |
| OpenVMS Alpha Version 7.0 | |
| 00050B01 | DECnet/OSI Version 7.0A MUP |
| OpenVMS VAX Version 7.0 | |
| 00050B00 | DECnet/OSI Version 7.0 |
| 00050B02 | DECnet/OSI Version 7.0 (+ ECO 2) |
| OpenVMS Alpha Version 7.1 | |
| 00050C00 | DECnet-Plus Version 7.1 |
| OpenVMS VAX Version 7.1 | |
| 00050C00 | DECnet-Plus Version 7.1 |
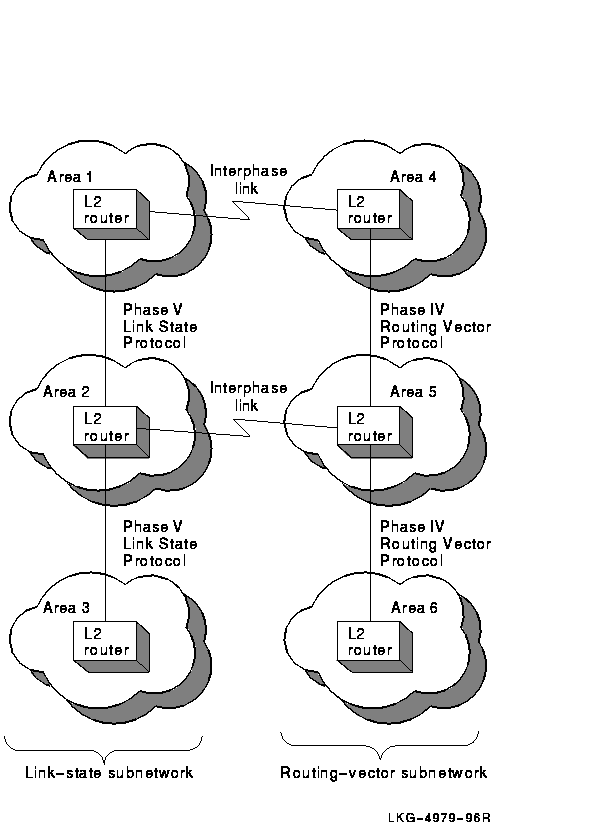
DECnet Phase IV routers and DECnet-Plus host-based routers use a routing vector protocol to relay messages and exchange routing information. DECnet Phase V routing also features a link state routing protocol. These two protocols can coexist in the network.
All routers within an area must use the same routing protocol at level 1. However, DECnet Phase V allows level 2 routers to run either a routing vector or a link state protocol at level 2. Routers running different protocols at level 2 can communicate through interphase links. An interphase link directly connects a level 2 router using a routing vector protocol with a level 2 router using a link state protocol. DECnet Phase V routers running link state use manually configured reachable-address tables to route information across these interphase links.
Note
Interphase links require the two areas connected by the interphase link to have different area numbers.
You can set up interphase links in one of two ways: use the WANrouter (or DECNIS) configuration program, as described in your router documentation, or use the decnet_migrate tool's create ipl_initialization_file command, as described in this chapter. Choose only one method, following these guidelines:
Invoke decnet_migrate on an OpenVMS system by entering the following command:
$ run sys$update:decnet_migrate
The following example shows how to create a command file that creates interphase link entries:
decnet_migrate> create ipl_initialization_file output-file (1) for
node-name (2)
For more information about the create ipl_initialization_file
command, see Appendix D. The following sections provide more
information about setting up interphase links.
4.2 Configurations That Do Not Require Manually Created Interphase Links
The simplest configuration that connects DECnet Phase V link-state subnetworks to Phase IV routing-vector subnetworks is one in which only two subnetworks are connected, with only one area in each subnetwork, as shown in Figure 4-1.
Figure 4-1 Configuration with Adjacent Areas
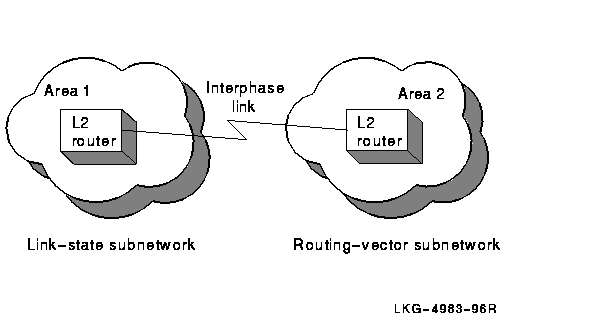
In this case, you are not required to manually create the interphase
link because the adjacent areas automatically configure to each other.
4.3 Configurations That Require Manually Created Interphase Links
If either subnetwork contains more than one area, or if multiple subnetworks are interconnected, you must create interphase links to provide routing information about the nonadjacent areas.
For small networks (for example, with three or four areas), you can enter the interphase link information into the reachable-address tables using the appropriate router configuration tools. For details, see the management documentation for your router.
For larger networks, you can use the create ipl_initialization_file command to create a DCL command file on an OpenVMS system. When executed, the command file creates interphase link entries in the reachable-address table on the target DECnet Phase V level 2 router. Whenever the level 2 network configuration changes, Digital recommends that you use the create ipl_initialization_file command for every DECnet Phase V level 2 router that has interphase links.
Figure 4-2 shows a level 2 network configuration that requires manually created interphase links, because areas 2 and 4 are nonadjacent and, therefore, do not exchange routing information.
Figure 4-2 Configuration Requiring Manually Created Interphase Links
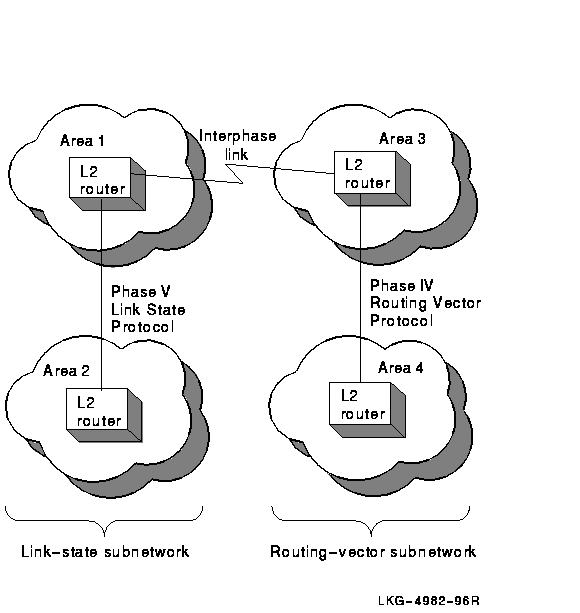
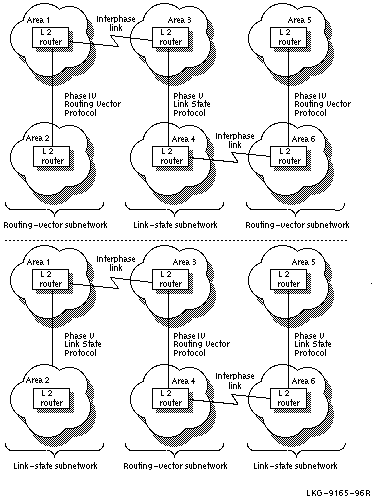
If your network configuration consists of multiple Phase IV routing-vector subnetworks connected by DECnet Phase V link-state subnetworks, you must run the create ipl_initialization_file command multiple times. Each time, specify the DECnet Phase V link-state level 2 router that needs interphase links. The same is true for networks that consist of multiple DECnet Phase V link-state subnetworks connected by Phase IV routing-vector subnetworks. Figure 4-3 shows two examples of these configurations.
Figure 4-3 Two Configurations with Multiple Interphase Links
If you use the create ipl_initialization_file command only once for each target router, the routing information created in the target routers' reachable-address tables is incomplete. It is incomplete because not all area routing information is available to each target router at the time the command is run. Information about nonadjacent areas becomes available only after you run the command file, created by the create ipl_initialization_file command.
For configurations with multiple interphase links, the simplest way to guarantee that routers have all required interphase links is to:
After you complete these steps, routing information for every area is
available to every level 2 router in the network.
4.5 Configurations with Multiple Interphase Links Between Two Subnetworks
You can use either a single interphase link or multiple interphase links to connect two subnetworks. This section discusses the advantages and disadvantages of both methods. Figure 4-4 shows the use of a single interphase link.
Figure 4-4 Single Interphase Link Between Two Subnetworks
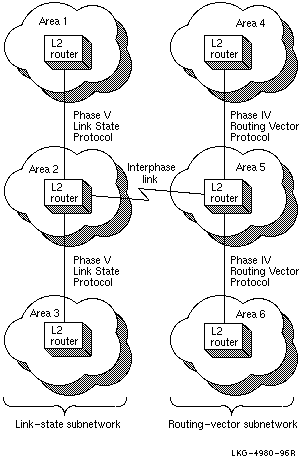
The advantage of the configuration shown in Figure 4-4 is that it is easier to diagnose connectivity problems. The disadvantage is that it makes possible a single point of failure between the subnetworks.
You can use multiple interphase links to provide communication path redundancy between the subnetworks, as shown in Figure 4-5.
Figure 4-5 Multiple Interphase Links Between Two Subnetworks
In Figure 4-5, the configuration solves the problem of having a single point of failure, but it can result in areas being unreachable even though there is a physical path that could be used. This makes connectivity problems more difficult to diagnose.
For example, in Figure 4-5, if the lowest cost path from area 1 to
area 5 is through area 4, and the circuits connecting area 4 to area 5
go down, messages from area 1 to area 5 are still sent to area 4. This
is because area 1 cannot detect the loss of connectivity between areas
4 and 5. Therefore, area 1 continues to send these messages through
area 4 rather than through area 2, because the path through area 4 is
the lowest cost path to area 5, but the messages never reach area 5.
4.6 Special Considerations Regarding Network Costs
When the create ipl_initialization_file command gathers the information about which areas exist and which paths to use to reach those areas, it also calculates the cost associated with each path. A network cost is then associated with each interphase link in the reachable-address table.
A restriction is built into the reachable-address tables regarding network cost. Costs of 63 or more cannot be included in the table. If a path has a network cost of 63 or greater, when you run the create ipl_initialization_file command, the commands to create the interphase link for that path are included in the command file as comments. When you run the command file, that path will not be entered into the reachable-address table.
You can, however, edit the output_file_cre command file on OpenVMS to change the network cost values. You must have a clear picture of your network topology to be able to make good decisions about modifying network cost values.
Refer to your router management documentation for more information about network costs.
This chapter covers the following topics:
For storing name and address information, DECnet Phase V supports the local namespace, the DECdns distributed namespace, and the Domain Name System (DNS/BIND) distributed namespace. DECnet Phase V uses one or more of these namespaces to look up name or address information. The order in which DECnet Phase V searches the available namespaces is determined by the naming search path. The naming search path is set up during DECnet configuration. The naming search path applies to DECnet applications systemwide.
The ordering of the name services is important. The first name service listed is the primary name service to use on the system. The primary name service is the first choice used when looking up names and addressing information. The remaining name services listed are the secondary name services used on the system.
Note that the search path information for a system is maintained in two separate search paths:
Note
DECdns servers must be configured to use DECdns as the primary name service.
5.1.1 Determining the Order for Name Service Searches
On OpenVMS systems, the system administrator uses
NET$CONFIGURE to configure DECnet-Plus and set up one or more
naming services for a node. From the information provided by the system
administrator, NET$CONFIGURE creates the
NET$SEARCHPATH_STARTUP.NCL script, which contains the naming
search path information for the node. For example, if the system
administrator chose the ordered list of LOCAL,DECDNS,DOMAINfor
the directory services at configuration time, then DECnet-Plus searches
the local namespace first for forward and back translation information.
If necessary, it will then search the DECdns namespace specified in the
node's DECdns name. Finally, if it still has not successfully obtained
the translation information, it will use the Domain Name System.
  PROFILE_VMS_002.HTML
  OSSG Documentation
   2-DEC-1996 12:34:48.86
Copyright © Digital Equipment Corporation 1996. All Rights Reserved.