![[HR]](../../IMAGES/REDBAR.GIF)
SHOW CLUSTER information includes approximately 100 fields of data. You can customize the appearance of SHOW CLUSTER reports or define reports for access to often-needed data.
SHOW CLUSTER reports are organized by classes and fields:
You can add fields or classes to the default SHOW CLUSTER report. If you add a field or class to a report in a continuous display, SHOW CLUSTER automatically adds the new data to the display.
Figure 20-1 shows a sample default SHOW CLUSTER report. The default report has two classes of information: SYSTEMS and MEMBERS. Below each class name are columns of fields that are associated with each class of information.
Figure 20-1 SHOW CLUSTER Default Display
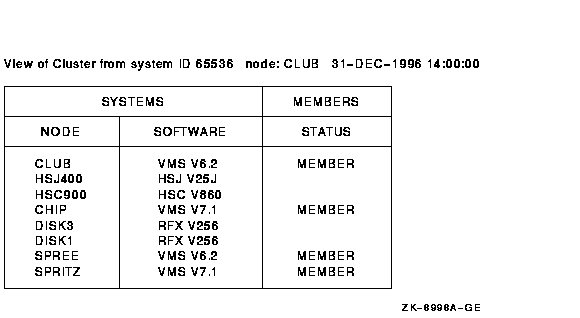
Table 20-1 briefly describes the fields shown in Figure 20-1.
| Field Name | Description |
|---|---|
| NODE | Node name of the remote system. Normally, the cluster manager sets the node name using the system parameter SCSNODE. The node name should be the same as the DECnet for OpenVMS node name. |
| SOFTWARE | Name and version of the operating system currently running on the remote system. |
| STATUS | Status of the node in the cluster. (MEMBER indicates that the system is participating in the cluster.) |
Over time, you can determine the most valuable classes and fields of data for your SHOW CLUSTER reports; you can then create a startup initialization file that establishes your default report formats. You can also build command procedures to use while running SHOW CLUSTER interactively. In this way, you can quickly reformat the report to show the data that is relevant for your installation. Startup initialization files and command procedures are explained later in this chapter.
Because SHOW CLUSTER information includes many fields of data, the report can quickly extend beyond screen limits. Therefore, SHOW CLUSTER provides mechanisms to help you control the display of data, including the following:
These mechanisms are described in detail in the OpenVMS System Management Utilities Reference Manual.
20.3.2 Beginning to Use SHOW CLUSTER Commands
To use the Show Cluster utility, enter the SHOW CLUSTER command. If you specify the command without any qualifiers, however, SHOW CLUSTER simply displays a default report like that shown in Figure 20-1 and then displays the DCL prompt.
In a continuous display, on the other hand, you can enter SHOW CLUSTER commands to control report output. You can, for example, add classes or fields to, or remove classes or fields from, reports. To invoke a continuous display, in which you can enter SHOW CLUSTER commands, use the /CONTINUOUS qualifier on the SHOW CLUSTER command. (SHOW CLUSTER command qualifiers are described in Section 20.3.2.3.)
How to Perform This Task
To invoke a continuous display of default SHOW CLUSTER report information, enter the following command:
$ SHOW CLUSTER/CONTINUOUS
SHOW CLUSTER then displays a default report. By default, SHOW CLUSTER updates the display every 15 seconds, with the changed data displayed in reverse video. After the default report, SHOW CLUSTER displays the following prompt:
Command>
(If the report extends below the limit of your terminal screen and you do not see the Command> prompt, you can press Return to display the prompt.)
The following sections contain instructions for performing beginning SHOW CLUSTER tasks:
| Task | Section |
|---|---|
| Viewing information that is off the screen | Section 20.3.2.1 |
| Exiting from a continuous display | Section 20.3.2.2 |
| Using SHOW CLUSTER qualifiers | Section 20.3.2.3 |
The PAN command allows you to view the entire display by shifting your view of the display by column (horizontally) or by line (vertically).
Note
Report headings also move out of view as the reports in the display are panned beyond the limits of the screen. The SCROLL command, which is explained in Section 20.3.5.4, preserves the headings as you scroll information. To use the SCROLL command, you must take the additional step of selecting a report if you have more than one report on the screen.
How to Perform This Task
To pan the display, do one of the following:
Command> PAN DOWN 10
Command> SET FUNCTION PAN
| Arrow Key | Redefinition |
|---|---|
| UP ARROW KEY | PAN UP 1 |
| DOWN ARROW KEY | PAN DOWN 1 |
| -> | PAN RIGHT 1 |
| <- | PAN LEFT 1 |
Resetting Arrow Keys
By default, the SHOW CLUSTER arrow keys are set to the EDIT function. This means that, at the command prompt, you can perform command line editing that is similar to DCL line-mode editing. For example, the left arrow key moves the cursor to the left, and the up arrow key recalls the previous command. See the OpenVMS User's Manual for information on DCL line-mode editing.
When you use the SET FUNCTION command, you reset the function keys. After that, the arrow keys are redefined and DCL line-mode editing is disabled.
To reset the arrow keys, enter the following command:
Command> SET FUNCTION EDIT
To exit from a continuous display, do one of the following:
Table 20-2 briefly describes the qualifiers you can use with the SHOW CLUSTER command. The OpenVMS System Management Utilities Reference Manual contains reference information about these SHOW CLUSTER qualifiers.
| Qualifier | Function |
|---|---|
| /BEGINNING= time | Specifies the time that the SHOW CLUSTER session is to begin. |
| /CONTINUOUS | Controls whether SHOW CLUSTER runs as a continuously updating display. |
| /ENDING= time | Specifies the time that the SHOW CLUSTER session is to end. |
| /INTERVAL= seconds | Specifies the number of seconds that report information remains on the screen before it is updated. |
| /OUTPUT= file-spec | Directs the output from SHOW CLUSTER to the specified file instead of to the current SYS$OUTPUT device. |
Example
In a continuous display, SHOW CLUSTER updates the display every 15 seconds by default. You can change this interval by using the /INTERVAL qualifier.
$ SHOW CLUSTER/CONTINUOUS/INTERVAL=5
In this example, SHOW CLUSTER updates reports every 5 seconds,
displaying changed data in reverse video.
20.3.3 Adding Information to a Report
When you use the SHOW CLUSTER command, the resulting report is only part of the total information available. As shown in Figure 20-1, the default classes displayed are MEMBERS and SYSTEMS. Table 20-3 briefly describes all the classes you can display in SHOW CLUSTER reports. See the OpenVMS System Management Utilities Reference Manual for details about these classes.
| Classes | Information Displayed |
|---|---|
| CIRCUITS | Describes virtual circuits on OpenVMS Cluster systems. |
| CLUSTER | Shows general information about the OpenVMS Cluster system, such as the time it was formed, the last time a system joined or left, and the cluster quorum. |
| CONNECTIONS | Describes the connections established over a virtual circuit in the OpenVMS Cluster system |
| COUNTERS | Shows counts of the total accumulated traffic over a connection for the life of the connection. |
| CREDITS | Shows send and receive credit counts for connections in the OpenVMS Cluster system. |
| ERRORS | Displays a count of the errors on each port, along with information on the feasibility of reinitializing a port. |
| LOCAL_PORTS | Displays information on the local system interface to the OpenVMS Cluster system, such as the name, number, and status of each port, and the number of entries in the queues associated with each port. |
| MEMBERS | Describes systems actively participating in the OpenVMS Cluster system. |
| SYSTEMS | Describes all OpenVMS Cluster systems. It shows node name, identification number, hardware type, and software version. |
Example
The following example shows how to add the CLUSTER class to a SHOW CLUSTER display:
Command> ADD CLUSTER
Figure 20-2 shows the display that results from entering the ADD CLUSTER command. CLUSTER class is displayed below the default SHOW CLUSTER display.
Figure 20-2 SHOW CLUSTER Display with CLUSTER Report
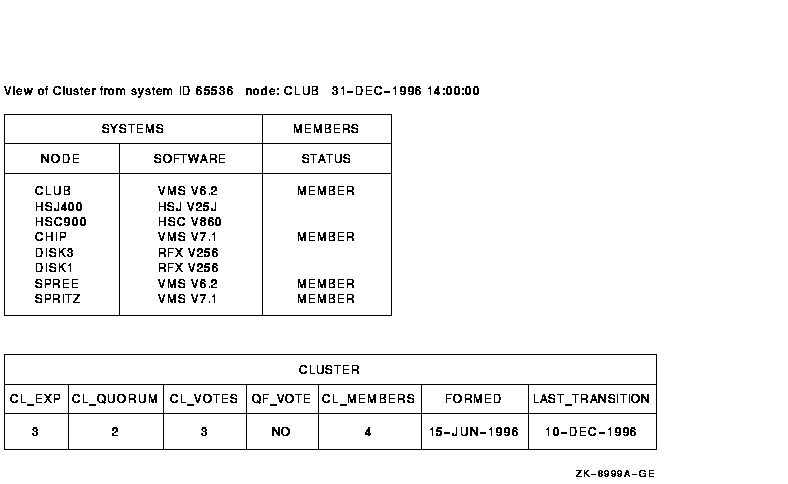
For descriptions of the fields in the CLUSTER class, see the SHOW
CLUSTER section of the OpenVMS System Management Utilities Reference Manual.
20.3.4 Controlling the Display of Data
Using SHOW CLUSTER commands, you can remove fields or classes from a
display, remove broadcast messages from the screen, and refresh the
screen display at any time. The following sections explain how to
perform these operations.
20.3.4.1 Entering Commands to Display Data
SHOW CLUSTER allows you to customize the display of data during a continuous session by entering various commands. The OpenVMS System Management Utilities Reference Manual describes SHOW CLUSTER commands in detail.
Updating of the continuous display stops as soon as you enter input from the terminal keyboard. When you press the Return key after entering a command, updating of the display resumes until you enter another command.
By default, updating takes place at 15-second intervals. If you do not
enter a new command within 15 seconds, the command prompt disappears,
and two more lines of data take its place.
20.3.4.2 Removing Broadcast Messages
When you receive a system broadcast message during a continuous SHOW CLUSTER session, the message appears at the bottom of the screen. A multiline message fills as many lines of the screen as it needs.
How to Perform This Task
The last broadcast message you receive remains on the screen until you acknowledge it by entering input from the terminal in one of the following ways:
SHOW CLUSTER also displays error messages at the bottom of the screen.
For an explanation of the error messages, see the OpenVMS System Messages and Recovery Procedures Reference Manual.
20.3.4.3 Refreshing the Screen
Ordinarily, a continuous display is updated or refreshed according to the default or specified interval time. SHOW CLUSTER scans the software databases, extracts and stores data for each field, displays any new or changed data, and updates the time. On Digital and Digital-compatible terminals, reverse video highlights any changed data.
How to Perform This Task
You can refresh the screen at any time by one of the following methods:
Because SHOW CLUSTER allows you to include additional fields and classes, you can produce reports that overflow the physical limits of the terminal screen. However, you can use a number of methods to modify the display to meet your needs:
| Formatting Method | For More Information |
|---|---|
| Remove data from reports | Section 20.3.5.1 |
| Modify field and screen size | Section 20.3.5.2 |
| Move a report | Section 20.3.5.3 |
| Scroll a report | Section 20.3.5.4 |
You can remove certain fields or classes to reduce the width of a report to fit the limits of your screen. Also, certain fields or classes might not be important for your particular needs. You can also remove particular types of data to reduce the length of the report.
How to Perform This Task
Use the REMOVE command to remove fields or entire classes. To remove a field or class, use the appropriate qualifier with the REMOVE command. See the REMOVE commands in the SHOW CLUSTER section of the OpenVMS System Management Utilities Reference Manual for appropriate class names and qualifiers.
Examples
Command> REMOVE SOFTWARE
Command> REMOVE MEMBERS
To make a report fit the physical limits of the screen, you can change the width of certain fields in the report. For example, if SHOW CLUSTER provides a field width that can contain any possible value and the values your cluster generates do not require that much space, you can adjust the field width with the SET (Field) command.
SHOW CLUSTER also allows you to adjust the size of the terminal screen. If the terminal is Digital-compatible and supports a wide report, you can set the screen to a width of up to 511 columns by specifying an appropriate value to the SET SCREEN command.
Examples
Command> SET TRANSITION_TYPE/WIDTH=10
Command> SET SCREEN=132
Refer to the OpenVMS System Management Utilities Reference Manual for more details about using the SET
(Field) and SET SCREEN commands.
20.3.5.3 Moving a Report
By default, SHOW CLUSTER operates with AUTO_POSITIONING ON. This means that the utility automatically arranges the reports to take best advantage of the available display space. However, you can position reports manually with the MOVE command, which implicitly sets AUTO_POSITIONING to OFF.
If you have multiple reports in your display, you must first select the report to be repositioned. You use the SELECT window-name command to specify the report name; for example:
Note
To select any report except the default SCS report, you must first add the class to the display if it is not already displayed; for example:Command> ADD LOCAL_PORTS
As an alternative, you can repeatedly press the Select function key or the period key on the keypad to cycle from one report to the next. The selected report appears highlighted.
How to Perform This Task
To move a report, do either of the following:
Command> SET FUNCTION MOVE
| Arrow Key | Redefinition |
|---|---|
| UP ARROW KEY | MOVE UP 1 |
| DOWN ARROW KEY | MOVE DOWN 1 |
| -> | MOVE RIGHT 1 |
| <- | MOVE LEFT 1 |
Example
Command> SELECT CLUSTER
Command> MOVE RIGHT 10
Command> DESELECT
Following is an explanation of the commands in the example:
For more information, see the SELECT, SET FUNCTION, and DESELECT commands in the OpenVMS System Management Utilities Reference Manual.
To reset the arrow keys, enter the following command:
Command> SET FUNCTION EDIT
The SCROLL command provides a means of quickly scanning through a report without losing column headings. Scrolling scans a display by field (horizontally) and by line (vertically). The report headings remain stationary when you scroll vertically.
When the display has more than one report, you must first select a report by entering the SELECT command. The selected report is highlighted.
How to Perform This Task
To scroll a display, do either of the following:
Command> SET FUNCTION SCROLL
| Arrow Key | Redefinition |
|---|---|
| UP ARROW KEY | SCROLL UP 1 |
| DOWN ARROW KEY | SCROLL DOWN 1 |
| -> | SCROLL RIGHT 1 |
| <- | SCROLL LEFT 1 |
Example
Command> SELECT SCS
Command> SET FUNCTION SCROLL
The commands in this example first select the SCS report (which is then highlighted), and then set the arrow keys to scroll functions. See the SET FUNCTION and SCROLL commands in the OpenVMS System Management Utilities Reference Manual for more information.
To reset the arrow keys, enter the following command:
Command> SET FUNCTION EDIT
To customize the SHOW CLUSTER display, you can create a startup initialization file, which the utility executes when you enter it. SHOW CLUSTER takes the original default display, and adds or removes whatever classes or fields you specify. The resulting display becomes your default startup format. A startup initialization file resembles the following:
!
!Startup Initialization File
!
!
INITIALIZE
REMOVE MEMBERS
ADD RP_REVISION,RP_TYPE,SYS_ID
SET SCREEN=132
This startup procedure deletes the MEMBERS class information from the default display. The procedure also adds the RP_REVISION and RP_TYPE fields from the CIRCUITS class and the SYS_ID field from the SYSTEMS class. The last line of the procedure sets the screen size to 132 columns.
How to Perform This Task
To create an initialization file, follow these steps:
DEFINE SHOW_CLUSTER$INIT DEVA:[JONES]SHCINI
Command> SAVE SHOW_CLUSTER$INIT.INI
You can edit the file that the SAVE command creates to include comments or to improve its efficiency. For more information, see the SAVE command in the OpenVMS System Management Utilities Reference Manual.
Instead of having SHOW CLUSTER build an initialization file, you can
build one yourself in the same way you build a command procedure. The
next section provides guidelines for creating a command procedure.
20.3.7 Using Command Procedures Containing SHOW CLUSTER Commands
You can create command procedures that contain SHOW CLUSTER commands. Such files let you modify display characteristics without having to enter commands interactively. You can use command procedures during a continuous SHOW CLUSTER session to perform a series of commands, for example, to customize the output of the display.
Following are guidelines for writing command procedures that contain SHOW CLUSTER commands:
Notes
Do not include an EXIT command at the end of the command procedure. The EXIT command terminates SHOW CLUSTER and erases the SHOW CLUSTER display before you can see it.Also, do not run SHOW CLUSTER command procedures from a batch job.
The following command procedure customizes a report display:
!
! Include only the node field from the default display; show votes
! and quorum for each node and for the cluster as a whole.
!
INITIALIZE
REMOVE SOFTWARE,STATUS
ADD VOTES,QUORUM,CL_VOTES,CL_QUORUM
This command procedure removes the SOFTWARE and STATUS fields from the report and adds fields that provide information about the cluster quorum and votes.
To execute a command procedure during a continuous SHOW CLUSTER session, specify the execute procedure (@) command, along with the file name of the command procedure. The default file type for command procedure files is .COM.
Example
The following command executes a command procedure named SYSMOD.COM:
Command> @SYSMOD
  6017P062.HTM
  OSSG Documentation
  22-NOV-1996 14:22:48.19
Copyright © Digital Equipment Corporation 1996. All Rights Reserved.