![[HR]](../../IMAGES/REDBAR.GIF)
The following example demonstrates this sequence of events:
Note that the output from the LIBRARY/LIST commands is omitted from the example.
$ HELP/MESSAGE/SECTION_FILE=*
$ LIBRARY/LIST SYS$LIBRARY:MSGHLP$MESSAGE_SECTIONS.OLB
$ LIBRARY/DELETE=VVIEFMSG SYS$LIBRARY:MSGHLP$MESSAGE_SECTIONS.OLB
$ HELP/MESSAGE/SECTION_FILE=USERS:[TOOLS]NEW_MSGS.EXE
$ LIBRARY/LIST SYS$LIBRARY:MSGHLP$MESSAGE_SECTIONS.OLB
$ COPY MSGHLP$MESSAGE_SECTIONS.EXE SYS$LIBRARY:MSGHLP$MESSAGE_SECTIONS.EXE
Help Message database files need not reside on the system disk. You can create system logical names to define one or more Help Message search paths to access multiple .MSGHLP$DATA files in different locations.
When Help Message is installed, the OpenVMS messages database file is installed by default at SYS$COMMON:[SYSHLP]MSGHLP$LIBRARY.MSGHLP$DATA. However, this file can optionally be installed on or moved to another disk. The alternate location must be pointed to by logical name MSGHLP$LIBRARY. Use this command to define the logical name:
DEFINE/SYSTEM MSGHLP$LIBRARY disk:[directory]MSGHLP$LIBRARY
By default, Help Message attempts to look up messages in the default location unless the logical name MSGHLP$LIBRARY is defined. If you do not use the default database location, include the logical name definition command in SYS$MANAGER:SYLOGICALS.COM so that the database is defined each time the system is booted.
Note
If you move MSGHLP$LIBRARY.MSGHLP$DATA to a new location after installation, be sure to set the proper protections on the file and directory so that the database cannot be accidentally deleted or modified. The protections at installation are (RWE, RWE, RE, RE) for the directory and (RWE, RWE, RWE, RE) for the file.
You and other system users can create additional .MSGHLP$DATA files, as described in the OpenVMS System Messages: Companion Guide for Help Message Users. None of the .MSGHLP$DATA files need reside on the system disk. You can add new files to a systemwide default database search path defined by MSGHLP$LIBRARY, or you can create specialized search paths to include different configurations of .MSGHLP$DATA files.
A search path definition can include individual file names or can point to one or more directories. If you specify a directory with no file name, Help Message searches all .MSGHLP$DATA files currently found in that directory. Pointing to a directory instead of individual files can minimize your bookkeeping when .MSGHLP$DATA files are added or removed.
To use system resources more efficiently, you can create different search paths for different user groups, depending on which .MSGHLP$DATA files they need to access. You can also set up different directories for different types of messages or for different user groups. For example, you could use three unique logical names to define three different search paths tailored to different user groups:
DEFINE/SYSTEM logical-name-1 file-a,file-b,file-c
DEFINE/SYSTEM logical-name-2 file-a,directory-z
DEFINE/SYSTEM logical-name-3 file-x,file-a,directory-y
Note
The first file you list in a search path is the default database for /INSERT and /DELETE operations that operate on that search path. By default, all other operations access all files in a search path. Specifying a directory first in a search path risks setting up a default moving target for /INSERT and /DELETE operations if files are added to or deleted from the directory.
Users can select an alternate to the system default database by specifying the /LIBRARY qualifier in the HELP/MESSAGE command. Individual users can also create their own logical name search paths at the process level.
Example
The following example defines a Help Message search path that accesses .MSGHLP$DATA database files in three locations: the Digital-supplied OpenVMS messages at USERS:[TOOLS], the user-supplied file USERS:[NEW_PROJ]OUR_MESSAGES.MSGHLP$DATA, and all .MSGHLP$DATA files in directory TEST:[TRY_ME].
$ DEFINE/SYSTEM MSGHLP$LIBRARY USERS:[TOOLS]MSGHLP$LIBRARY,-
_$ USERS:[NEW_PROJ]OUR_MESSAGES.MSGHLP$DATA,TEST:[TRY_ME]
You can delete Digital-supplied messages from the database to conserve system resources or improve response time.
How to Perform This Task
HELP/MESSAGE/FACILITY=facility-name/EXTRACT=filename.MSGHLP
HELP/MESSAGE/EXTRACT=filename.MSGHLP search-string
HELP/MESSAGE/DELETE=filename.MSGHLP
HELP/MESSAGE/DELETE=filename.MSGHLP/LIBRARY=disk:[directory]filename.MSGHLP$DATA
CONVERT disk:[directory]filename.MSGHLP$DATA disk:[directory]filename.MSGHLP$DATA
PURGE disk:[directory]filename.MSGHLP$DATA
Example
The following example extracts and then deletes all messages for the DDTM (DECdtm services) facility from the default database. The last two commands compress the Digital-supplied database file to conserve disk space after the deletions.
$ HELP/MESSAGE/FACILITY=DDTM/EXTRACT=DDTM.MSGHLP
$ HELP/MESSAGE/DELETE=DDTM.MSGHLP
$ CONVERT SYS$COMMON:[SYSHLP]MSGHLP$LIBRARY.MSGHLP$DATA -
_$ SYS$COMMON:[SYSHLP]MSGHLP$LIBRARY.MSGHLP$DATA
$ PURGE SYS$COMMON:[SYSHLP]MSGHLP$LIBRARY.MSGHLP$DATA
You can add comments to Digital-supplied messages documentation. Comments display with change bars immediately following the Digital-supplied description. This feature is a handy way to publicize a site-specific solution for a common problem.
Note
Currently, user-supplied comments to Digital-supplied .MSGHLP$DATA files are not preserved through the next upgrade. However, if the Digital-supplied message descriptions do not change during the upgrade, you can reuse .MSGHLP files to reinsert comments after the upgrade.
How to Perform This Task
$ HELP/MESSAGE/EXTRACT=NOSNO.MSGHLP NOSNO
1NOSNO, can't ski; no snow
2XCSKI, XCSKI Program
3Your attempt to ski failed because there is no snow.
4Wait until there is snow and attempt the operation again.
5If you don't want to wait, go to a location where there is
5snow and ski there.
5
5Or, try ice skating instead!
$ HELP/MESSAGE/INSERT=NOSNO.MSGHLP
Example
$ HELP/MESSAGE/EXTRACT=ACCVIO.MSGHLP ACCVIO
$ HELP/MESSAGE/INSERT=ACCVIO.MSGHLP
You cannot use the procedure described in Section 5.6.4 to alter Digital-supplied information. The recommended way to permanently change Digital-supplied information is to send your comments to the OSSG Documentation Group (see the Preface for Internet and mail addresses) or contact a Digital support representative.
The sequence described in this section allows you to modify Digital-supplied data, with the following results:
Note
Currently, the Digital-supplied message is reinserted into the database at the next upgrade and the user-supplied text is overwritten.
How to Perform This Task
HELP/MESSAGE/EXTRACT=filename.MSGHLP search-string
HELP/MESSAGE/DELETE=filename.MSGHLP
HELP/MESSAGE/INSERT=filename.MSGHLP
Example
$ HELP/MESSAGE/EXTRACT=NOFILES.MSGHLP NOFILES
$ HELP/MESSAGE/DELETE=NOFILES.MSGHLP
$ HELP/MESSAGE/INSERT=NOFILES.MSGHLP
The OpenVMS System Messages: Companion Guide for Help Message Users describes how to create your own .MSGHLP$DATA files to add new messages to the Help Message database. Keeping your messages in a separate file can simplify your messages bookkeeping and ensure that your messages are preserved through future upgrades.
With write access to Digital-supplied .MSGHLP$DATA files, you can alternatively insert your own messages into the Digital-supplied MSGHLP$LIBRARY.MSGHLP$DATA file. However, messages inserted using this technique will currently be overwritten at the next upgrade. You can, however, save your input .MSGHLP files and repeat the insertion process at the next upgrade.
How to Perform This Task
HELP/MESSAGE/INSERT=filename.MSGHLP
Example
$ HELP/MESSAGE/INSERT=MYMESSAGES.MSGHLP
You can customize the operation of Mail on your system, including sending mail directly to a user's mail file if the node the user is on is currently in your OpenVMS Cluster system.
You customize Mail by defining the logical name MAIL$SYSTEM_FLAGS as a system and executive mode logical name. For example:
$ DEFINE/SYSTEM/EXECUTIVE_MODE MAIL$SYSTEM_FLAGS 1
The value of the logical name MAIL$SYSTEM_FLAGS is interpreted in the following ways:
| Value | Meaning |
|---|---|
| 1 |
Indicates that this node is part of a homogeneous OpenVMS Cluster
system. In other words, all disks are accessible to the cluster, and a
common SYSUAF file and a common mail file exist for the cluster.
When this bit is set, the system checks the node to which you are sending mail to see if it is currently in the cluster. If the node is in the cluster, the system bypasses DECnet, and the message is written directly to the recipient's mail file. (Note that the node must be up to determine whether it is part of the cluster.) |
| 2 | Directs Mail to set the OpenVMS Cluster system breakthrough flag when issuing the $BRKTHRU service to notify the recipient of new mail. This flag is used only in OpenVMS Cluster systems and, typically, only in homogeneous OpenVMS Cluster systems (in other words, flag 1 is also set). |
| 4 | Directs Mail to include the time the message was delivered in the notification message displayed on the recipient's terminal. |
| + 8 | Directs Mail to use DECnet VAX address syntax when the system is running DECnet-Plus. |
| +16 | Directs Mail to use DECnet-Plus address syntax. |
For example, if MAIL$SYSTEM_FLAGS translates to 7, the system selects the first three flags. If the logical name does not translate, the default is 0, which indicates that no flags are set.
On VAX systems, if neither 8 nor 16 is in the value for MAIL$SYSTEM_FLAGS, the system checks to see whether DECnet for OpenVMS or DECnet-Plus is running on the system and requires the appropriate address syntax. Note that, ordinarily, you do not set either flag.
If the number of new (unread) mail messages displayed on the user's screen is inconsistent with the actual number of new messages, enter the READ/NEW command once (for each nonexistent message) when there is no new mail.
In mail messages sent through DECnet, users can specify node names and user names as logical names. Any access control information in the node name or logical name is ignored.
On VAX systems running DECnet-Plus, users can also specify node
synonyms.
5.8 Setting Correct Time Zone Information on Your System
Beginning with OpenVMS Version 7.0, the DEC C RTL implements its default date/time support for programs compiled with DEC C Version 5.2 using a model based on Coordinated Universal Time (UTC), an international standard for measuring time of day.
Note
Even if you do not use the DEC C RTL directly, you must set correct time zone information on your system because other system utilities written in the DEC C language might require it.To set the correct time zone information on your system, use the UTC$TIME_SETUP.COM command procedure to do the following:
Using UTC allows the DEC C RTL to implement ANSI C/POSIX functionality. In addition, the UTC model makes the DEC C RTL compatible with the Digital UNIX and POSIX RTL time functions. With a UTC-based system, users can do the following:
The following sections explain these concepts and tasks:
| Concept or Task | Section |
|---|---|
Understanding time-setting concepts:
|
Section 5.8.1 |
| Determining your system's TDF | Section 5.8.2 |
Using UTC$TIME_SETUP.COM:
|
Section 5.8.3 |
| Adjusting for daylight saving time and standard time | Section 5.8.4 |
| Setting time in an OpenVMS Cluster environment | Section 5.8.5 |
Understanding some time concepts will help you see the importance of
setting the correct time zone and TDF on your system.
5.8.1.1 Coordinated Universal Time
Coordinated Universal Time (UTC) is similar in most respects to Greenwich Mean Time (GMT). Under the UTC time standard, zero hours occurs when the Greenwich Meridian is at midnight. Unlike local time, which can go backward and forward depending on daylight saving time, UTC always increases.
Local times can be up to 12 hours behind Greenwich Mean Time or 13 hours ahead of it.
Because UTC is independent of time zones, you can use UTC around the
world; for example, it is 2:00 UTC at the same moment in Paris as well
as in Tokyo. You can examine data that is time-stamped with UTC values
in Paris and Tokyo without complicated conversions to deal with local
time zones.
5.8.1.2 Time Differential Factor
One of the steps in setting the correct time on your system is to calculate a time differential factor (TDF) for your time zone.
The TDF associates each local time zone with UTC; it is the difference between your local system time and UTC. The TDF changes each time your local system time undergoes a time zone change; the UTC, on the other hand, does not change.
The TDF value is expressed in signed (+ or -) hh:mm format. The Americas have negative TDFs, while Europe, Africa, Asia, and Australia have positive TDFs.
Section 5.8.2 explains how to select the correct TDF for your time zone.
5.8.1.3 Daylight Saving Time and Standard Time
Typically, you make seasonal changes to the local system time (for example, for daylight saving time and standard time). You usually adjust the local time one hour forward or backward.
You also need to adjust the TDF to compensate for the new local system
time. You adjust the TDF in the same direction as the local time; that
is, when you add an hour to the local time, you also add an hour to the
TDF.
5.8.1.4 Time Zones
Time zones are names for geographical areas that share the same TDF;
they also share the same rule or rules for seasonal changes between
standard time and daylight saving time.
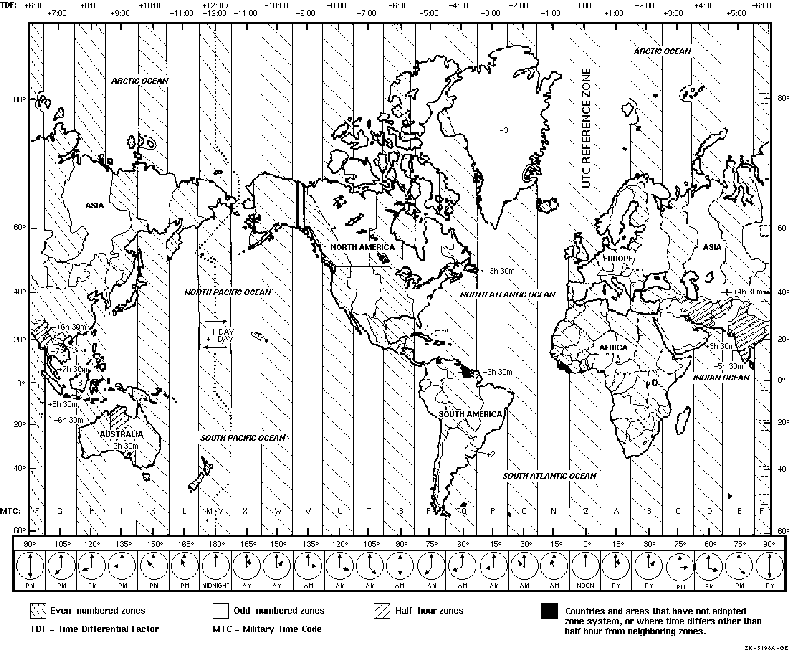
5.8.2 Determining Your System's Time Differential Factor
You can use the map in Figure 5-1 to determine the TDF for your time zone. If you prefer, you can use the tables in Appendix B in the OpenVMS System Manager's Manual to determine the standard or daylight saving time TDF for your time zone. The procedure described in Section 5.8.3 shows default TDF values for various time zones.
To use the map to determine the TDF of your time zone, follow these steps:
Some time zones do not have full-hour TDFs. In these cases, find the specific value on the map itself. For example, if you live in Adelaide, Australia, your TDF is +9:30.
If your time zone has daylight saving time, your TDF for daylight saving time is typically +1:00 from the standard time. For example, if your standard time TDF is +2:00, your daylight saving time TDF is +3:00; if your standard time TDF is -7:00, your daylight saving time TDF is -6:00.
Figure 5-1 Time Differential Factor Map
5.8.3 Using UTC$TIME_SETUP.COM
You can use this command procedure in the following ways:
If you set the time zone and the TDF on one node in a cluster, the values you set take effect on other nodes in the cluster when those nodes are rebooted.
For your convenience, the instructions for using the command procedure have been split into two sections:
Beginning the Procedure
To use SYS$MANAGER:UTC$TIME_SETUP.COM, follow these steps:
$ SET PROCESS/PRIVILEGES=(LOG_IO,OPER)
$ @SYS$MANAGER:UTC$TIME_SETUP.COM
%UTC-I-UPDTIME, updating Time Zone information in SYS$COMMON:[SYSEXE]
Configure which time parameter (TIMEZONE/TDF/BOTH/NONE)? [BOTH]
Note
Digital recommends that you set both the time zone and the TDF. If you set the TDF without setting the time zone, the procedure cannot provide default TDF values.
If you answer BOTH or TIMEZONE to the time parameter question in the
command procedure, continue with the next section. If you answer TDF to
the question, skip to Section 5.8.3.2.
5.8.3.1 Setting the Time Zone on Your System
The local time zone is the location you want to consider your default local time zone. Usually this local time zone is the same as the local time zone in which your system is located.
You set the local time zone by making choices in a command procedure.
The system first displays the following information:
    Configuring the Local Time Zone


    TIME ZONE SPECIFICATION -- Main Time Zone Menu

      1) Australia       11) GMT             21) Mexico          31) Turkey
      2) Brazil          12) Greenwich       22) NZ              32) UCT
      3) CET             13) Hong Kong       23) NZ-CHAT         33) US
      4) Canada          14) Iceland         24) Navajo          34) UTC
      5) Chile           15) Iran            25) PRC             35) Universal
      6) Cuba            16) Israel          26) Poland          36) W-SU
      7) EET             17) Jamaica         27) ROC             37) WET
      8) Egypt           18) Japan           28) ROK             38) Zulu
      9) Factory         19) Libya           29) Singapore
     10) GB-Eire         20) MET             30) SystemV

      0) None of the above
Table 5-4 lists and describes the acronyms that appear in the Main Time Zone Menu.
| Time Zone Acronym | Description |
|---|---|
| CET | Central European Time |
| EET | Eastern European Time |
| Factory | Specifies no time zone |
| GB-Eire | Great Britain/Ireland |
| GMT | Greenwich Mean Time |
| MET | Middle European Time |
| NZ | New Zealand |
| NZ-CHAT | New Zealand, Chatham Islands |
| PRC | People's Republic of China |
| ROC | Republic of China |
| ROK | Republic of Korea |
| SystemV | Specific to System V operating system |
| UCT | Coordinated Universal Time |
| US | United States |
| UTC | Coordinated Universal Time |
| Universal | Coordinated Universal Time |
| W-SU | Middle European Time |
| WET | Western European Time |
To select a time zone, follow these steps:
Select the number above that best describes your location: 33
You selected US as your time zone.
Is this correct? (Yes/No) [YES]: [Return]
    US Time Zone Menu

       1) Alaska           4) Central          7) Hawaii          10) Mountain
       2) Aleutian         5) East-Indiana     8) Indiana-Starke  11) Pacific
       3) Arizona          6) Eastern          9) Michigan        12) Samoa

       0) None of the above
Select the number above that best describes your location: 6
You selected US/Eastern as your time zone.
Is this correct? (Yes/No) [YES]: [Return]
    Default Time Differential Factor for standard time is -5:00.
   *Default Time Differential Factor for daylight saving time is -4:00.
If you answer TDF or BOTH to the time parameter question at the beginning of the command procedure, the system displays prompts for the TDF on your system.
  6017P012.HTM
  OSSG Documentation
  22-NOV-1996 14:21:33.41
Copyright © Digital Equipment Corporation 1996. All Rights Reserved.