![[HR]](../../IMAGES/REDBAR.GIF)
The following diagram illustrates these conditions:
$ COPY WALNUT"KMAHOGANY A25D3255"::BIONEWS.MEM BIONEWS.MEM
$ COPY WALNUT::BIONEWS.MEM BIONEWS.MEM
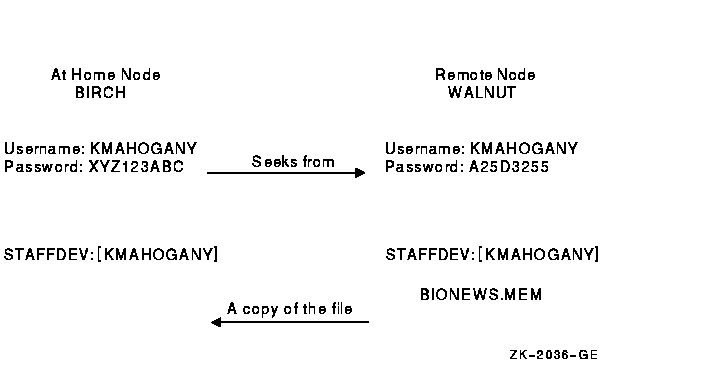
Your security administrator can also authorize groups of users from foreign nodes to share in the use of a general access proxy account. For example, the security administrator at node WALNUT can create a general access account with the following conditions:
If the security administrator grants BIRCH::KMAHOGANY proxy access to the GENACCESS account, the user KMAHOGANY can copy the file BIONEWS.MEM by entering the following command:
$ COPY WALNUT::[KMAHOGANY]BIONEWS.MEM BIONEWS.MEM
Note that KMAHOGANY must specify the directory [KMAHOGANY] because the
file BIONEWS.MEM is not in the default device and directory for the
GENACCESS account (STAFFDEV:[BIOSTAFF]). In addition, the protection
for the file BIONEWS.MEM must permit access to the GENACCESS account.
Otherwise, the command fails.
19.6.9 Specify Proxy Accounts
If you have access to more than one proxy account on a given node and you do not want to use the default proxy account, specify the name of the proxy account. For example, to use a proxy account called PROXY2 instead of the GENACCESS account (the default), KMAHOGANY enters the following command:
$ COPY WALNUT"PROXY2"::[KMAHOGANY]BIONEWS.MEM BIONEWS.MEM
This command uses the PROXY2 account to copy the file BIONEWS.MEM from
the [KMAHOGANY] directory on node WALNUT.
19.7 Auditing Access to Your Account and Files
Although it is the security administrator's job to monitor the system
for possible break-in attempts, you can assist the security
administrator in auditing access to your account and files.
19.7.1 Observing Your Last Login Time
The OpenVMS system maintains information in your UAF record about the last time you logged in to your account. Your security administrator decides whether the system should display this information at login time. Sites with medium to high security requirements frequently display this information and ask users to check it for unusual or unexplained successful logins and unexplained failed logins.
If there is a report of an interactive or a noninteractive login at a time when you were not logged in, report it promptly to your security administrator. Also change your password. The security administrator can investigate further by using accounting files and audit logs.
If you receive a login failure message and cannot account for the failure, it is likely that someone has been trying to access your account unsuccessfully. Check your password to ensure that it adheres to all recommendations for password security described in Section 2.9. If not, change your password immediately.
If you expect to see a login failure message and it does not appear or
if the count of failures is too low, change your password. Report
either of these indications of login failure problems to your security
administrator.
19.7.2 Asking Your Security Administrator to Enable Auditing
The security administrator can select one or more types of events that warrant special attention when they occur. When such an event is detected, the security administrator directs the system to send an audit to the system security audit log file or an alarm to terminals enabled as security operator terminals. For example, the security administrator might identify one or more files for which write access is prohibited. An audit can be enabled or an alarm can be set to indicate attempted access to these files.
If you suspect a break-in to your account, change your password. You
might want to request that your security administrator implement
auditing on sensitive files.
19.7.3 Events That Can Trigger Security Alarms
Events triggering an audit or alarm can include the following:
In the following example, assume you decide to audit the file CONFIDREVIEW.MEM. If user ABADGUY accesses CONFIDREVIEW.MEM and has delete access, the following audit record is written to the system security audit log file:
%%%%%%%%%%%  OPCOM  11-DEC-1996 09:21:11.10  %%%%%%%%%%%
Message from user AUDIT$SERVER on BOSTON
Security audit (SECURITY) on BOSTON, system id: 19424
Auditable event:        Attempted file access
Event time:              11-DEC-1996 09:21:10.84
PID:                    23E00231
Username:               ABADGUY
Image name:             BOSTON$DUA0:[SYS0.SYSCOMMON.][SYSEXE]DELETE.EXE
Object name:            _BOSTON$DUA1:[RWOODS]CONFIDREVIEW.MEM;1
Object type:            file
Access requested:       DELETE
Status:                 %SYSTEM-S-NORMAL, normal successful completion
Privileges used:        SYSPRV
The auditing message reveals the name of the perpetrator, the method of
access (successful deletion accomplished by using the program
[SYSEXE]DELETE.EXE), time of access (9:21 A.M.), and the use of a
privilege (SYSPRV) to gain access to the file. With this information,
the security administrator can take action.
19.7.5 Security Audit Log Files
Security audit messages are written to the security audit log file every time any file is accessed and meets the conditions specified in the audit entry of the ACL for that file (see Section 19.7.6). Access to the file CONFIDREVIEW.MEM, as well as access to any file on the system that is protected with security auditing, prompts an audit record to be written to the security audit log file.
After auditing has been introduced, check with your security
administrator periodically to see if any additional break-ins have
occurred.
19.7.6 Adding ACEs to Sensitive Files
If you have key files that might have been accessed improperly, you might want to develop a strategy with your security administrator to audit access to the files.
Once you review the situation and ensure that you have done everything possible to protect your files with standard protection codes and general ACLs (described in the OpenVMS Guide to System SecurityOpenVMS Guide to System Security), you may conclude that security auditing is required.
To specify security auditing, you can add special access control entries (ACEs) to files you own or to which you have control access. Keep in mind, however, that the audit log file is a systemwide mechanism, so Digital recommends that a site security administrator control the use of file auditing. Although you can add auditing ACEs to files over which you have control, the security administrator has to enable auditing of files on a system level.
If you suspect break-in attempts to your account, the security administrator may temporarily enable auditing for all file access. The security administrator can also enable auditing to monitor read access to your files to catch file browsers.
An access violation of one file frequently indicates access problems
with other files. Therefore, the security administrator may need to
monitor access to all key files having security-auditing ACEs. When
undesired access is gained to key files, the security administrator
must take immediate action.
19.7.7 Example
In the following example, user RWOODS and his security administrator concur that they must know when a highly confidential file, CONFIDREVIEW.MEM, is being accessed, so RWOODS adds an entry to the existing ACL for the file CONFIDREVIEW.MEM:
$ SET SECURITY/ACL=(ALARM=SECURITY,ACCESS=READ+WRITE-
_$ +DELETE+CONTROL+FAILURE+SUCCESS) CONFIDREVIEW.MEM
This appendix describes how to use startup files to modify the standard EVE editor. It includes information on:
For additional information, refer to:
Startup files hold key definitions and editing commands that set the characteristics of the editing environment. Startup files can also hold DECTPU procedures, which augment the editing capability of the standard EVE editor.
By placing your definitions and procedures in a startup file, you can
invoke the editor and automatically establish the editing environment
your task requires.
A.1.3 Tailoring the Standard Editor
EVE provides the following ways of tailoring the standard editor to meet your editing requirements:
You can define keys to execute EVE commands or to enter a series of
keystrokes, called a learn sequence.
A.2.1 Undefinable Keys
EVE does not let you define the Return key (Ctrl/M), the space bar, or any printing characters (such as letters, digits, and punctuation marks) on the main keyboard.
In addition, Digital recommends that you do not define the following keys and control key sequences (some cannot be defined unless you use special terminal settings):
You can define all other keys (including control keys) except those
noted. You can redefine the Do key, as long as you have assigned the DO
command to another key.
A.2.2 Obsolete Keys
The SET SHIFT KEY and SET NOSHIFT KEY commands are obsolete. Instead,
use the SET GOLD KEY and SET NOGOLD KEY commands, respectively.
A.2.3 Defining Keys to Execute EVE Commands
By defining keys, you can create editing keys to enter EVE commands you
use frequently. You can define a key to execute an EVE command by using
the DEFINE KEY command or by using an initialization file. If
you are using help and press a key to which you have assigned an EVE
command, EVE provides the help text for that command. Key definitions
are discarded when you end an EVE editing session, unless you use the
SAVE ATTRIBUTES command or SAVE EXTENDED EVE command to save key
definitions from one editing session to the next.
A.2.4 Using the DEFINE KEY Command
The DEFINE KEY command assigns an EVE command to a single key, a GOLD key combination, or control key sequence. You can enter the DEFINE KEY command, the key to be defined, and the command on a single command line, or you can enter the DEFINE KEY command and let EVE prompt you.
To enter the DEFINE KEY command on a single command line, use the following command syntax:
DEFINE KEY [=key-name] command
The elements are as follows:
| key-name | The key to be defined |
| command | The command you assign to the key |
For example, the following command assigns the MOVE BY WORD command to keypad key 1 (KP1):
Command: DEFINE KEY=KP1 MOVE BY WORD
The following command assigns the FILL command to Ctrl/F:
Command: DEFINE KEY=Ctrl/F FILL
You can use one of three different separators when specifying key names: an underscore (_), a dash (--), or a slash (/). For example, the Ctrl/F key can be specified as Ctrl_F, Ctrl--F, or Ctrl/F.
To use the DEFINE KEY command and let EVE prompt you, invoke EVE, then press the Do key and enter the DEFINE KEY command, as follows:
[End of file]


Buffer: MAIN                           | Write | Insert | Forward
Command: DEFINE KEY
Type the EVE command you want to assign to a key and press the Return key.
[End of file]


Buffer: MAIN                           | Write | Insert | Forward
EVE command: START OF LINE
Press the key to be associated with the EVE command.
[End of file]


Buffer: MAIN                           | Write | Insert | Forward
Press the key you want to define: [F20]
The message "Key defined" appears if you have successfully defined a key.
Another way to assign EVE commands to keys is to create an initialization file. You can define keys and set the characteristics of an editing session in the initialization file. The file contains EVE commands and key definitions, and is executed when you invoke EVE. Use the syntax given in this section to put DEFINE KEY commands in the file. For more information about initialization files, see the online help topic called Initialization Files.
To remove a key definition, use the UNDEFINE KEY command.
Section A.2.11 contains more examples of defining keys to execute EVE commands.
You can type the name of a key as a parameter for the DEFINE KEY, SET
GOLD KEY, SHOW KEY, and UNDEFINE KEY commands. EVE key names are
generally the same as the labels on the keys---you can specify them by
their labels as well as by their positional number on one of the
keypads. For example, the 7 on the numeric keypad is named KP7 and the
keys on the minikeypad are named E1 to E6.
A.2.5 Key Name Abbreviations
You can abbreviate key names as long as your abbreviation is not
ambiguous. For example, G Rem is a valid abbreviation for GOLD Remove
and G R is an abbreviation for GOLD R. The case of letters does not
matter in a key definition.
A.2.6 Defining Control Keys
You can specify control keys by using Ctrl, Control, or the circumflex character (^). For example, Ctrl/A, Control/A, and ^A are the same. For a list of the control keys defined by EVE, see the EVE online help topic called Control Keys.
In specifying control keys or GOLD key sequences, use a dash (--), slash (/), or underscore (_) as a delimiter in the key name (for example, GOLD-F20, Alt/A, or Ctrl_N.) Thus, in an initialization file, you can use commands with typed key names such as the following:
   DEFINE KEY= Ctrl/P  MOVE BY PAGE
   DEFINE KEY= GOLD-N  NEXT BUFFER
   DEFINE KEY= KP7     CENTER LINE
   SET GOLD KEY F17
Some EVE key names are different from key names that you use in DECTPU command files, as shown in Section A.2.7.
| In EVE Commands | In DECTPU Procedures |
|---|---|
| GOLD A | KEY_NAME (A, SHIFT_KEY) |
| GOLD MINUS | KEY_NAME (MINUS, SHIFT_KEY) |
| Ctrl/D | Ctrl_D KEY |
| SHIFT/F14 | KEY_NAME (F14, SHIFT_MODIFIED) |
The following table lists EVE key names and the key labels on the keyboard or keypads. Some keys may not appear on some terminals. (For example, VT100 series terminals do not have the F1 to F20 keys. VT200, VT300, and VT400 series terminals do not have Backspace and line-feed keys.) Do not use these key names in DECTPU built-in procedures. (See the table "Keywords Used for Key Names" in the Guide to the DEC Text Processing Utility for the correct keywords to use in DECTPU built-in procedures.)
| Key | Key Name |
|---|---|
| F7 ...F20 | F7 ...F20 |
| Help | HELP or F15 |
| Do | DO or F16 |
| Find | FIND or E1 |
| Insert Here | INSERT_HERE or E2 |
| Remove | REMOVE or E3 |
| Select | SELECT or E4 |
| Prev Screen | PREV_SCREEN or E5 |
| Next Screen | NEXT_SCREEN or E6 |
| Up arrow key | UP |
| Left arrow key | LEFT |
| Down arrow key | DOWN |
| Right arrow key | RIGHT |
| PF1 ...PF4 | PF1 ...PF4 |
| 0 ...9 (numeric keypad) | KP0 ...KP9 |
| -- (numeric keypad) | MINUS |
| . (numeric keypad) | PERIOD |
| , (numeric keypad) | COMMA |
| < X| or Delete | DELETE |
| Tab or TAB | TAB or Ctrl/I |
| Backspace | BS or Ctrl/H |
| Line-feed | LF or Ctrl/J |
A.2.9 Undefinable Keys
You cannot define any of the following keys:
Digital recommends that you do not define the following keys and control keys. You can define these control keys, but you cannot execute them unless you set terminal characteristics in special ways.
If you redefine Ctrl/B or Ctrl/R, you should define other keys as
RECALL and REMEMBER, respectively, because you can execute those
commands only by pressing a key.
A.2.11 Defining the GOLD Key
You can assign two definitions to the same editing key if you create a GOLD key. Invoke one key definition by pressing the editing key. Invoke the other key definition by first pressing the GOLD key and then pressing the editing key.
To define a GOLD key, enter the SET GOLD KEY command and press the key
you want to use as the GOLD key. When you successfully define the key,
the message "GOLD key set." appears in the Messages buffer.
EVE does not have a default GOLD key.
A.2.12 Using the GOLD Key
After you create a GOLD key, you can use the GOLD key definitions supplied by EVE. To see a diagram of these key definitions, enter the command HELP KEYPAD. The GOLD key definitions appear in the display in reverse video.
If you press the GOLD key by mistake, press the Select key to cancel
it. Use the SAVE ATTRIBUTES command or the SAVE EXTENDED EVE command to
save key definitions from one editing session to the next.
A.2.13 GOLD Key Combinations
The following table lists the GOLD key combinations on the EVE keypad and the definitions associated with them:
| Key | Definition |
|---|---|
| GOLD F13 | Restore Word (except with the WPS keypad) |
| GOLD Help | Help keys |
| GOLD Find | Wildcard Find |
| GOLD Insert Here | Restore |
| GOLD Remove | Store Text |
| GOLD Select | Reset |
| GOLD Prev Screen | Previous Window |
| GOLD Next Screen | Next Window |
| GOLD up arrow key | Top |
| GOLD down arrow key | Bottom |
| GOLD left arrow key | Start of Line |
| GOLD right arrow key | End of Line |
You can also use the GOLD key to create your own key definitions. This tutorial demonstrates how to define a GOLD key and assign two commands to a single key. The tutorial defines the 4 key on the numeric keypad as the GOLD key and then assigns the BOTTOM and TOP commands to the Ctrl/G key. Thus, pressing Ctrl/G alone enters the BOTTOM command and pressing the GOLD key followed by Ctrl/G enters the TOP command.
To define a GOLD key and the bottom and top keys, follow these steps:
| Step | Task |
|---|---|
| 1 |
Define the GOLD key:
|
| 2 |
Define the bottom key:
|
| 3 |
Define the GOLD Ctrl/G key as the top key:
|
For the rest of your editing session, when you press Ctrl/G, EVE
executes the BOTTOM command. When you press the GOLD key (4 on the
numeric keypad) followed by Ctrl/G, EVE executes the TOP command.
A.2.15 Removing GOLD Keys
You cannot define more than one GOLD key at a time. To remove a GOLD
key definition, enter the SET NOGOLD KEY command, then press the key
you want to undefine. You can also define another GOLD key, which
removes the original GOLD key.
A.2.16 Defining GOLD Keys in Initialization Files
Use the following format to define a GOLD key in an initialization file:
SET GOLD KEY keyname
  6489P037.HTM
  OSSG Documentation
  22-NOV-1996 13:17:32.91
Copyright © Digital Equipment Corporation 1996. All Rights Reserved.