![[HR]](../../IMAGES/REDBAR.GIF)
Mail displays a message if the network connection to the remote node is not available. Wait a while, and try to send the message later.
For additional information on specifying node names, refer to
Section 4.2.8.
6.5.2 Example
In the following example, a message is sent to user HIGGINS on node CHEETA:
MAIL> SEND [Return]
To: CHEETA::HIGGINS [Return]
You can use a logical name to represent a user's name and node; then
you can use the logical name to send mail. Note that Mail ignores any
access control information in the node name or logical name.
6.5.4 Example
In the following example, HENRY is used in place of CHEETA::HIGGINS. First, the logical name (HENRY) is defined, then it is used in place of the username and node:
$ DEFINE HENRY CHEETA::HIGGINS
$ MAIL [Return]
MAIL> SEND [Return]
To: HENRY [Return]
The following sections describe how to send mail to more than one user.
6.6.1 Using Individual Names
You can send mail to several users at the same time in one of two ways:
using individual user names at the To: prompt or using a distribution
list. To send the same message to several users on the same node by
using their user names, enter the user names at the To: prompt and
separate them with commas or spaces.
6.6.2 Example
In the following example, a message is sent to Thompson, Jones, and Barney:
MAIL> SEND [Return]
To:      THOMPSON,JONES,BARNEY [Return]
Subj:    Meeting on January 9 [Return]
A distribution list is a file that contains a list of users and their node names. You must use a text editor to create distribution lists. Distribution lists are not created within the Mail utility.
Your open file quota (a limit associated with your account) determines
the number of different nodes to which you can send mail (at one time)
and the depth to which you can nest distribution lists. If you exceed
the quota, Mail displays an error message. Ask your system manager to
increase your quota or send mail in batches to fewer nodes at one time.
6.6.4 Default File Type for Distribution Lists
By default, the system looks for a distribution list file with the file
type .DIS. If the file containing your distribution list has a
different file type, specify the file name and file type at the To:
prompt. If you invoke Mail while in one directory and the file
containing the distribution list is in another, enter the distribution
list's full directory name at the To: prompt.
6.6.5 How to Create Distribution Lists
To create a distribution list, use the following procedure:
| Step | Task |
|---|---|
| 1 | Use a text editor to create a distribution list file with the file type .DIS. |
| 2 | Type one user name per line in the file. |
| 3 | To include the names of other distribution lists in the file (to "nest" the lists), specify an at sign (@) followed by the name of the distribution list. |
| 4 | To include comments in the file, enter an exclamation point (!) before the comment. |
The following example shows a distribution list file:
! ALLBUDGET.DIS
!
! Budget Committee Members
@BUDGET         ! listed in BUDGET.DIS.
! Staff
  Thompson
  BRUTUS::JONES
  PORTIA::BARNEY
In the following example, if the file BUDGET.DIS is not in the same
directory as the new distribution list file you are creating
(ALLBUDGET.DIS), include the file specification for BUDGET.DIS in the
new distribution file. Depending on where you create ALLBUDGET.DIS, you
might have to specify the device and directory in which BUDGET.DIS is
located. (See Chapter 4 for more information about file
specifications.)
6.6.7 Sending Messages to Distribution Lists
To send mail to several users by using a distribution list, use the following procedure:
| Step | Task |
|---|---|
| 1 | Invoke Mail. |
| 2 | Enter SEND at the MAIL> prompt and press Return. |
| 3 | Enter an at sign (@) and the file name of the distribution list at the To: prompt. Press Return. |
| 4 | Enter the subject of the message at the Subj: prompt and press Return. |
| 5 | Enter the text of the message at the text prompt. |
In the following example, a message is sent to the distribution list ALLBUDGET.DIS:
MAIL> SEND [Return]
To: @ALLBUDGET [Return]
Subj: Tomorrow's Meeting [Return]
Enter your message below. Press CTRL/Z when complete, or CTRL/C to quit:

The meeting about the Hubbub Cola account is tomorrow at 2:00.  [Return]

--Jeff  [Return]
You can also send a file to a distribution list from DCL level. If you
omit the file type .DIS, place quotation marks ("") around the at sign
(@) and file name to identify the file as a distribution list. To
include a subject, use the /SUBJECT qualifier with the MAIL command.
6.6.10 Examples
$ MAIL/SUBJECT="update" MEETING THOMAS,"@FRIENDS.DIS" [Return]
$ MAIL NOTICE "@WRITERS" [Return]
The following sections describe how to manipulate files in the Mail
environment.
6.7.1 How to Send Files
You can send a file to other users from within Mail or from DCL level. Use the following procedure to send a file from within Mail:
| Step | Task |
|---|---|
| 1 | At the MAIL> prompt, enter SEND and the name of the file you want to send. |
| 2 | At the To: prompt, enter the user name of the person you want to receive the file. |
| 3 | At the Subj: prompt, enter the subject of the file. |
| 4 | Press Return to send the file. To cancel the send operation, press Ctrl/C or Ctrl/Y. Ctrl/C keeps you within Mail; Ctrl/Y returns you to DCL level. |
In the following example, the file MEMO.TXT is sent to user EDGELL:
MAIL> SEND MEMO.TXT [Return]
To: EDGELL [Return]
Subj: Another memo [Return]
If the file is a compound document structured according to the DIGITAL
Document Interchange Format (DDIF) specification, Mail preserves the
OpenVMS RMS file tags and DDIF semantics, for OpenVMS AXP Version 1.0
or VAX/VMS Version 5.2-2 or later systems only. If you try to send mail
messages containing DDIF files to operating systems other than OpenVMS
or to OpenVMS systems earlier than OpenVMS AXP Version 1.0 or VAX/VMS
Version 5.2-2, Mail returns an error message.
6.7.4 Sending Files from DCL
When you send a file from DCL level, Mail is invoked but you do not enter an interactive session, nor do you see the MAIL> prompt. When the file is sent, you return to DCL level automatically. After you have typed the MAIL command with the appropriate qualifiers, press Return to send the file or press Ctrl/C to cancel the send operation.
Note the following as well:
$ MAIL/SUBJECT="Another memo" MEMO.TXT CHEETA::EDGELL [Return]
$ MAIL SYS$INPUT: [Return]
To: ARMSTRONG [Return]
Enter your message below.  Press CTRL/Z when complete, or CTRL/C to quit:
The text of the message is here.
[Ctrl/Z]
$
To create a text file from a message, enter the EXTRACT command and the file name at the MAIL> prompt while you are reading the message. When you exit from Mail, the file is listed in your current directory (unless you specify another directory). If the file is a DDIF file, Mail preserves the OpenVMS RMS file tags and DDIF semantics (VAX/VMS Version 5.2-2 or later).
The mail header is composed of the From:, To:, and Subj: lines. To create a file that does not include header information, specify the /NOHEADER qualifier to the EXTRACT command. If the message has more than one header (for example, a forwarded message), only the topmost header is deleted.
Use the /APPEND qualifier to the EXTRACT command to copy a message to
the end of an existing file. Use the /ALL qualifier to copy all the
files in the current folder to an existing file.
6.7.7 Examples
#1                  01-DEC-1996  14:12:27        NEWMAIL

From:  STONE::FELLINI
To:    Thompson
Subj:  Dates for December sales meetings

Sales meetings in December will be held on the following dates:
      Wednesday Dec. 8, 1996
      Tuesday   Dec. 14, 1996
      Monday    Dec. 20, 1996
      Thursday  Dec. 30, 1996
MAIL> EXTRACT DEC_MEETINGS.TXT [Return]
%MAIL-I-CREATED, DISK:[THOMPSON]DEC_MEETINGS.TXT
MAIL> READ 3 [Return]
.
.
.
MAIL> EXTRACT/NOHEADER JANUARY_MEETINGS.TXT  [Return]
%MAIL-I-CREATED, DISK1:[JONES]JANUARY_MEETINGS.TXT;1 created
MAIL>
To append a small file to the end of a mail message automatically, use the SET SIGNATURE_FILE command. The file you specify is automatically (by default) appended to every mail message you send using the ANSWER, FORWARD, MAIL, REPLY, or SEND command. An example of a signature file is a text file that is formatted as a business card, containing the user's company name, address, telephone number, and Internet address.
If you want to selectively append a file to a message or override the default signature file setting, use the /SIGNATURE_FILE[=file-name] qualifier with the ANSWER, FORWARD, MAIL, REPLY, or SEND command.
Use the SHOW SIGNATURE_FILE command to show whether you have specified a default signature file. (The SHOW ALL command also displays signature file information.)
You can also set the default signature file at the DCL level by using the /SIGNATURE_FILE[=file-name] qualifier with the DCL command MAIL.
Note that when you create a mail message that includes a signature file, that message requires more temporary disk space than a conventional message because temporary files are created during the operation. After the message is sent, those temporary files are deleted.
When specifying the signature file name, also note the following:
MAIL> SET SIGNATURE_FILE BUSINESS_CARD.SIG
MAIL> REPLY/SIGNATURE_FILE=GREETINGS.SIG
The following sections describe other ways to use the Mail utility to
send messages.
6.8.1 Replying to Messages
To reply to a message you have received, use the following procedure:
| Step | Task |
|---|---|
| 1 | Type REPLY at the MAIL> prompt and press Return. |
| 2 | Enter your message and press Ctrl/Z to send the message or press Ctrl/C to quit. |
In the following example, a reply is being sent to STONE::THOMPSON. Note that after the reply command is entered, Mail automatically displays the To: and Subj: prompts:
To: STONE::THOMPSON
Subj:  RE: Budget Meeting
Enter your message below. Press CTRL/Z when complete. CTRL/C to quit:
In most cases, you can use the Mail command REPLY to reply to mail
received from an address containing nested quotation marks. However, if
your system does not have this capability, contact your system manager.
6.8.3 Forwarding Messages
To forward a mail message to other users, enter the FORWARD command at the MAIL> prompt after you have read the message. Mail prompts you for the name of the addressee and a subject line. After you enter the requested information, press Return to send the message.
If you forward a message that consists of a .DDIF file, Mail sends the
entire .DDIF file, including .DDIF semantics and the .DDIF tag, to the
addressee.
6.8.4 Example
In the following example, a message is forwarded to user STONE::JONES:
MAIL> FORWARD [Return]
To: STONE::JONES [Return]
Subj: FYI -  Status of proposed budget meeting [Return]
In prior versions of the OpenVMS operating system, you had to specify
an extra pair of quotation marks if you wanted them included with the
SET FORWARD command because the command automatically removed the first
pair. Starting with OpenVMS Version 7.0, you need not specify an extra
pair of quotation marks because the SET FORWARD command no longer
removes the first pair.
6.9 Organizing Messages
The following sections describe how to organize mail messages.
6.9.1 Folders
To organize your mail messages, you can create your own mail files and folders. A mail file contains folders, and a folder contains mail messages. Each folder and file can contain any number of messages.
Typically, you organize your messages by creating folders rather than by creating mail files. As with the default mail folders (NEWMAIL, MAIL, WASTEBASKET), the folders you create are normally stored in the mail file MAIL.MAI. The name of the current folder is displayed in the top right corner of the screen each time you enter a READ or DIRECTORY command. You can work only with messages that are in your current folder.
If your mail file is very large (over 500 blocks), you might want to
create separate mail files for the larger folders to improve Mail's
performance.
6.9.2 Creating Mail Subdirectories
When you receive mail messages, they are written to files named MAIL$xxxxxxxxxx.MAI by default and are located in your top-level directory. (Note that the x characters represent a long, random file specification.) Your default mail file, MAIL.MAI, is created in your top-level directory the first time you receive a mail message.
To avoid the display of .MAI files in your top-level directory, use the Mail command SET MAIL_DIRECTORY. This command creates a mail subdirectory and moves all your .MAI files to that subdirectory. To move the .MAI files from a subdirectory back to your top level directory, use the SET NOMAIL_DIRECTORY command.
To display the name of the subdirectory that contains all your .MAI
files, enter SHOW MAIL_DIRECTORY at the MAIL> prompt.
6.9.3 Example
In the following example, a user (FRED) creates the directory .MAIL:
MAIL> SET MAIL_DIRECTORY [.MAIL] [Return]
MAIL> SHOW MAIL_DIRECTORY [Return]
Your mail file directory is SY$LOGIN:[FRED.MAIL]
You can use either the FILE command or the MOVE command to place the
current message in a different folder. If the folder does not exist,
Mail displays a message asking if you want to create it. After filing
the message in the specified folder, Mail automatically deletes the
message from the current folder.
6.9.5 Copying Messages
The Mail command COPY places a copy of the current message into the
folder you specify. If the folder does not exist, Mail displays a
message asking if you want to create it.
6.9.6 Example
In the following example, all messages containing the word MEETING are copied from the current folder to a folder named SCHEDULE. After the COPY command completes, there are two copies of each message, one in the current folder and one in the folder named SCHEDULE.
MAIL> SEARCH MEETING [Return]
MAIL> COPY SCHEDULE [Return]
Folder SCHEDULE does not exist.
Do you want to create it (Y/N, default is N)?Y  [Return]
%MAIL-I-NEWFOLDER, folder SCHEDULE created
The following command selects and displays the next message containing the word "meeting":
MAIL> SEARCH [Return]
MAIL> COPY SCHEDULE [Return]
MAIL> SEARCH [Return]
%MAIL-E-NOTFOUND, no messages containing 'MEETING' found
To display a list of the folders in your current mail file, enter the DIRECTORY/FOLDER command. To select a new folder as your current folder, use one of the following commands:
In the following example, the MEMOS folder is selected:
MAIL> DIRECTORY/FOLDER [Return]
Listing of folders in SYS$LOGIN:[FRED]MAIL.MAI;1
     Press CTRL/C to cancel listing
MAIL                                  MEETING_MINUTES
MEMOS                                 PROJECT_NOTES
STAFF
MAIL> SELECT MEMOS
To delete a mail folder, delete all the messages in the folder or move
them to another folder. When you delete all messages in a folder, the
empty folder is deleted automatically as soon as you select another
folder.
6.9.10 Example
In the following example, the messages in the MUSIC folder are deleted:
MAIL> SELECT MUSIC [Return]
%MAIL-I-SELECTED, 2 messages selected
MAIL> DELETE/ALL [Return]
You can also create files to organize your mail messages. You use the same commands to create a mail file that you use to create a folder: COPY, MOVE, and FILE. After Mail prompts you for the name of the folder, it also prompts you for a file name. If you enter a new file name at the File: prompt, a new mail file is created.
To work within a mail file other than the default mail file, use the
Mail command SET FILE to specify the alternate file. The Mail command
SHOW FILE displays the name of the current mail file. When you change
mail files, the WASTEBASKET folder of the current mail file is emptied
and deleted (if AUTO_PURGE is set) and the mail file is closed.
6.9.12 Figure: Organization of a Typical Mail Directory
Figure 6-1 shows how a typical user might organize their mail.
Figure 6-1 Organizing Mail
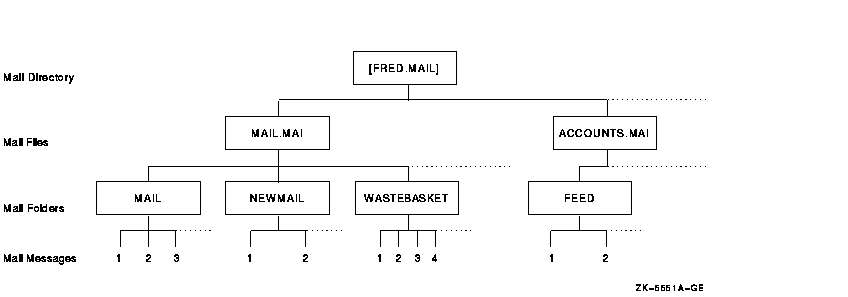
MAIL> MOVE [Return]
_Folder:  FEED [Return]
_File:  ACCOUNTS [Return]
MAIL> SET FILE ACCOUNTS [Return]
MAIL> SET FOLDER FEED [Return]
MAIL> SHOW FILE [Return]
Your current mail file is SYS$LOGIN:[FRED.MAI]ACCOUNTS.MAI;1.
If the number of new (unread) mail messages displayed on your screen is inconsistent with the actual number of new messages, enter the READ/NEW command when there is no new mail. You will know there is no new mail when you enter the READ/NEW command and receive one of the following system messages:
"%MAIL-W-NONEWMAIL, no new messages"

"%MAIL-E-NOMOREMSG, no more messages"
The following sections describe how to delete messages and recover them.
6.10.1 Using the DELETE Command
To delete a mail message from the current folder, either enter the
DELETE command while you are reading the message or enter the DELETE
command followed by the number (or range of numbers) of the message you
want to delete. You can use either the hyphen (-) or the colon (:) to
define the range of messages to be deleted.
6.10.2 Example
In the following example, messages 4, 5, 6, 11, 12, 14, 15, 16, and 17 are deleted:
MAIL> DELETE 4-6,11,12,14:17 [Return]
When you delete a message, the message is moved to a folder called WASTEBASKET. Deleted messages collect in the WASTEBASKET folder until you exit from the current mail file (either by exiting from Mail or by specifying a different mail file). If you have issued the SET AUTO_PURGE command, when you exit from the current mail file, WASTEBASKET is emptied and the folder itself is deleted. During your interactive Mail session, you can recover any deleted message by moving the message out of the wastebasket folder. You can also empty the WASTEBASKET folder by entering the PURGE command.
6.10.4 Example
In the following example, the mail message identified by the number 12
is deleted and then recovered from the WASTEBASKET folder.
MAIL> DELETE 12

MAIL> SELECT WASTEBASKET
%MAIL-I-SELECTED, 1 message selected

MAIL> DIRECTORY
    # top
From                 Date         Subject

    1 FABLES::WEST         11-DEC-1996  Meeting this week

MAIL> MOVE MAIL
The following sections describe how to print mail messages.
6.11.1 Using the PRINT Command
To print a mail message, enter the PRINT command at the MAIL>
prompt. By default, Mail sends your message to the SYS$PRINT queue.
Mail files are not sent to a print queue until you press Ctrl/Z, enter
the EXIT command, or enter the PRINT/PRINT command.
6.11.2 Specifying Print Queues
To specify a different queue, use the PRINT command qualifier /QUEUE.
You can also select a different queue by issuing the SET QUEUE
queue-name command; this queue will remain your default print queue
until you enter another SET QUEUE command, even if you exit Mail.
6.11.3 Examples
MAIL> PRINT/QUEUE=AK34$PRINT [Return]
MAIL> SET QUEUE AK34$PRINT [Return]
The following sections describe how to protect mail files.
6.12.1 Default Protection
Mail files (for example, MAIL.MAI) are protected so that no one else can read them and so that you cannot accidentally delete them. The protection code that Mail gives .MAI files is: (S:RW,O:RW,G:,W:). The system (including Mail itself) and the owner (you) can read and write to the file. The group and world are denied all access.
  6489P008.HTM
  OSSG Documentation
  22-NOV-1996 13:16:44.02
Copyright © Digital Equipment Corporation 1996. All Rights Reserved.