![[HR]](../../IMAGES/REDBAR.GIF)
The following example includes several commands used to fix problems preventing the deletion of a queue:
$ DELETE/QUEUE JADE_BATCH (1)
%DELETE-E-NOTDELETED, error deleting JADE_BATCH
-JBC-E-QUENOTSTOP, queue must be stopped to perform operation (2)
$ STOP/QUEUE/NEXT JADE_BATCH (3)
$ DELETE/QUEUE JADE_BATCH (4)
%DELETE-E-NOTDELETED, error deleting JADE_BATCH (5)
-JBC-E-REFERENCED, existing references prevent deletion
$ SHOW QUEUE/FULL
   .
   .
   .
Generic batch queue CLUSTER_BATCH (6)
  /GENERIC=(JADE_BATCH,RUBY_BATCH,OPAL_BATCH) /OWNER=[SYSTEM]
  /PROTECTION=(S:M,O:D,G:R,W:R)
   .
   .
   .
$ STOP/QUEUE/NEXT CLUSTER_BATCH (7)
$ START/QUEUE CLUSTER_BATCH/GENERIC=(RUBY_BATCH,OPAL_BATCH)(8)
$ DELETE/QUEUE JADE_BATCH (9)
This example does the following:
To delete a file using the PRINT/DELETE or SUBMIT/DELETE command, the clusterwide queue manager process must have access to the file specified. Otherwise, the file is printed or submitted but not deleted.
You can ensure that the PRINT/DELETE or SUBMIT/DELETE command deletes the specified files by mounting the disks on which the files reside clusterwide. To mount a disk clusterwide, use the /CLUSTER qualifier with the MOUNT command.
However, if your operating environment does not allow you to mount a
disk clusterwide, you can resolve this problem by running the queue
manager process on a node that has access to the disk. You can specify
the node on which the queue manager process runs by specifying the
/ON=node qualifier with the START/QUEUE/MANAGER command. For
more information about this qualifier, see the OpenVMS DCL Dictionary.
13.8.7 Adding or Deleting a Device Control Library Module
When attempting to add or delete a device control library module, you might see the following message:
$LIBRAR-F-OPENIN, error opening module-name
-RMS-E-FLK, file currently locked by another user
To add or delete a library module, you must stop all output queues to which the library is assigned. To determine which queues the library is assigned to, perform the following steps:
SHOW QUEUE/FULL/OUTPUT=filespec
The result of your search will include all queues to which that library is assigned. Stop the queues and reenter the command to add or delete the library module.
Note
The SHOW QUEUE/FULL display shows the library assigned to a queue only if you explicitly assigned a library for the queue by including the /LIBRARY qualifier with INITIALIZE/QUEUE or START/QUEUE. If you do not explicitly assign a library to a queue, the default library, SYSDEVCTL, is used.If the module you are trying to delete is in the default library, SYSDEVCTL, you must stop all queues for which SHOW QUEUE/FULL displays no library. To make sure the SYSDEVCTL library appears in the SHOW QUEUE/FULL display in the future, specify /LIBRARY=SYSDEVCTL when you restart the queue.
If you cannot stop the queues immediately, perform the following steps:
If your site has a large number of different printers, you can help
prevent this problem by using more libraries, so that each library is
assigned to fewer queues. For example, you should create and assign a
different library for each type of printer, as explained in
Section 13.6.8.3.
13.8.8 Fixing a Disabled Queue
The queue manager attempts to correct any kind of corruption detected. If the queue manager detects corruption in a queue record, it might disable a queue to isolate the corruption. When a queue is disabled, the following message is written on the console and in the operator log file:
%QMAN-I-QUEDISCOR, queue 'queue_name' has been
disabled due to database corruption
When a queue is disabled, any attempt to modify or submit a job to it returns the following message:
%JBC-E-QUEDISABLED, disabled queue cannot be modified, nor can a job be
submitted to it
If you see either of the previous messages, do the following:
If you encounter a problem with your queues, and you want to report it to Digital, please provide as much information as possible. Section 12.12 specifies the information that is most useful to Digital in diagnosing your queuing system problems.
When your system is installed or upgraded, values of system parameters are automatically set by the command procedure SYS$UPDATE:AUTOGEN.COM (AUTOGEN), which is supplied by Digital. Digital recommends you use AUTOGEN regularly to adjust the values for system parameters to fit your hardware configuration and your system's work load.
Information Provided in This Chapter
This chapter describes the following tasks:
| Task | Section |
|---|---|
| Converting your customized parameter settings for use with AUTOGEN | Section 14.3 |
| Modifying system parameter values with AUTOGEN (recommended method) | Section 14.5 |
| Controlling AUTOGEN's parameter settings with MODPARAMS.DAT | Section 14.5.1 |
| Automating AUTOGEN reports | Section 14.6 |
| Managing system parameters with SYSMAN | Section 14.7 |
| Managing system parameters with SYSGEN | Section 14.8 |
| Managing system parameters with a conversational boot | Section 14.9 |
This chapter explains the following concepts:
| Concept | Section |
|---|---|
| System parameters | Section 14.1 |
| Default, current, and active values of system parameters | Section 14.1.1 |
| Pages and pagelets | Section 14.1.2 |
| The recommended method for changing system parameter values | Section 14.2 |
| The AUTOGEN command procedure | Section 14.4 |
| AUTOGEN feedback | Section 14.4.1 |
| The AUTOGEN feedback report (AGEN$PARAMS.REPORT) | Section 14.4.2 |
| AUTOGEN phases | Section 14.4.3 |
| The AUTOGEN parameter file (MODPARAMS.DAT) | Section 14.4.4 |
14.1 Understanding System Parameters
The system uses values for system parameters to control how
the system functions. System parameters control a wide range of system
functions, including but not limited to the following:
The OpenVMS System Management Utilities Reference Manual lists and describes each system parameter.
Your distribution kit provides default values for system parameters to allow you to boot any supported configuration. When your system is installed or upgraded, the SYS$UPDATE:AUTOGEN.COM command procedure executes to evaluate your hardware configuration, estimate typical work loads, and adjust the values of system parameters as needed.
Each system parameter has associated minimum and maximum values that define the scope of allowable values.
Parameter Types
System parameters can be one or more of the following types:
| Type | Description |
|---|---|
| Dynamic | The value of a dynamic system parameter can be modified while the system is active by changing the active value in memory. In contrast, if you change the value of a parameter that is not dynamic, you must change the current value stored in the parameter file, and you must reboot the system for the changed value to take effect. For information on active and current values, see Section 14.1.1. |
| General | The value of a general parameter affects the creation and initialization of data structures at boot time. |
| Major | Major parameters are most likely to require modification. |
| Special | Special parameters are intended for use only by Digital. Change these parameters only if recommended by Digital personnel or in the installation guide or release notes of a Digital-supplied layered product. |
Parameter Categories by Function
System parameters can be divided into the following categories, according to their function:
| Category | Function |
|---|---|
| ACP | Parameters associated with file system caches and Files-11 XQP (extended QIO procedure) or ancillary control processes (ACPs).¹ |
| Cluster | Parameters that affect VAXcluster or OpenVMS Cluster system operation. |
| Job | Parameters that control jobs. |
| LGI | Parameters that affect login security. |
| Multiprocessing | Parameters associated with symmetric multiprocessing. |
| PQL | Parameters associated with process creation limits and quotas. |
| RMS | Parameters associated with OpenVMS Record Management Services (RMS). |
| SCS | Parameters that control system communication services (SCS) and port driver operation. The parameters that affect SCS operation have the prefix SCS. |
| SYS | Parameters that affect overall system operation. |
| TTY | Parameters associated with terminal behavior. |
| User-defined |
The following parameters can be user-defined:
|
A system has several different sets of values for system parameters. The following table describes these values:
| Value | Description |
|---|---|
| Default values | Values provided with the system to allow you to boot any supported configuration. |
| Current values |
Values stored in the default parameter file on disk and used to boot
the system.
On VAX systems, the default parameter file is VAXVMSSYS.PAR. On Alpha systems, the default parameter file is ALPHAVMSSYS.PAR. |
| Active values | Values that are stored in memory and are used while the system is running. You can change the active value on a running system only for system parameters categorized as dynamic system parameters. |
| Values stored in other parameter files | For special purposes, you can create a parameter file other than the default parameter file that is used to store current values. |
When the system boots, it reads the current values into memory, creating active values. An active value remains equal to the current value until you change either the active value or the current value.
When you execute the AUTOGEN command procedure through the SETPARAMS phase, it changes current values.
The System Management utility (SYSMAN) and the System Generation utility (SYSGEN) allow you to show and modify both current and active values. Use the USE and WRITE commands to specify which values you want to show or modify.
For more information about managing parameters with SYSMAN, see
Section 14.7. For more information about managing parameters with
SYSGEN, see Section 14.8.
14.1.2 Pages and Pagelets
On VAX systems, the operating system allocates and deallocates memory for processes in units called pages. A page on a VAX system is 512 bytes. Some system parameter values are allocated in units of pages.
On Alpha systems, some system parameter values are allocated in units of pages, while others are allocated in units of pagelets.
A page on an Alpha system can be 8 kilobytes (KB) (8192 bytes), 16KB, 32KB, or 64KB. A pagelet is a 512-byte unit of memory. One Alpha pagelet is the same size as one VAX page. On an Alpha computer with a page size of 8KB, 16 Alpha pagelets equal one Alpha page.
When reviewing parameter values, especially those parameters related to
memory management, be sure to note the units required for each
parameter. Section 14.7.2 and Section 14.8.2 explain how to show
parameter values and their units of allocation.
14.2 Recommended Method for Changing Parameter Values
Many system parameters can affect other parameters and the performance of the system. For this reason, Digital recommends you use the command procedure SYS$UPDATE:AUTOGEN.COM (AUTOGEN) to manage system parameters. For information on AUTOGEN, see Section 14.4.
The System Management utility (SYSMAN) and the System Generation utility (SYSGEN) also allow you to manage system parameters. Although these utilities are not generally recommended for changing parameter values, you can use one of these utilities for the following reasons:
Caution
If you change a parameter value with SYSMAN or SYSGEN, the value you set will be overridden or reset to the default value when you run AUTOGEN. To retain the changes when you run AUTOGEN, you must add the parameter value to the AUTOGEN parameter file MODPARAMS.DAT. For more information, see Section 14.5.1.If you currently use SYSMAN or SYSGEN to change parameters, and you have not added your customized parameter settings to MODPARAMS.DAT, follow the instructions in Section 14.3 before running AUTOGEN.
Digital recommends you use the AUTOGEN command procedure to tune your system. If you use the System Management utility (SYSMAN) or the System Generation utility (SYSGEN) to modify system parameter values, and you do not include these changes in the AUTOGEN parameter file MODPARAMS.DAT, these changes will be overridden the next time you run AUTOGEN.
If you used SYSMAN or SYSGEN to change parameter values in the past, use the following procedure to convert your parameter settings to work with AUTOGEN. This procedure explains how to add your customized parameter settings to MODPARAMS.DAT so they will be retained when you run AUTOGEN.
Before performing this task, you should understand AUTOGEN, feedback, and the AUTOGEN parameter file MODPARAMS.DAT, as explained in Section 14.4.
$ RUN SYS$SYSTEM:SYSMAN
SYSMAN> PARAMETERS USE ACTIVE
SYSMAN> PARAMETERS WRITE SYS$SYSTEM:nodename_PARAMS_CURRENT.PAR
SYSMAN> PARAMETERS SHOW/ALL/OUTPUT=nodename_PARAMS.OLD
SYSMAN> PARAMETERS SHOW/SPECIAL/OUTPUT=nodename_PARAMS_SPECIAL.OLD
SYSMAN> EXIT
$ APPEND nodename_PARAMS_SPECIAL.OLD nodename_PARAMS.OLD
$ EDIT SYS$SYSTEM:MODPARAMS.DAT
SCSNODE = "MYNODE"  ! Not calculated by AUTOGEN
SCSSYSTEMID = 10001  ! Not calculated by AUTOGEN
MIN_GBLPAGES = 10000  ! Needed for MCS, BLISS32, and ADA
MIN_GBLSECTIONS = 600  ! Needed for MCS, BLISS32, and ADA
$ @SYS$UPDATE:AUTOGEN SAVPARAMS SETPARAMS FEEDBACK
$ @SYS$UPDATE:AUTOGEN GETDATA SETPARAMS FEEDBACK
$@SYS$UPDATE:AUTOGEN GETDATA SETPARAMS CHECK_FEEDBACK
$ RUN SYS$SYSTEM:SYSMAN
SYSMAN> PARAMETERS USE CURRENT
SYSMAN> PARAMETERS SHOW /ALL /OUTPUT=nodename_PARAMS.NEW
SYSMAN> PARAMETERS SHOW /SPECIAL /OUTPUT=nodename_PARAMS_SPECIAL.NEW
SYSMAN> EXIT
$ APPEND nodename_PARAMS_SPECIAL.NEW nodename_PARAMS.NEW
$ DIFFERENCES/PARALLEL/OUTPUT=nodename_PARAMS.DIF/MATCH=5  -
_$ nodename_PARAMS.OLD nodename_PARAMS.NEW
Figure 14-1 Old and New Parameter Values
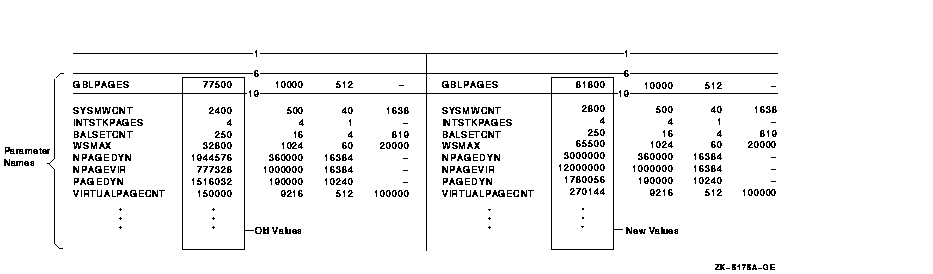
MIN_GBLPAGES = 10000
SYSBOOT> USE SYS$SYSTEM:nodename_PARAMS_CURRENT.PAR
SYSBOOT> CONTINUE
When you enter the CONTINUE command, the system boots with the parameter values you saved before running AUTOGEN.
$ RUN SYS$SYSTEM:SYSMAN
SYSMAN> PARAMETERS USE SYS$SYSTEM:nodename_PARAMS_CURRENT.PAR
SYSMAN> PARAMETERS WRITE CURRENT
SYSMAN> EXIT
The AUTOGEN command procedure, SYS$UPDATE:AUTOGEN.COM, is provided on your distribution kit, and runs automatically when your system is installed or upgraded to set appropriate values for system parameters. In addition, Digital recommends you run AUTOGEN when you want to reset values for system parameters or to resize page, swap, and dump files. The new values and file sizes take effect the next time the system boots.
AUTOGEN only calculates certain significant system parameters. See the AUTOGEN section of the OpenVMS System Management Utilities Reference Manual for a table of system parameters affected by AUTOGEN calculation.
When to Run AUTOGEN
Digital recommends running AUTOGEN in the following circumstances:
  6017P045.HTM
  OSSG Documentation
  22-NOV-1996 14:22:22.13
Copyright © Digital Equipment Corporation 1996. All Rights Reserved.