![[Digital logo]](../../IMAGES/DIGITAL-LOGO.GIF)
![[HR]](../../IMAGES/REDBAR.GIF)
![[Digital logo]](../../IMAGES/DIGITAL-LOGO.GIF)
![[HR]](../../IMAGES/REDBAR.GIF)
If you choose a value less than DEFPRI, jobs in this queue will potentially progress more slowly than the typical interactive job. CPU time will be allocated to jobs in this queue only after servicing jobs of DEFPRI priority.
If a queue is defined for a very special purpose---for example,
high-priority jobs---a value greater than DEFPRI (for example, 5) might
be appropriate. However, this choice can have a significant negative
effect on the performance of other users and batch jobs.
13.6.4.2 Job Limit
Keep this value low when using a base process priority of DEFPRI or
greater, because each batch job can affect the performance of
interactive jobs.
13.6.4.3 Working Set Default, Quota, and Extent
If you do not specify values for these options, a job uses the value specified in its owner's user authorization file (UAF) record.
In general, the working set quota and extent values specified in the UAF record for each user are sufficient. However, you can specify more generous or stringent values for a queue, depending on the purpose of the queue. For example, you can encourage users to submit large jobs (such as compiling and linking large programs) as batch jobs to reserve interactive use of the system for jobs that do not require extensive resources, as follows:
You can restrict and expand the amount of time a job is allowed in the CPU by setting CPU limit values.
Do not set CPU time limit values too low. When a job's CPU time limit is exceeded, the job is terminated with an error status. If working set values (explained in Section 13.6.4.3) are set too low, the system might use memory less efficiently but the jobs can still complete normally. However, if CPU time limit values are set too low, the system might terminate jobs that are making legitimate and authorized use of the CPU.
For example, you might use a CPU time limit on a batch queue devoted to execution of newly coded software that could unexpectedly enter a CPU loop. The CPU time limit would terminate infinitely looping jobs so they do not waste the CPU resource. However, you must be careful to choose a sufficiently high time limit so normally executing jobs do not terminate prematurely.
Another way to control allocation of the CPU resource is to create a
special-purpose batch queue that shifts execution of its jobs to a less
busy time of day when CPU time is more available.
13.6.4.5 Swapping
Typically, swapping is enabled on batch queues. However, for a special-purpose, high-priority queue, you might disable swapping. This provides a favorable status to jobs in this queue by removing them from consideration when memory must be reclaimed from processes (through the operating system's swapping and trimming mechanism).
For more information, see the OpenVMS Performance Management.
13.6.4.6 Options for Memory-Constrained Systems
On memory-constrained systems, total the pages required for the batch working sets on all batch queues. Also make sure that enough fluid memory remains for interactive jobs.
Fluid memory can be reassigned from one process to another through
swapping and paging. (You can calculate fluid memory as the space that
remains when you subtract the number of pages permanently allocated to
the operating system from the total memory. To obtain these values,
enter SHOW MEMORY.)
13.6.4.7 Optimizing Batch Queues for the Sort/Merge Utility
You can improve the efficiency of the OpenVMS Sort/Merge utility (SORT/MERGE) by designating one batch queue for sorting jobs and giving this queue a very large working set quota.
You can also set process quotas for greatest SORT efficiency. The values recommended here are based solely on SORT considerations; you should integrate other system considerations with these to determine appropriate values.
The queue manager uses the following criteria to determine the scheduling order for batch and print jobs that are eligible for processing:
How to Perform This Task
To specify job scheduling options, follow these steps:
Commands for Job Scheduling Options
Use the following commands to specify job scheduling options:
| Command | Description |
|---|---|
|
INITIALIZE/QUEUE/SCHEDULE=[NO]SIZE
START/QUEUE/SCHEDULE=[NO]SIZE SET QUEUE/SCHEDULE=[NO]SIZE |
Specifies whether pending jobs in an output execution queue are scheduled for printing based on the size of the job. (Shorter jobs print before longer ones.) |
|
INITIALIZE/QUEUE/[NO]BLOCK_LIMIT=([lowlim,]uplim)
START/QUEUE/[NO]BLOCK_LIMIT=([lowlim,]uplim) SET QUEUE/[NO]BLOCK_LIMIT=([lowlim,]uplim) |
Limits the size of print jobs that can be processed on an output execution queue. |
|
PRINT/PRIORITY=n
SUBMIT/PRIORITY=n SET ENTRY/PRIORITY=n |
Specifies the job scheduling priority of the print job. The value of n can be from 0 through 255, where 0 is the lowest priority and 255 is the highest. |
Following are explanations of how to set job printing priorities and sizes.
How to Prioritize Jobs by Size
To prioritize jobs based on their sizes, use the /SCHEDULE=SIZE qualifier with INITIALIZE/QUEUE, START/QUEUE, or SET QUEUE. (The /SCHEDULE=NOSIZE qualifier prints jobs in the order they were submitted, regardless of size.)
In the following example, /SCHEDULE=SIZE (the default), causes short jobs to print before longer ones on the print queue LPA0_PRINT:
$ INITIALIZE/QUEUE/SCHEDULE=SIZE LPA0_PRINT
If you enter this command while pending jobs are in any queue, its effect on future jobs is unpredictable.
How to Limit the Size of Jobs
To limit the size of print jobs, use the /BLOCK_LIMIT qualifier with INITIALIZE/QUEUE, START/QUEUE, or SET QUEUE. By default, printer and terminal queues are created with no block limit, so jobs of any size will be printed. You can specify only an upper limit or both upper and lower limits.
In the following example, LPB0_PRINT has a block size limit of 50, indicating that this queue is reserved for jobs smaller than 51 blocks.
$ INITIALIZE/QUEUE/BLOCK_LIMIT=50 LPB0_PRINT
You might also want to limit the size of jobs during certain hours of
the day. You can submit a batch job that runs a command procedure to
set a maximum block limit of 500 blocks for a queue at 8:00 a.m. The
command procedure might resubmit itself and remove the block limit
after 5:00 p.m. each day. This lets users print jobs of any size after
normal work hours, when the printing work load is lighter. Users can
specify the /AFTER qualifier with the PRINT command to specify that a
job is to be printed after a specific time.
13.6.5.2 Changing the Scheduling Priority of a Job
If a batch or print job cannot be processed, it is placed in a pending state and is not processed until the cause of the pending state is resolved. For more information, see Section 13.8.2.
To change the scheduling priority of a job, use the /PRIORITY qualifier with SET ENTRY in the following format:
SET ENTRY/PRIORITY=n entry-number
The following example changes the scheduling priority of a job to 50:
$ SET ENTRY/PRIORITY=50 1131
Do not confuse the job scheduling priority with the base process
priority on a queue. The job scheduling priority value must be in a
range of 0 through 255, where 0 is the lowest priority and 255 is the
highest. The default value for /PRIORITY, which refers to the job
scheduling priority, is the value of the system parameter DEFQUEPRI
(usually set at 100).
13.6.6 Using Banner Pages
Banner pages are specially formatted pages that you can set up for queues, to help identify and separate output jobs when they exit a printer. Banner pages also help identify and separate files within jobs.
Two types of banner pages are the following:
Most sites use only a subset of the available banner pages at any given time. The following table describes the types of banner pages you can use:
| Type | Description | For More Information |
|---|---|---|
| Job Pages | ||
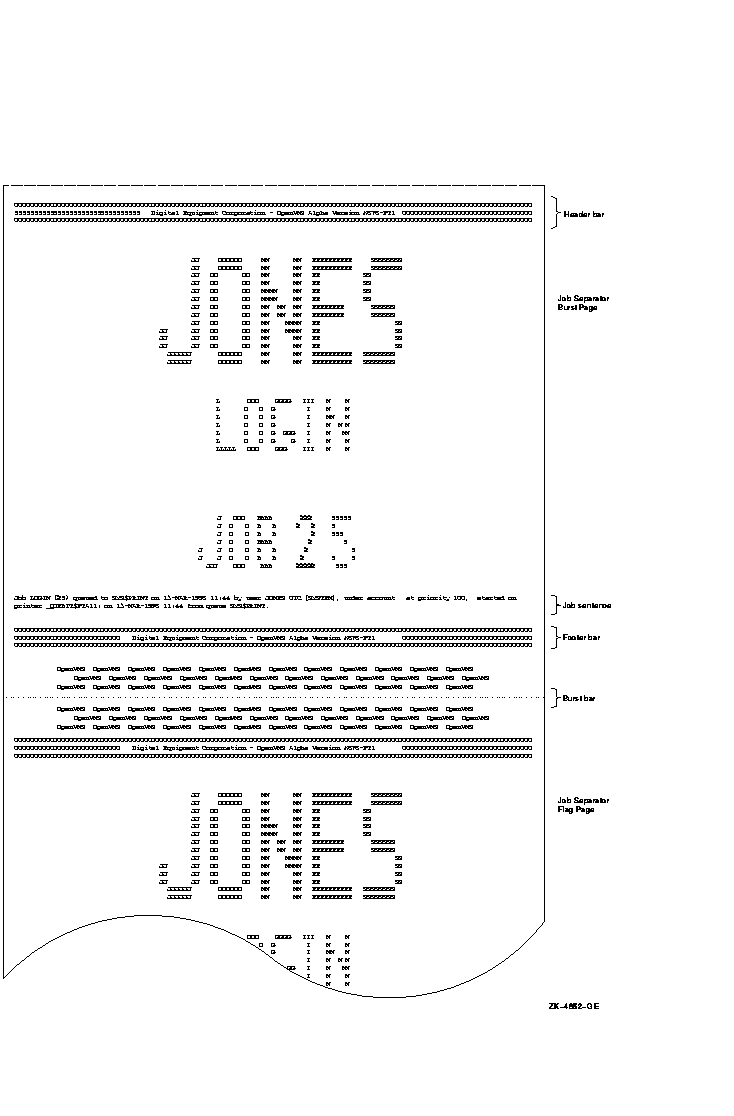
| Flag page | A single page printed before each job. | Figure 13-11 |
| Burst page | Two flag pages, divided by a separation (burst) bar, printed before each job. | Figure 13-11 |
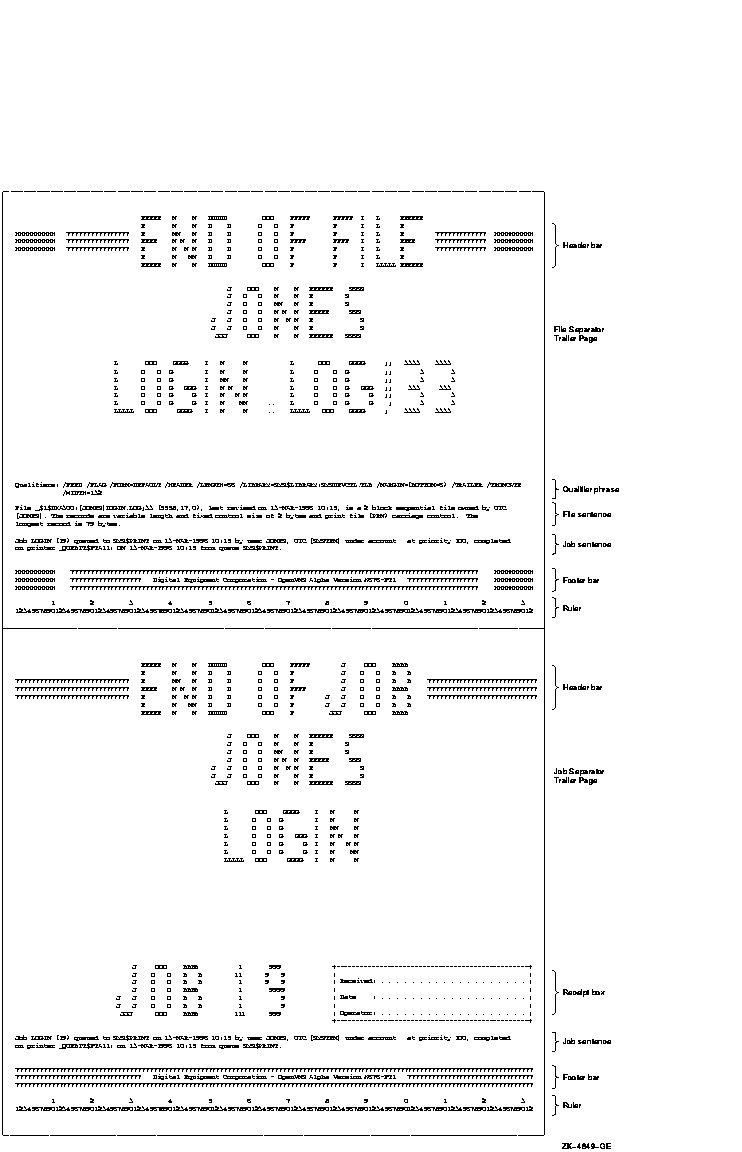
| Trailer page | A page printed after each job. | Figure 13-13 |
| File Pages | ||
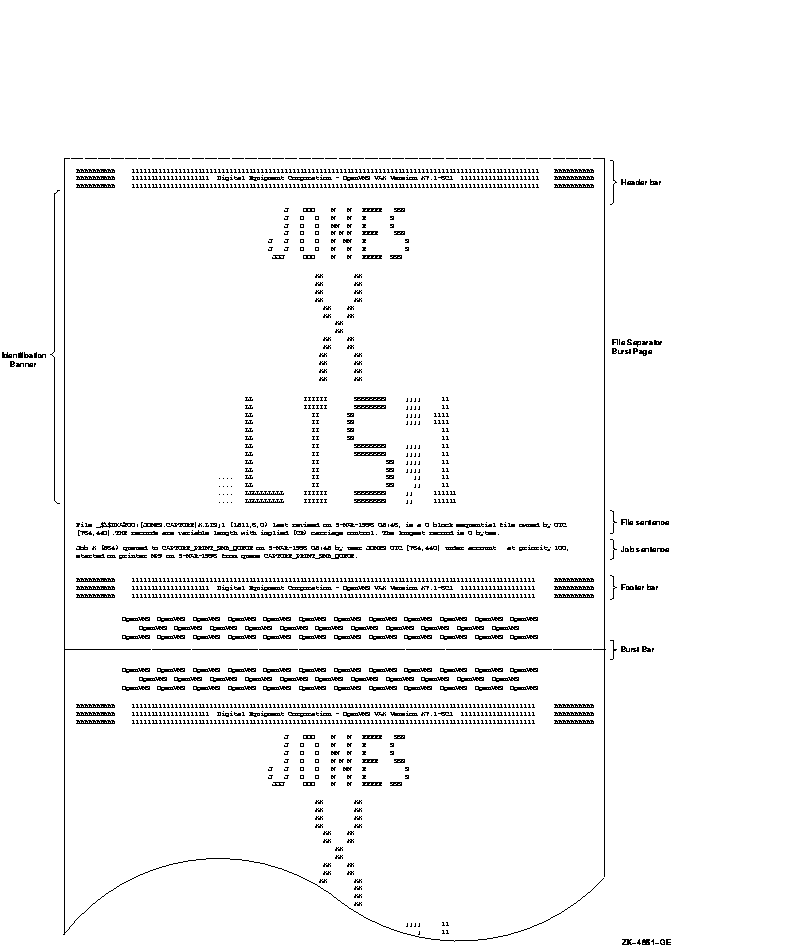
| Flag page | A single page printed before each file in a job. | Figure 13-12 |
| Burst page | Two flag pages, divided by a separation (burst) bar, printed before each file in a job. | Figure 13-12 |
| Trailer page | A page printed after each file in a job. | Figure 13-13 |
Note
If you do not need to burst pages of a printer's output---for example, if your printer uses cut sheet paper---avoid the burst page option. Flag pages, or flag and trailer pages, are usually sufficient for identifying the end of a job.
Table 13-2 describes the information found on job flag pages, file flag pages, job trailer pages, and file trailer pages.
| Item | Description |
|---|---|
| Header bar |
A segmented bar composed of the following:
For a job flag page: A single-segment bar composed of:
For a file flag page: A three-segment bar composed of:
For a job trailer page: A three-segment bar composed of:
For a file trailer page: A five-segment bar composed of the following elements:
|
| Note | A user-specified string of up to 255 characters using the PRINT/NOTE command. |
| Identification banner | Includes the user name of the process submitting the job, the job name, and the job number. |
| Qualifier phrase (file trailer page only) | Indicates the print, queue, and form qualifiers active when the job was submitted; nonactive qualifiers (except /NORECORD_BLOCKING and /NOFEED) are not included. |
| File sentence (file flag and file trailer pages only) |
Indicates the following information:
|
| Receipt box (job trailer page only) | Contains the following signoff fields: Received:, Date:, and Operator:. |
| Job sentence |
Indicates the following information:
|
| Footer bar |
A segmented bar composed of the following:
For a job flag page: Identical to the job flag header bar except the definition of the system logical name (PSM$ANNOUNCE) is not used as the embedded string. The default text is always used as the embedded string. For a file flag page: Identical to the file flag header bar except that the embedded text string is "Digital Equipment Corporation" followed by the operating system version number. For a job trailer page: Identical to the job flag header bar except the definition of the system logical name (PSM$ANNOUNCE) is not used as the embedded string. For a file trailer page: Identical to the file flag header bar except that the embedded text string is "Digital Equipment Corporation" followed by the operating system version number. |
| Ruler (file trailer and job trailer pages only) | A sequence of numbers counting to the end of the form. |
Figure 13-11 shows job flag and burst pages. Figure 13-12 shows file flag and burst pages. Figure 13-13 shows file trailer and job trailer pages.
Figure 13-11 Job Flag and Burst Pages

Figure 13-12 File Flag and Burst Pages

Figure 13-13 File and Job Trailer Pages

Widths greater than 40 characters and less than 200 characters and lengths of any size greater than 40 characters are supported for file and job banner pages. Pages requested for widths greater than 200 characters are formatted and printed at 200-character widths. Lengths less than 40 characters are extended by that form length until the 40-character threshold is exceeded. Margins are not taken into account when formatting banner pages.
Note
All banner pages format information to the width and length of the default form size of 80 characters by 51 lines. Therefore, information might be truncated, depending on the form sizes you specify. See Section 13.6.7.8 for information about controlling line and page overflow.
Commands for Specifying Banner Pages
Use the following commands when working with banner pages:
Print forms determine certain page formatting attributes (such as margins, page length, and wrapping lines). Also, the paper stock specified in the form definition is used in determining whether a job is eligible to print.
In OpenVMS, you have the option of using either of the following:
Mounting Forms
The stock of a form affects whether a job is eligible to print. The stock must match the queue's mounted form. The mounted form is the form of the current job or, if no job is processing, the form of the last job printed in a queue.
If the stock of a job's form matches the stock of the queue's mounted form, the job is processed using the options in the job's form. The mounted form changes automatically to the form of the job being processed in the queue. If the stock does not match the stock of the mounted form, the job remains pending until you perform special steps. (See Section 13.6.7.6.)
Commands for Specifying Forms
Use the following commands when working with forms:
| Command | Description |
|---|---|
| DEFINE/FORM | Creates a form and assigns a name and number. |
| SHOW QUEUE/FORM/FULL | Displays information about forms available on a system. |
| DELETE/FORM | Deletes a form. |
|
INITIALIZE/QUEUE/DEFAULT=FORM
START/QUEUE/DEFAULT=FORM SET QUEUE/DEFAULT=FORM |
Specifies the name or number of the default form for an output execution queue. |
|
PRINT/FORM
SET ENTRY/FORM |
Specifies the name or number of the form to be associated with a print job. |
|
INITIALIZE/QUEUE/FORM_MOUNTED
START/QUEUE/FORM_MOUNTED SET QUEUE/FORM_MOUNTED |
Specifies the name or number of the mounted form for an output execution queue. |
| SHOW QUEUE/FULL | Displays information about a queue, including the default form for the queue and the form mounted on the queue. |
Systemwide Default or Customized Forms
To use the systemwide default form with no changes, do nothing. The system will automatically use the systemwide default form, DEFAULT, for all queues.
If you want to change the default form, however, do so before creating any queues that reference the form. For more information about how to make changes, see Section 13.6.7.3.
To create customized forms, perform the steps explained in Section 13.6.7.4.
The following sections provide guidelines for performing these tasks with all forms, systemwide default forms, or customized forms:
| Task | Type of Form | Reference |
|---|---|---|
| Display forms defined on a system | All | Section 13.6.7.1 |
| Display the form assigned to a queue | All | Section 13.6.7.2 |
| Change the systemwide default form | Default | Section 13.6.7.3 |
| Create a form | Customized | Section 13.6.7.4 |
| Assign a default form for a queue | Customized | Section 13.6.7.5 |
| Mount a form on a queue | Customized | Section 13.6.7.6 |
| Delete a form | Customized | Section 13.6.7.7 |
| Control line and page overflow | All | Section 13.6.7.8 |
| Suppress initial form feed | All | Section 13.6.7.9 |
To display forms defined on a system, enter SHOW QUEUE/FORM/FULL. If you know the name of the form, you can specify the form name as a parameter.
Example
$ SHOW QUEUE/FORM/FULL MEMO
Form name                            Number   Description
---------                            ------   -----------
MEMO (stock=DEFAULT)                    110   LN03 indented memo format
    /LENGTH=66 /MARGIN=(TOP=2,BOTTOM=2,LEFT=5) /STOCK=DEFAULT /TRUNCATE
    /WIDTH=80
To display the default form for a queue, enter SHOW QUEUE/FULL.
![[HR]](../../IMAGES/REDBAR.GIF)
  6017P041.HTM
  OSSG Documentation
  22-NOV-1996 14:22:16.18
Copyright © Digital Equipment Corporation 1996. All Rights Reserved.