![[HR]](../../IMAGES/REDBAR.GIF)
This method of dynamic correction of data inconsistencies during read requests allows a shadow set member to fail at any point during the merge operation without impacting data availability.
Volume Shadowing for OpenVMS supports both assisted and unassisted
shadow sets in the same cluster. Whenever you create a shadow set, add
members to an existing shadow set, or boot a system, the shadowing
software reevaluates each device in the changed configuration to
determine whether it is capable of supporting the merge assist.
6.3.1 Unassisted Merge Operations
For systems running software prior to VMS Version 5.5--2, the merge operation is performed by a VAX CPU and is known as an unassisted merge operation.
To ensure minimal impact on user I/O requests, volume shadowing implements a mechanism that causes the merge operation to give priority to user and application I/O requests.
Performing merge operations as a background process ensures that when failures occur, they minimally impact user I/O. A side effect of this is that unassisted merge operations can often take extended periods of time to complete, depending on user I/O rates. Also, if another node fails before a merge completes, the current merge is abandoned and a new one is initiated.
Note that data availability and integrity are fully preserved during
merge operations regardless of their duration. All shadow set members
contain equally valid data.
6.3.2 Assisted Merge Operations
With VMS Version 5.5--2 or later, the merge operation includes enhancements for shadow sets that are configured on controllers that implement assisted merge capabilities. The assisted merge operation is also referred to as a minimerge. The minimerge feature significantly reduces the amount of time needed to perform merge operations. Usually, the minimerge completes in a few seconds.
By utilizing information about write operations that is logged in controller memory, the minimerge is able to merge only those areas of the shadow set where write activity is known to be in progress. This avoids the need for the total read and compare scans required by unassisted merge operations, thus reducing consumption of system I/O resources.
Controller-based write logs contain information about exactly which LBNs in the shadow set had write I/O requests outstanding (from a failed node). The remaining nodes use the write logs to merge the LBNs that are inconsistent across the shadow set.
Note
Because of the requirement to consolidate crash dump files, the shadowing software cannot perform a minimerge on a system disk.
The minimerge operation is enabled on nodes running VMS Version 5.5--2 or later. Volume shadowing automatically enables the minimerge if the controllers involved in accessing the physical members of the shadow set support it. See the Volume Shadowing for OpenVMS VAX Software Product Description (SPD 27.29.xx) or the Volume Shadowing for OpenVMS Alpha Software Product Description (SPD 47.04.xx) for a list of supported controllers. Note that minimerge operations are possible even when shadow set members are connected to different controllers. This is because write log entries are maintained for each shadow set member.
Volume Shadowing for OpenVMS automatically disables minimerges if:
The following transient conditions can also cause a minimerge operation to be disabled:
To disable both the merge and copy performance assists on the HSC controller, follow these steps on each HSC controller for which you want to disable the assists:
HSC> RUN SETSHO
SETSHO> SET SERVER DISK/NOHOST_BASED_SHADOWING
SETSHO-I Your settings require an IMMEDIATE reboot on exit.
SETSHO> EXIT
SETSHO-Q Rebooting HSC.  Press RETURN to continue, CTRL/Y to abort:
After you issue these commands, the HSC controller automatically reboots:
INIPIO-I Booting...
To reenable the assists, follow the same procedure on your HSC controller, but use the /HOST_BASED_SHADOWING qualifier on the SET SERVER DISK command.
Use the HSC command SHOW ALL to see whether the assists are enabled or disabled. The following example shows a portion of the SHOW ALL display that indicates the shadowing assists status:
HSC> SHOW ALL
   .
   .
   .
2-Feb-1993 16:42:51.40 Boot:  5-Dec-1992 15:43:33.20   Up: 1416:59
Version: V650           System ID: %X00000000F906       Name: RDHSC6
Front Panel:  Secure                                    HSC Type: HSC70

Disk Server Options Enabled:
        Variant Protocol
        Host Based Shadowing Assists: Enabled
        Disk Drive Controller Timeout: 2 seconds
        Maximum Sectors per Track: 74 sectors
        Enhanced mode fragment size: 7
        Enhanced mode DRAT buffers: 70
        Reserved BMB count: 10
        Disk Copy Data connection limit: 4   Active: 0
   .
   .
   .
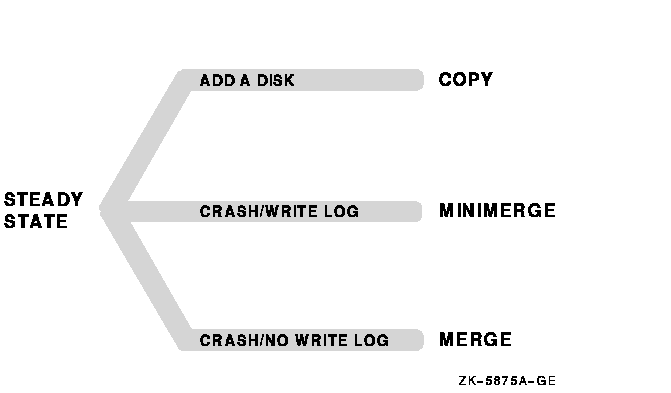
When a CPU, controller, or disk failure occurs, the shadowing software maintains data availability by performing the appropriate copy, merge, or minimerge operation. The effect on applications and users is minimal. The following subsections describe the courses of action taken when failures occur. The course of action taken depends on the event and whether the shadow set is in a steady state or a transient state.
When a shadow set is in a steady state, the following transitions can occur:
Once the transition completes, the disks contain identical information and the shadow set returns to steady state.
Figure 6-1 illustrates these state transitions.
Figure 6-1 Steady State Transitions
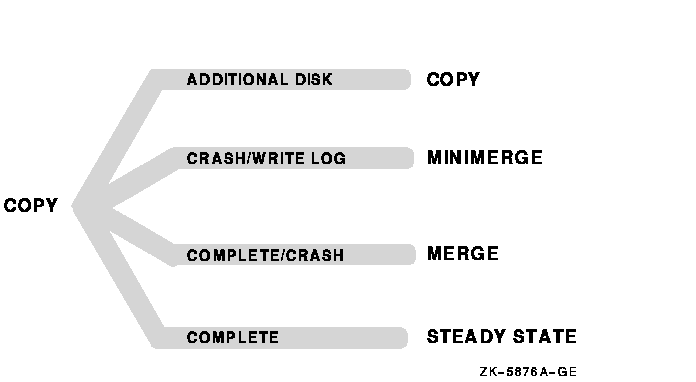
Transitions During Copy Operations
The following list describes the transitions that can occur to a shadow set that is undergoing a copy operation:
When a node failure occurs during a shadow set copy operation, merge behavior depends on whether or not the shadowing performance assists are enabled.
Figure 6-2 illustrates these transitions.
Figure 6-2 Copy Operation Transitions
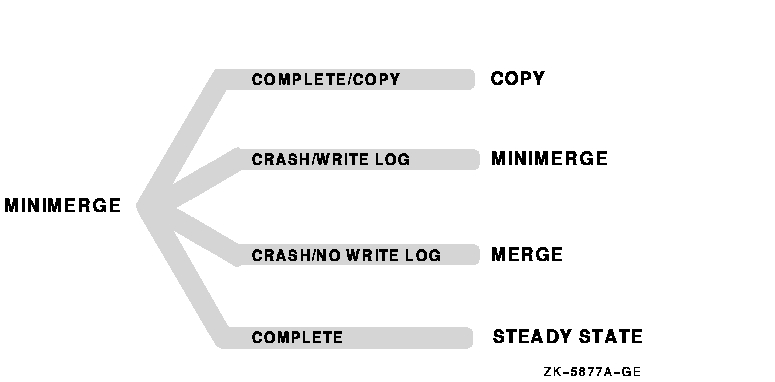
Transitions During Minimerge Operations
When a shadow set is undergoing a minimerge operation, the following transitions can occur:
Figure 6-3 illustrates these transitions.
Figure 6-3 Minimerge Operation Transitions
Transitions During Merge Operations
The following list describes the transitions that can occur to the shadow set that is undergoing a merge operation when performance assists are not available:
Figure 6-4 illustrates these transitions.
Figure 6-4 Merge Operation Transitions

6.6 Examples of Copy and Merge Operations
Examples
6-1 shows what happens when you create a shadow set by
mounting two disk volumes that have never been a part of a shadow set.
Because neither disk volume has been a part of a shadow set, the Mount
utility (MOUNT) assumes that the first disk named in the MOUNT command
is the source member. When the Mount utility checks the volume labels
on the disks, it discovers that they are different from each other, and
the utility automatically performs a copy operation.
In this example, DSA0 is the virtual unit name, $1$DUA8 and $1$DUA89 are the names of the disk volumes, and SHADOWDISK is the volume label.
Examples
6-1 Copy Operation: Creating a New Shadow
Set
$ MOUNT DSA0: /SHADOW=($1$DUA8:,$1$DUA89:) SHADOWDISK
%MOUNT-I-MOUNTED, SHADOWDISK    mounted on _DSA0:
%MOUNT-I-SHDWMEMSUCC, _$1$DUA8: (FUSS) is now a valid member
                      of the shadow set
%MOUNT-I-SHDWMEMCOPY, _$1$DUA89: (FUSS) added to the shadow
                      set with a copy operation
$ SHOW DEVICES DSA0:
Device                  Device           Error    Volume         Free  Trans Mnt
 Name                   Status           Count     Label        Blocks Count Cnt
DSA0:                   Mounted              0  SHADOWDISK      890937     1   1
$1$DUA8:        (FUSS)  ShadowSetMember      0  (member of DSA0:)

$1$DUA89:       (FUSS)  ShadowCopying        0  (copy trgt DSA0:  1% copied)
The SHOW DEVICES display in Examples
6-1 shows the shadow set during
the copy operation (transient state). Because the SCB information on
$1$DUA8 and $1$DUA89 indicates that these devices have never been part
of a shadow set, the shadowing software uses the first device named in
the command line ($1$DUA8) as the source of the copy operation. The
device status "ShadowSetMember" indicates that the $1$DUA8
device is a source shadow set member, and "ShadowCopying"
indicates that the physical device $11$DUA89 is the target of a copy
operation.
Suppose you want to add a new member to an existing shadow set, and the device you add is a previous member of the shadow set. In this case, the volume label of the new member matches that of the current shadow set members, but the new member's MOUNT generation number is out of date compared with those of the current members. Thus, the Mount utility automatically performs a copy operation.
Examples
6-2 shows the format of the MOUNT command and MOUNT status
messages returned when you add the $3$DIA12 device to the shadow set
represented by the DSA9999 virtual unit. Notice that you do not need to
list the member units currently in the shadow set on the MOUNT command
line.
Examples
6-2 Copy Operation: Adding a Member to an
Existing Shadow Set
$ MOUNT /SYSTEM DSA9999: /SHADOW=$3$DIA12: APPARITION
%MOUNT-I-MOUNTED, APPARITION mounted on _DSA9999:
%MOUNT-I-SHDWMEMCOPY, _$3$DIA12: (SHAD03) added to the shadow
                      set with a copy operation
$ SHOW DEVICES DSA9999:
Device                  Device           Error    Volume         Free  Trans Mnt
 Name                   Status           Count     Label        Blocks Count Cnt
DSA9999:                Mounted              0  APPARITION       70610     1   1
$3$DIA7:      (BGFUSS)  ShadowSetMember      0  (member of DSA9999:)
$3$DIA5:      (SHAD03)  ShadowSetMember      0  (member of DSA9999:)

$3$DIA12:     (SHAD03)  ShadowCopying        0  (copy trgt DSA9999:  87% copied)
Examples
6-3 shows what happens if a three-member shadow set is
dissolved on one node and then is immediately remounted on another
node. When the Mount utility checks the volume information on each
member, it finds that the volume information is consistent across the
shadow set. Thus, a copy operation is not necessary when the shadow set
is mounted.
In Examples
6-3, DSA10 is the virtual unit and $3$DUA10, $3$DUA11, and
$3$DUA12 are the member volumes. The first part of the example displays
the output from a SHOW DEVICES command, which shows that the shadow set
is mounted and in a steady state. Then the user dismounts the DSA10
shadow set and immediately remounts it.
Examples
6-3 No Copy Operation: Rebuilding a Shadow
Set
$ SHOW DEVICES D
Device                  Device           Error    Volume         Free  Trans Mnt
 Name                   Status           Count     Label        Blocks Count Cnt
DSA10:                 Mounted              0  EIDOLON          292971     1   1
$3$DUA10:    (MYNODE)  ShadowSetMember      0  (member of DSA10:)
$3$DUA11:    (MYNODE)  ShadowSetMember      0  (member of DSA10:)
$3$DUA12:    (MYNODE)  ShadowSetMember      0  (member of DSA10:)
$ DISMOUNT /NOUNLOAD DSA10:
%%%%%%%%%%%  OPCOM  24-MAR-1990 20:26:41.40  %%%%%%%%%%%
$3$DUA10: (MYNODE) has been removed from shadow set.
%%%%%%%%%%%  OPCOM  24-MAR-1990 20:26:41.69  %%%%%%%%%%%
$3$DUA11: (MYNODE) has been removed from shadow set.
%%%%%%%%%%%  OPCOM  24-MAR-1990 20:26:41.69  %%%%%%%%%%%
$3$DUA12: (MYNODE) has been removed from shadow set.
%%%%%%%%%%%  OPCOM  24-MAR-1990 20:26:41.69  %%%%%%%%%%%
$ MOUNT /SYSTEM DSA10: /SHADOW=($3$DUA10:, $3$DUA11:, $3$DUA12:) EIDOLON
%MOUNT-I-MOUNTED, EIDOLON mounted on _DSA10:
%MOUNT-I-SHDWMEMSUCC, _$3$DUA10: (MYNODE) is now a valid member of
                      the shadow set
%MOUNT-I-SHDWMEMSUCC, _$3$DUA11: (MYNODE) is now a valid member of
                      the shadow set
%MOUNT-I-SHDWMEMSUCC, _$3$DUA12: (MYNODE) is now a valid member of
                      the shadow set
$
Examples
6-4 shows the output from the SHOW DEVICES command at the
time of the merge operation.
When a system fails the volume information is left in a state that shows that the shadow set member was not dismounted. If you issue the MOUNT command again after the node reboots, the shadowing software automatically performs a merge operation on the shadow set.
Examples
6-4 Merge Operation: Rebuilding a Shadow
Set
$ SHOW DEVICES DSA5:
Device                  Device           Error    Volume         Free  Trans Mnt
 Name                   Status           Count     Label        Blocks Count Cnt
DSA5:                   Mounted              0  GHOST           565997     1   1

$11$DUA21:    (00NODE)  ShadowMergeMbr       0  (merging DSA5: 0% merged)
$11$DUA31:    (YRNODE)  ShadowMergeMbr       0  (merging DSA5: 0% merged)
This chapter explains how to accomplish system maintenance tasks on a
standalone system or an OpenVMS Cluster system that uses volume
shadowing. Refer to Chapter 3 for information about setting up and
booting a system to use volume shadowing.
7.1 Upgrading the OpenVMS Operating System on a System Disk Shadow Set
It is important to upgrade the operating system at a time when your system can afford to have its shadowing support disabled. This is because you cannot upgrade to new versions of the OpenVMS operating system on a shadowed system disk. If you attempt to upgrade a system disk while it is an active member of a shadow set, the upgrade procedure will fail.
Procedure for Upgrading Your Operating System
This procedure is divided into four parts. Part 1 describes how to prepare a shadowed system disk for the upgrade. Part 2 describes how to perform the upgrade. Part 3 describes how to enable volume shadowing on the upgraded system. Part 4 shows how to boot other nodes in an OpenVMS Cluster system with and without volume shadowing.
Part 1: Preparing a Shadowed System Disk
Note
If you need to change the volume label of a disk that is mounted across the cluster, be sure you change the label on all nodes in the OpenVMS Cluster system. For example, you could propagate the volume label change to all nodes in the cluster with one SYSMAN utility command, after you define the environment as the cluster:SYSMAN> SET ENVIRONMENT/CLUSTER SYSMAN> DO SET VOLUME/LABEL=new-label disk-device-name:
Note
You cannot perform an upgrade on a shadowed system disk. If your system is set up to boot from a shadow set, you must disable shadowing before performing the upgrade. This requires changing SYSGEN parameter values interactively using the SYSGEN utility.
$ RUN SYS$SYSTEM:SYSGEN
SYSGEN> USE upgrade-disk:[SYSn.SYSEXE]ALPHAVMSSYS.PAR
SYSGEN>
SYSGEN> USE upgrade-disk:[SYSn.SYSEXE]VAXVMSSYS.PAR
SYSGEN>
The USE command defines the system parameter file from which data is to be retrieved. You should replace the variable upgrade-disk with the name of the disk to be upgraded. For the variable n in [SYSn.SYSEXE], use the system root directory you want to boot from (this is generally the same root you booted from before you started the upgrade procedure).
SYSGEN> SET SHADOWING 0
SYSGEN> SET SHADOW_SYS_DISK 0
SYSGEN> WRITE upgrade-disk:[SYSn.SYSEXE]ALPHAVMSSYS.PAR
SYSGEN> WRITE upgrade-disk:[SYSn.SYSEXE]VAXVMSSYS.PAR
Even if you plan to use the upgraded system disk to upgrade the operating system on other OpenVMS Cluster nodes, you should complete the upgrade on one node before altering parameters for other nodes. Proceed to Part 2.
Part 2: Performing the Upgrade
Part 3: Enabling Volume Shadowing on the Upgraded
System
Once the upgrade is complete and the upgraded node has finished running AUTOGEN, you can enable shadowing for the upgraded node using the following steps.
$ RUN SYS$SYSTEM:SYSGEN
SYSGEN> USE CURRENT
SYSGEN>
SYSGEN> SET SHADOW_SYS_DISK 1
SYSGEN> SET SHADOW_SYS_UNIT 54
SYSGEN> WRITE CURRENT
Part 4: Booting Other Nodes in the OpenVMS Cluster from the
Upgraded Disk
  5423P006.HTM
  OSSG Documentation
  22-NOV-1996 13:03:44.90
Copyright © Digital Equipment Corporation 1996. All Rights Reserved.